Table of Contents
Advertisement
Quick Links
Advertisement
Table of Contents

Subscribe to Our Youtube Channel
Related Manuals for E-Collar Technologies PG-300


Summary of Contents for E-Collar Technologies PG-300
- Page 2 Communicator PG 300 Series Remote Communication Collar Thank you for purchasing the PG-300 or PG-302 Remote Pager from E- Collar Technologies, Inc. We have made every attempt to provide you with the most technologically advanced product using the most stringent quality and manufacturing standards.
-
Page 3: Table Of Contents
TABLE OF CONTENTS ........- Important Notice . -
Page 4: Important Notice
IMPORTANT NOTICE This product is intended to be used on animals only. E-Collar Technologies, Inc. is not responsible for any misuse of this product including damages from dog bites and lost items. Seek an evaluation by a professional trainer before use on aggressive dogs. It is not uncommon for aggressive dogs to associate the vibration with the handler and take action against the handler. -
Page 5: Characteristics
CHARACTERISTICS Range : ½ Mile • Three Vibration Modes Supported • (Momentary, Continuous, and Combo Mode) The right button can be set to Tapping Sensation • or Tone Quick Charge Li-Polymer Batteries • Convenient Intensity Dial for Quick Adjustment • Vibration Levels Adjustable from 0 to 100 •... -
Page 6: Package Contents
2 Receivers and straps) • • Battery Charger Owner’s Manual (PG 302 package contains splitter cable) Welcome to the World of E-Collar Technologies, Inc. PG 300/302 Owner's Manual “Communication with your Best Friend has Never Been Easier” • Lanyard PG300/302 Owner’s Manual... -
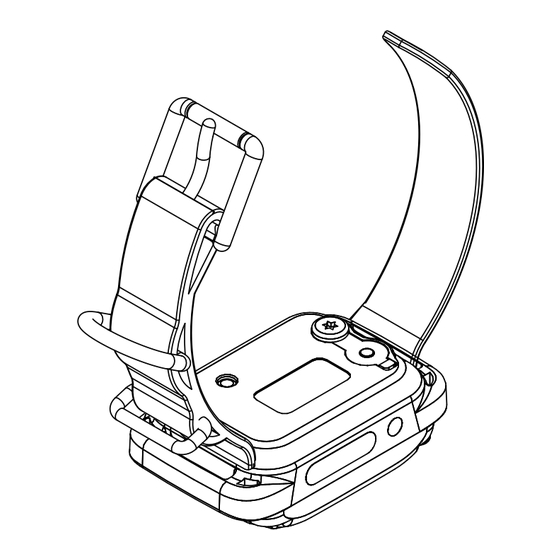
Page 7: Device Operation
DEVICE OPERATION Antenna Vibrationn Level Dial & Lock/Unlock Knob Vibration Button (Black) Vibration Button (Red) LCD Display Battery Indicator Light (LED Window) Momentary / Continuous Mode Button Tapping Sensation Light and On/Off Button or Tone On/Off Magnetic Red Dot Battery Charging Receptacle and Rubber Cover Collar Strap Battery Charging... -
Page 8: Charging The Batteries
CHARGING THE BATTERIES Indicator Light is blinking “Green” under normal operation. vibration solid “Red” when is applied. blinking “Red” when recharging is required. Do not allow the batteries to get hot or be fully discharged, store at room temperature and 50% capacity charge. Transmitter Battery Charging Collar Receiver Battery Charging Receptacle and Rubber Cover... -
Page 9: Turning Your E-Collar On/Off
TURNING YOUR E-COLLAR ON/OFF • To turn the Collar Receiver On or Off : Place the small red dot on the Transmitter to the small red dot on the Collar Receiver. • To turn the Transmitter On or Off : Press the “L”... -
Page 10: Correctly Fitting Collar
CORRECTLY FITTING COLLAR You should be able to fit a couple of fingers between the collar strap and your dog's skin. Too tight poses discomfort. Too loose will not be able to administer he vibration consistently. If your dog seems overly sensitive to the vibration try loosening the collar strap. -
Page 11: The Lcd Display Description
THE LCD DISPLAY DESCRIPTION Blinking “1D” indicates the vibration level ready for adjustment. Solid “1D” indicates vibration level is “Locked” Displays the Vibration Level : “0” means no vibration and “HI” means the highest vibration level(100 ) Momentary / Continuous Button "M/C"- M/C Button on the backside of the transmitter allows the user to easily switch between the three vibration modes. -
Page 12: Button Functions
BUTTON FUNCTIONS Momentary Vibration Sends a single pulse of vibration at the set level when you press the vibration button. Continuous Vibration Sends vibration for as long as the button is pressed, timing out after 10 seconds (this is a safety feature designed to prevent accidental over-vibration of your dog). - Page 13 BUTTON FUNCTIONS Boosting Vibration in Combo Mode Momentary Boosting is accomplished by first sending a momentary vibration pulse “S (Black)” to the dog and then pressing “S (Red)” button without releasing “S (Black)” button. (PLEASE PRACTICE) Continuous Boosting is accomplished by first administering continu- ous vibration “S (Red)”...
-
Page 14: How To Find The Proper Vibration Level
HOW TO FIND THE PROPER VIBRATION LEVEL Rotating clockwise increases the vibration level, and rotating counter-clockwise lowers the vibration level. It is highly recommended that the user practices changing levels and modes before putting the collar receiver on a dog. Setting the correct vibration level for your dog is very important. -
Page 15: Lock/Unlock The Vibration Leve . L
LOCK/UNLOCK THE VIBRATION LEVEL How to Lock/Unlock the Vibration Level Set the desired vibration level and then press on the top of the stimulation dial until you see “1D” light up on the top portion of the LCD display. Flashing "1D" indicates unlocked vibration and Solid "1D" indicates locked vibration level. -
Page 16: How To Set The Boost
HOW TO SET THE BOOST Boosted vibration adds the set boost level to the vibration level, great for those situations when your dog does not respond to the “conditioning” level. Determining the Boosted vibration level is a little more difficult than vibration level setting due to the wide differences in temperaments and vibration tolerance among the many breeds of dogs. -
Page 17: Lost Transmitter Mode
LOST TRANSMITTER MODE Your PG 300/302 transmitter allows the user to turn on a 6 hour timer. After 6 hours the transmitter will begin beeping providing the ability to locate the transmitter. Lost transmitter mode is activated by simultaneously pressing the light (L) button and then simultaneously pressing the stimulation button (Black "S") when the intensity level is set to zero. -
Page 18: Replace/Add A Collar
REPLACE/ADD COLLAR Occassionally, it is necessary to pair/sync a transmitter to a collar receiver, the following procedure will accomplish this: 1. Turn on the Transmitter 2. Turn intensity dial to “0” 3. Make sure the collar receiver is turned off. 4. -
Page 19: 302 Lcd Description
302 LCD DESCRIPTION Blinking 1D or 2D icons indicates the vibration level is ready for adjustment. Solid icon indicates vibration level locked. Displays the Vibration Level : “0” means no vibration and “HI” means the highest vibration level(100) Momentary / Continuous Button "M/C"- M/C Button on the backside of the transmitter allows the user to easily switch between two vibration modes either momentary or continuous. -
Page 20: 302 Button Functions
302 BUTTON FUCTIONS Mode Button "T” Mode button allows the user to change modes as shown in the diagram Tapping Sensation or Tapping Sensation or Dog 1 Set Mode Dog 2 Set Mode Tone Tone 1 Dog Set Mode - LCD display shows 1D 2 Dog Set Mode - LCD display shows 2D Tapping Sensation or Tone - LCD display a T Light Button(On Back) “L”... - Page 21 302 BUTTON FUCTIONS Momentary Vibration Sends a single pulse of vibration at the set level when you press stimulation button. Continuous Vibration Sends vibration for as long as the button is pressed, timing out after 10 seconds (this is a safety feature designed to prevent accidental over-stimulation of your dog).
-
Page 22: How To Lock/Unlock The Vibration Level
HOW TO LOCK/UNLOCK THE VIBRATION LEVEL How to Lock/Unlock the Vibration Level See page 13 for help finding the proper vibration level. You can lock each dog to a different level. In 1 Dog Mode, if you see “1D” icon is blinking (unlocked) Set the desired vibration level and then press the vibration dial until you see “1D”... -
Page 23: 302 Boost Level Setup
302 BOOST LEVEL SETUP Boosted vibration adds the set boost level to the vibration level, great for those situations when your dog does not respond to the “conditioning” level. Determining the Boosted vibration level is a little more difficult than vibration level setting due to the wide differences in temperaments and vibration tolerance among the many breeds of dogs. -
Page 24: Training Tips
We are marking and reinforcing the desired behaviors (turn and follow) with the low level vibration. We have more information on training on our website. Search E-Collar Technologies on youtube and subscribe to our channel, new pager training videos are posted weekly. -
Page 25: Troubleshooting
TROUBLESHOOTING My Receiver / Transmitter is not turning on Make sure the collar receiver is fully charged. Collar receiver light should turn green when the battery is connected to the charger. My Receiver is not responding Check Receiver’s indicator light is blinking green and Transmitter LCD is on. -
Page 26: Two Year Warranty
TWO YEAR WARRANTY To register your PG 300/302 product, please log onto our website at www.ecollar.com, click on the warranty registration link and fill out the required information. Please register your product within 30 days of your purchase. If you do not have access to a computer, please call our customer service number of 1-260-357-0051 and one of our customer service representatives will register your product for you. -
Page 27: Accessories
ACCESSORIES • • Car Charger Sew-On Holster • • Belt Clip 3/4” Bungee Collar (24” or 30” length) • • 3/4” Quick Snap Nylon Collar Deluxe Hard Carry Case (black or red) PG300/302 Owner’s Manual... -
Page 28: Safety And General Information
An FCC license is not needed to operate PG 300/302 remote pager transmitters. However, any change or modification made to the transmitter, including the supplied antenna, without the expressed written approval of E-Collar Technologies, Inc. could void your authority to operate. PG300/302 Owner’s Manual... - Page 29 SPECIAL ACCESSORY Some dogs may be sensitive to the pager sensation. The pager reducer will significantly lower the sensation. PG300/302 Owner’s Manual...
- Page 30 TRAINING NOTES PG300/302 Owner’s Manual...
- Page 31 TRAINING NOTES PG300/302 Owner’s Manual...
- Page 32 Copyright 2015 E-Collar Technologies, Inc. All Rights Reserved.
Need help?
Do you have a question about the PG-300 and is the answer not in the manual?
Questions and answers