Table of Contents
Advertisement
Quick Links
Model 22 doseBadge User Manual
Page 1
User Manual for the
Model 22 doseBadge Personal
Noise Dosemeter & Model
22R Reader Unit
This manual, the software to which it relates, the
program code and drawings are all:
© Copyright Pulsar Instruments Plc 1989-2014
Impex Produkter AS
Verkseier Furulunds vei 15
0668 OSLO
Tel. 22 32 77 20
Fax 22 32 77 25
info@impex.no
www.impex.no
Advertisement
Table of Contents

Related Manuals for Pulsar 22


Summary of Contents for Pulsar 22
- Page 1 Model 22 doseBadge User Manual Page 1 User Manual for the Model 22 doseBadge Personal Noise Dosemeter & Model 22R Reader Unit This manual, the software to which it relates, the program code and drawings are all: © Copyright Pulsar Instruments Plc 1989-2014...
-
Page 2: Model 22 Dosebadge User Manual
The content of this manual, any illustrations, technical information and descriptions within this document were correct at the time of going to print. Pulsar Instruments Plc reserves the right to make any changes necessary, without notice, in line with the policy of continuing product development and improvement. -
Page 3: Table Of Contents
Preface Guidelines for Safe & Efficient Use ................... 6 Warnings ........................6 What’s new in the MODEL 22 doseBadge and MODEL 22R Reader Unit ......... 6 doseBadge Configuration ....................6 doseBadge Battery Performance ..................7 Recharging the battery ......................7 Storage of the doseBadge ...................... - Page 4 Cleaning ........................48 Storing the doseBadge ....................48 Changing the Reader Batteries ..................49 Section 7 Troubleshooting ................... 51 The MODEL 22 doseBadge .................... 51 The MODEL 22R Reader ....................52 "No Badge" ..................52 "Too Low" ................... 52 "Trace Error" ..................53 The Chargers ......................
-
Page 5: Guidelines For Safe & Efficient Use
What’s new in the MODEL 22 doseBadge and MODEL 22R Reader Unit This User Manual refers to the MODEL 22 doseBadge Personal Noise Dosemeter and the MODEL 22R Reader Unit. Please note that this manual does not refer to any previous version of the doseBadge Personal Noise Dosemeter. -
Page 6: Dosebadge Battery Performance
This is no longer necessary with the MODEL 22 and will prevent mains power failures from resetting the charger to discharge/charge mode. The MODEL 22 can now be removed from the Charger and kept for future use. The charge will not reduce significantly for many weeks. Only if the doseBadge has not been used for over one month is a full recharge recommended. -
Page 7: Battery Operating Life
This software should be installed with full administration rights to ensure that the configuration of the software can be completed. Pulsar Instruments Plc accepts no responsibility for the installation of this software on systems where full access rights are not available. -
Page 8: Section 1 Introduction
This version of the doseBadge, the MODEL 22 and the MODEL 22R Reader Unit, provide a range of configuration options which allow the system to be used to measure and record noise levels to most Occupational Noise and Industrial Hygiene Regulations. -
Page 9: How The Dosebadge Works
Model 22 doseBadge User Manual Page 9 How the doseBadge works The doseBadge is controlled by the Reader unit through an infrared link. The link between the doseBadge and the Reader is used to send information in a similar way to a television remote control. - Page 10 Page 10 Model 22 doseBadge User Manual Parameter Configuration Options Exchange Rate (Q) 3dB, 4dB or 5dB Criterion Time 8hrs, 12hrs, 16hrs, 18hrs Criterion Level 80dB, 85dB, 90dB Threshold None, 80dB, 90dB Time Weighting None, ‘S’ (Slow) All of these configuration options can be selected from the MODEL 22R Reader Unit. In addition, the dBLink software allows user defined configurations to be loaded into the Reader Unit.
-
Page 11: Section 2 Layout & Controls
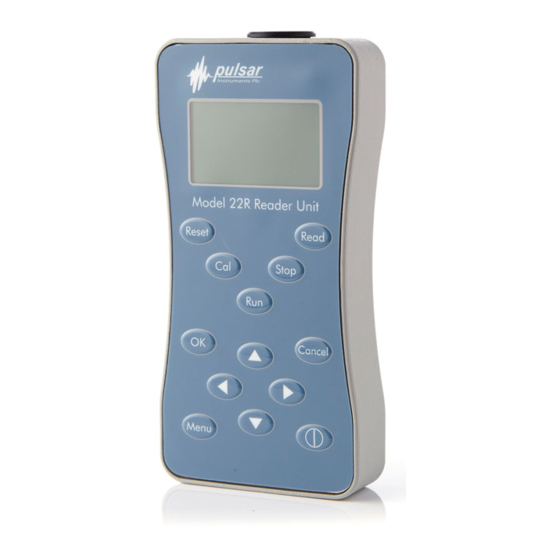
Model 22 doseBadge User Manual Page 11 Section 2 Layout & Controls MODEL 22R Reader Unit The figure below shows the layout of the MODEL 22R Reader Keypad. The MODEL 22R Reader unit has an integral Acoustic Calibrator that has been specifically designed to suit the unique shape and performance of the doseBadge. -
Page 12: Model 22 Dosebadge
Page 12 Model 22 doseBadge User Manual MODEL 22 dosebadge The layout of the MODEL 22 doseBadge is shown on the right. The microphone capsule is mounted in the top of the doseBadge in a shock mount to reduce the noise generated from movement or handling of the case. -
Page 13: Charger Unit
Model 22 doseBadge User Manual Page 13 Charger Unit The CHR22 Charger Unit replaces all previous versions of the doseBadge chargers and is compatible with all versions of the doseBadge. The charger has a number of new and important features which are different from the previous CHR-20 Charger Units. -
Page 14: Section 3 Getting Started
There are different ways to use a doseBadge and Reader. The following simple instructions should be followed to carry out personal sound exposure measurements using a single MODEL 22 doseBadge and MODEL 22R Reader. Ensure that you have read all of the instructions and information contained in this manual before operating the equipment. -
Page 15: Charging The Dosebadges
Model 22 doseBadge User Manual Page 15 Operating Manuals Certificates of Calibration Please check that any other components you have ordered are included with your equipment. Charging the doseBadges The Charger Unit has a maximum charge time of 2½ hours. If the doseBadge is not fully discharged, the charge time will be shorter than this. - Page 16 Model 22 doseBadge User Manual Page 16 During the charge cycle, the green indicator will flash to show that the charging is in progress. Once charging has finished, the green indicator stops flashing and remains on continuously. At this time the doseBadge is receiving a trickle charge to keep it topped up. To ensure optimum operation, the doseBadge may be left on trickle charge when not in use.
-
Page 17: Inserting The Model 22R Reader Batteries
Model 22 doseBadge User Manual Page 17 Inserting the MODEL 22R Reader Batteries The MODEL 22R Reader unit requires batteries to operate. The doseBadge contains a rechargeable battery pack which is not user replaceable. The batteries for the MODEL 22R Reader unit are located under the black cover on the back of the instrument. -
Page 18: Switching On The Reader Unit
Pulsar Instruments Plc accepts no responsibility for the accuracy of measurements made where the configuration of the doseBadge and Reader unit is not correct for Local, National or International Regulations. -
Page 19: Time History Measurement
Model 22 doseBadge User Manual Page 19 The Time is set in the format hh:mm:ss and the Date is set in the format dd/mm/yy. For details of the procedure to set the clock, refer to section 4 Configuration & Options. This is the default configuration and can be changed in the dBLink3 software. -
Page 20: Threshold Setting (Th)
Exchange Rate, please refer to section 4, Configuration & Options. The Exchange Rate is programmed into the doseBadge when it is Reset by the Reader Reset key. Dose Exceedence The Model 22 doseBadge can indicate when the 100% Noise Dose value has been exceeded during the measurement. - Page 21 Model 22 doseBadge User Manual Page 21 Model 22 Main Menu Threshold Level Time Weighting Exchange Rate Dose Exceedence On Dose Exceedence On When this option is switched on, the LED indicator on the doseBadge will flash twice every second to indicate that the noise exposure has exceeded the 100% Dose value.
-
Page 22: Shake To Wake" Function
Please read the information below carefully before using the doseBadge. In the MODEL 22 doseBadge, a function has been added to lengthen the battery life of the unit. If the doseBadge has not been used for 1 hour and it is not measuring data, it will go into Sleep mode. -
Page 23: Insert The Dosebadge In The Acoustic Calibrator
Model 22 doseBadge User Manual Page 23 To wake the doseBadge, shake the unit as shown in the diagram below. When the sensor is activated, the doseBadge status indicator will flash (blue) twice and the doseBadge can be used. Note that the sensor may be activated when the doseBadge is removed from the charger unit or when it is handled. -
Page 24: Resetting The Dosebadge
Model 22 doseBadge User Manual Page 24 Resetting the doseBadge The doseBadge must be reset before a measurement is made. Resetting the doseBadge will clear any information from the doseBadge, program the doseBadge with the user configuration, set the date and time and prepare the unit for calibration. -
Page 25: Calibrating The Dosebadge
Model 22 doseBadge User Manual Page 25 Calibrating the doseBadge The doseBadge must be calibrated before operation to ensure that the measurements are correct. To calibrate the doseBadge, press the Cal key. When the calibration is complete, the Reader unit will display the calibration information. -
Page 26: Mounting The Dosebadge
Page 26 Model 22 doseBadge User Manual Mounting the doseBadge The doseBadge is supplied, as standard, with accessories to mount the doseBadge on the shoulder of the wearer. There may be applications where the doseBadge must be mounted in an alternative location, such as on a hard hat or other clothing or safety equipment. -
Page 27: Using The Dosebadge Windshield
Model 22 doseBadge User Manual Page 27 Using the doseBadge Windshield The optional WS22 doseBadge Windshield can be used to reduce the effects of air movement upon the noise measurements. The windshield also reduces the effects of impacts upon the noise measurements which may cause false Peak(C) readings. -
Page 28: Starting The Measurement
Model 22 doseBadge User Manual Page 28 Starting the measurement To start a measurement session, hold the Reader with the infrared link aimed at the infrared link window of the doseBadge. The Reader and doseBadge can be up to 50cm apart. -
Page 29: Stopping A Measurement
Model 22 doseBadge User Manual Page 29 Stopping a measurement At the end of a measurement period, hold the Reader up to the doseBadge as shown above and press the Stop key. The Reader will show the status of the communication between the doseBadge and the Reader on the display. -
Page 30: Checking The Calibration Of The Dosebadge
Model 22 doseBadge User Manual Page 30 Checking the Calibration of the doseBadge The calibration of the doseBadge can be checked by removing the unit from the wearer and performing the same calibration procedure as described above. This records the second calibration value into the doseBadge. -
Page 31: Downloading The Measurements To The Reader Unit
Page 31 Model 22 doseBadge User Manual Downloading the measurements to the Reader Unit The doseBadge must be in the Acoustic Calibrator cavity on the Reader before the measurements are downloaded. If the Time History Measurement configuration has been set to Off, no Time History data will be downloaded from the doseBadge. -
Page 32: Viewing Stored Measurements
Model 22 doseBadge User Manual Page 32 Viewing stored measurements When the measurement download has been completed, the Reader unit will display the last measurement data. The different measurement parameters can be viewed by pressing the Down Arrow button. For further details, please refer to section 5 Reviewing & Downloading Measurements. - Page 33 P a g e | 33 (1) Reset Resets the doseBadge. All information in the doseBadge is deleted and the configuration data programmed. (2) Cal Calibrates the doseBadge using the internal Acoustic Calibrator. This key is also used for the second calibration check if required. (3) OK Accepts data entry or confirms menu options.
-
Page 34: Menu Structure
P a g e | 34 Menu Structure The menu system of the MODEL 22R Reader unit is entered by pressing the Menu key. The menu system can be exited by pressing the Cancel key at any time. The layout of the menu system is shown below:... -
Page 35: Clear The Memory Of The Reader
If the Reader time and time is not set then the display shows “Please set clock” The current Time and Date are 22-R Main Menu Set the Current Time shown at the bottom of the Clear Memory display. -
Page 36: Time History Measurement Mode
If the setting is not as required, the setting can be changed. Please note that the Time History data in the MODEL 22 doseBadge is stored differently from the previous Model 20-TH version. -
Page 37: Configuration Of The Measurement Parameters
| 37 Configuration of the Measurement Parameters The MODEL 22 doseBadge, when used with the MODEL 22R Reader Unit, allows configuration of several different measurement parameters which can be adjusted to meet the requirements of Local, National or International Standards as required. -
Page 38: Criterion Level (Cl)
85dB 90dB 95dB If the setting for the Criterion Level is not correct, the value can be selected from the list. Select Criterion Level 22-R Main Menu 80 dB Adjust LCD Contrast 85 dB Time History Control 87 dB Criterion Time... -
Page 39: Time Weighting
None. This applies in the European Union and in many other countries that use the 3dB Exchange Rate. Ensure that this parameter is Select Threshold 22-R Main Menu set to meet the requirements None of any regulations that are to... - Page 40 Ensure that this parameter is set to meet the requirements of any regulations that are to be met. Measurements made with an incorrect Exchange Rate cannot be recalculated after the measurement has been made Select Exchange Rate 22-R Main Menu 3dB (Q=3) Criterion Level 4dB (Q=4) Treshold Level...
-
Page 41: Dose Exceedence
| 41 % Dose Exceedence The version of the Model 22 doseBadge referred to in this manual provides a visual display of when the accumulated noise has exceeded the % Dose level. For example, if the Criterion Level is set to 90dB, the 100% Noise Dose is equivalent to a level of 90dB over 8 hours. -
Page 42: Section 5 Reviewing & Downloading Measurements
P a g e | 42 Section 5 Reviewing & Downloading Measurements Once measurements have been downloaded from the doseBadge into the Reader unit, they are stored in the memory of the Reader automatically. The measurements can be reviewed on the display of the Reader unit or they can be downloaded from the Reader to the dBLink software. - Page 43 P a g e | 43...
-
Page 44: Time History Display
P a g e | 44 Time History Display The measured Time History Data is displayed on the Reader display. The Time History graph is drawn with a fixed range of 80dB to 130dB in 10dB steps with a marker at 133dB (for overload). If the measurement was paused, the display will show a solid bar over the full height of the display. -
Page 45: Other Information
P a g e | 45 Other Information Other information may be displayed by the Reader unit during the measurement review. These are covered below. Shown when: The Run Time and Leq are too low for the Reader unit to accurately calculate an L value. -
Page 46: Downloading Measurements To A Pc
This software should be installed with full administration rights to ensure that the configuration of the software can be completed. Pulsar Instruments Plc accepts no responsibility for the installation of this software on systems where full access rights are not available. -
Page 47: Section 6 Maintenance & Care
Pulsar or an authorised service centre at least every 12 months for verification, calibration and servicing. This should only be carried out by Pulsar Instruments Plc or a service centre authorised by Pulsar Instruments Plc for the service and calibration of the doseBadge. -
Page 48: Changing The Reader Batteries
P a g e | 48 The internal NiMH (Nickel Metal Hydride) battery, like all rechargeable batteries, will self-discharge. When arranged into a battery the individual cells within the battery, not being identical, will not all discharge at the same rate. This means that the first cell to discharge will often be forced into a 'reverse current' situation by the other cells and will be damaged. - Page 49 P a g e | 49 The battery should be of alkaline type AA (LR6 / AM3 / MN1500 / Mignon). Ensure that the polarity of the batteries is correct. Replace the battery cover and switch the Reader unit on.
-
Page 50: Section 7 Troubleshooting
The following information is designed to solve common problems found when using the doseBadge system. If you cannot solve the problem, please contact your local representative or Pulsar Instruments Plc directly. There are no user serviceable parts inside the doseBadge, Reader or Chargers. -
Page 51: The Model 22R Reader
Calibrating the doseBadge: Model 20-TH and the the Model 20 or Model 20-TH “Not Compatible” configuration is not supported by doseBadges or use a MODEL 22 these units. doseBadge. The Reader gives an error when The doseBadge battery is flat... -
Page 52: The Chargers
Page 52 doseBadge User Manual The Reader will not download to Reader and the PC is not correct between the Reader and the PC the software The Reader is not switched on Switch on the Reader and try again The dBLink software is not Run the dBLink software from the running Programs, Cirrus, dBLink directory... -
Page 53: Section 8 Glossary & Terminology
Section 8 Glossary & Terminology The following section lists the acoustic terminology that is found in this manual and in the MODEL 22 doseBadge Personal Noise Dosemeter and MODEL 22R Reader Unit. For further information, please contact your local representative or Pulsar Instruments Plc directly. - Page 54 Page 54 doseBadge User Manual EP,d The L is the average of the measured L over an eight hour period. The L will be EP,d EP,d lower than the L when the measurement duration is less than eight hours, equal to the L for a measurement of eight hours, and higher than the L for measurements...
-
Page 55: Glossary
The true peak level of the pressure wave (not the highest sound pressure level which is termed the L ). The MODEL 22 doseBadge measures the true Peak level. Overload Indicated when the noise level exceeds the upper design limit of an instrument. In the... - Page 56 Page 56 doseBadge User Manual dB(A) Decibels A weighted dB(C) Decibels C Weighted Decibel (dB) The units of sound level and noise exposure measurement Fast Time Weighting A standard time weighting applied by the Sound Level Meter IEC 61252:1993 The International Standard for Personal Sound Exposure Meters (PSEM) Integrating Averaging A Sound Level Meter which accumulates the total sound energy...
- Page 57 Page 57 doseBadge User Manual Time History A sample of the noise levels taken every 1 second throughout the measurement period. Type 1 Laboratory & Field Grade for Sound Level Meters. Personal Noise Dosemeters to the IEC 61252 Standard do not have a Class or Type.
-
Page 58: Appendix 1 Specifications
User Manual Appendix 1 Specifications The MODEL 22 doseBadge Personal Noise Dosemeter and the MODEL 22R Reader Unit have been designed to meet the requirements of IEC 61252:1993 Personal Sound Exposure Meters and the ANSI S1.25:1991 Personal Noise Dosemeters. The MODEL 22 doseBadge and the MODEL 22R Reader unit must be used as a combination to ensure compliance with these standards. - Page 59 Criterion Time 8hrs, 12hrs, 16hrs, 18hrs Threshold None, 80dB, 90dB Time Weighting None, ‘S’ (Slow) Power MODEL 22 doseBadge Internal NiMH Battery with intelligent charging system MODEL 22R Reader 2 x AA/LR6 CHR22 Charger Unit PS22 Mains Power Supply Memory Backup The memory of the MODEL 22R Reader is protected when the main batteries are removed.
- Page 60 C Operating C to +60 C Storage Humidity Up to 99% RH Non-Condensing Weight MODEL 22 45 gms (1.6 oz) MODEL 22R Reader 400 gms (14 oz) Software The dBLink3 Download program is compatible with Microsoft Windows versions 98SE or...
-
Page 61: Appendix 2 Ordering Information
Appendix 2 Ordering Information The doseBadge measurement kits can be ordered with standard numbers of doseBadges. Number of doseBadges Standard Measurement Kit Model 22-1 Model 22-2 Model 22-5 Model 22-10 Additional or spare components can be added to a system. The following components... -
Page 62: Appendix 3 Resetting The Dosebadge And Reader Unit
Reader Unit and if all of the troubleshooting steps have been followed, this reset procedure can be followed. This procedure should only be followed if the MODEL 22 doseBadge does not respond to commands from the MODEL 22R Reader Unit. Please ensure that all of the troubleshooting listed above has been followed before carrying out this procedure. -
Page 63: Reset
P a g e | 63 Take a thin small metal object (a pin or bent open paperclip is ideal) and insert it into the hole highlighted blue in the picture below. Care must be taken to insure that it is the correct hole. Use the locating pin in the case and the notch in the baseplate as a reference. -
Page 64: Resetting The Model 22R Reader Unit
P a g e | 64 Resetting the MODEL 22R Reader Unit The MODEL 22R Reader Unit can be reset to the factory settings by pressing the Reset Button that is located within the Battery Compartment on the back of the Reader Unit. Please note that this reset procedure will not clear the memory, and will only reset the internal microprocessor of the Reader Unit. -
Page 65: Appendix 4 Ce Certificate Of Conformity
Equipment Description The following equipment manufactured after 1 January 2006: MODEL 22R doseBadge Reader Unit MODEL 22 doseBadge Personal Noise Dosemeter CHR22 Charger Unit Along with their standard accessories According to EMC Directives 89/336/EEC and 93/98/EEC meet the following standards:... -
Page 66: Guarantee
| 66 Guarantee Pulsar Instruments Plc offers a 12 month guarantee on all of their units. This covers all parts and labour excepting only damage caused by the user. Because of the unique fragility of microphones, only internal short or open circuits are accepted as faults and not accident damage.
Need help?
Do you have a question about the 22 and is the answer not in the manual?
Questions and answers