
Related Manuals for DAPAudio PA-303 TU


Summary of Contents for DAPAudio PA-303 TU
- Page 1 MANUAL ENGLISH PA-303TU Ordercode: D6140 Highlite International B.V. – Vestastraat 2 – 6468 EX – Kerkrade – the Netherlands...
-
Page 2: Table Of Contents
PA-303TU Table of contents Warning ....................................2 Unpacking Instructions ..............................2 Safety Instructions ................................. 2 Operating Determinations ............................3 Connection with the mains............................4 Return Procedure ................................4 Claims ....................................4 Description of the device ..............................5 Features ..................................5 Frontpanel .................................. -
Page 3: Warning
PA-303TU Warning FOR YOUR OWN SAFETY, PLEASE READ THIS USER MANUAL CAREFULLY BEFORE YOUR INITIAL START-UP! Unpacking Instructions Immediately upon receiving this product, carefully unpack the carton and check the contents to ensure that all parts are present and have been received in good condition. Notify the dealer immediately and retain packing material for inspection if any parts appear damaged from shipping or the carton itself shows signs of mishandling. -
Page 4: Operating Determinations
PA-303TU Do not insert objects into air vents. Do not connect this system to a dimmerpack. Do not switch the system on and off in short intervals, as this would reduce the system’s life. Do not open the device and do not modify the device. ... -
Page 5: Connection With The Mains
PA-303TU Connection with the mains Connect the device to the mains with the power-plug. Always pay attention, that the right color cable is connected to the right place. International EU Cable UK Cable US Cable BROWN YELLOW/COPPER FASE BLUE BLACK SILVER NULL YELLOW/GREEN... -
Page 6: Description Of The Device
PA-303TU Description of the device Features The PA-303TU is a professional 30W Public Adress amplifier with built in tuner and media player: Inputs: 2 x Mic/Line, 1 x Line input Phantom power Front line input: 3,5mm Jack ... -
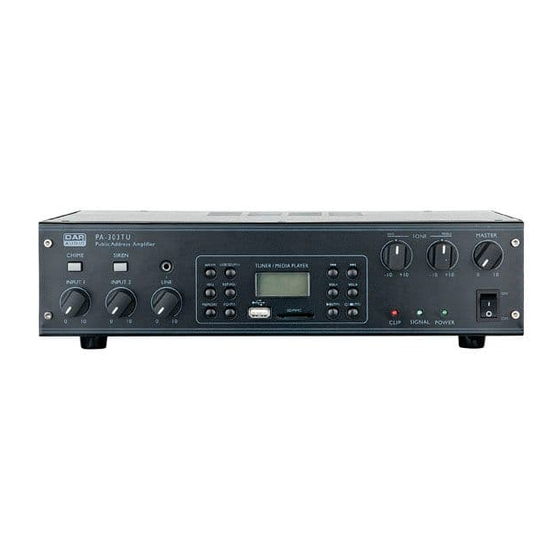
Page 7: Frontpanel
PA-303TU Frontpanel 1. Chime button Activates the chime circuit. If pushed in, you can enter chime mode by shorting the priority (35) terminal at the backside. In chime mode, the chime will be activated and all inputs except input 1 will be muted so you are able to broadcast a message after the chime signal. -
Page 8: Tuner/Media Player
PA-303TU 8. Input 2 level Use to adjust the input volume level for input 2 (46). 9. Iine level Use to adjust the input volume level for the line (3, 45) inputs. 10. Tuner/media player See the next paragraph. 11. Clip LED The clip LED indicates peak levels at the output of the amplifier. - Page 9 PA-303TU button MP3 mode: Use this button for skipping tracks backwards Tuner mode: Use this button to select the desired station. Each time this button is pushed in, the AM frequency decreases with 9Khz intervals, while the FM frequency decreases with 0,1Mhz. If the button is pushed in, longer than 1,5 seconds, the radio frequency will decrease automatically until a station is tuned in.
-
Page 10: Backpanel
PA-303TU Backpanel 30. AC-selector Before connecting your PA-303TU to the mains, make sure the AC-selector is set to the proper voltage used in your country. If you’re not sure, consult a skilled technician. 31. FM Antenna connector Connect your FM antenna to this connector 32. - Page 11 PA-303TU GND Screw This screw offers a separate ground connection. Can be useful in case of grounding problems. 40. DC 12V 5A terminal DC 12V input (battery) 41. Common speaker terminal Connect this terminal with the – terminal of your speaker(s). 42.
-
Page 12: Operation
PA-303TU Operation Installation Remove all packing materials from the PA-303TU. Check that all foam and plastic padding is removed. Secure the equipment into a 19" rack if prefered. Connect all cables. Set Up and Operation Before plugging the unit in, always make sure that the power supply matches the product specification voltage. -
Page 13: Operating The Usb/Sd Player
PA-303TU Operating the USB/SD Player Switching between radio and MP3 playback Insert a USB stick or a SD stick and push the MP3 (22) button. Now the display will search for an inserted USB stick or SD card. The display will briefly show USB if a USB stick is inserted and then proceed in playback mode. During playback the display will show the current track as shown below. - Page 14 PA-303TU Repeat/ Random play Push the rep (17) button once to repeat the current track. Push the rep (17) button again to repeat the whole disc. Push the rep (17) button again to start random play. Push the rep (17) button a fourth time, to exit the Repeat/ Random Mode. Switching between USB and SD playback Make sure that an USB stick as well as a SD-card are inserted.
-
Page 15: Connecting Outputs
PA-303TU Connecting Outputs. Speakers are connected using terminal connectors. See the examples below and following page. Low impedance outputs You can use as many speakers as you want as long as the total impedance matches the amplifiers output. Example 1: using the 4Ω output with two 8Ω speakers. Fig. -
Page 16: Connection Cables
PA-303TU Connection Cables Take care of your cables, always holding them by the connectors and avoiding knots and twists when coiling them: This gives the advantage of increasing their life and reliability. Periodically check your cables. A great number of problems (faulty contacts, ground hum, discharges, etc.) are caused entirely by using unsuitable or faulty cables. -
Page 17: Maintenance
PA-303TU Maintenance DAP Audio Core PA-303TU requires almost no maintenance. However, you should keep the unit clean. Disconnect the mains power supply, and then wipe the cover with a damp cloth. Do not immerse in liquid. Do not use alcohol or solvents. Keep connections clean. -
Page 18: Product Specifications
PA-303TU Product Specifications Output power: Power outputs: 4 Ohm, 8 Ohm, 70V, 100V (terminal strip) Record output: Input 1: Line/microphone with phantom power (XLR/jack combo) Input 2: Line/microphone with phantom power (XLR/jack combo) Input 3: Line (back, RCA / front 3,5mm jack) Tuner presets: Media player: MP3 format... -
Page 19: Notes
PA-303TU Notes Ordercode: D6140... - Page 20 ©2013 DAP Audio...
Need help?
Do you have a question about the PA-303 TU and is the answer not in the manual?
Questions and answers