
Related Manuals for Cook's Companion CCDCS126


Summary of Contents for Cook's Companion CCDCS126
- Page 1 MULTI FUNCTION DUAL BOWL CHOPPER AND SPIRALIZER INSTRUCTION MANUAL MODEL CCDCS126...
-
Page 2: Important Safeguards
IMPORTANT SAFEGUARDS When using electrical appliances, basic safety precauBons should be followed as follows: • Read all the instruc0ons. • Intended for household use only. • Do not use the appliance for anything other than intended use. • Do not operate this unit in the presence of explosives and/or flammable fumes. • Remove the unit and the instruc0on manual from the box and remove all packing materials. • Do not leave the appliance una@ended during opera0on. Close supervision is necessary when any appliance is used by or near children to avoid injury to themselves or others. • Do not operate any appliance with a damaged cord or plug, or aEer the appliance malfunc0ons or has been damaged in any manner. • Do not place the unit on or near gas or electric cooktops or in a heated oven to avoid damage. • Use only replacement parts provided by the manufacturer. • To protect against electrical shock, do not immerse power cord, plugs, or the whole unit in water or any other liquid. • Always unplug from the wall outlet first. • The use of an extension cord is not recommended. • Place the unit on a level surface away from walls and cupboards. Do not let the cord hang over the edge of a table or counter, or come into contact with hot surfaces. - Page 3 • Unplug the unit when not in use and before cleaning. • Make sure the unit is unplugged before moving the unit. • The blades are extremely sharp, handle with care. • Keep hands and utensils out of the chopper while in use to prevent personal injury or damage to the unit. • The unit needs to be fully stopped before opening the lid. • Always store blades and discs properly to avoid damage or personal injury. • Never chop ice in the chopper. • Never put frozen food into the chopper to avoid damaging the blade. • Never use the chopper for longer than specified to avoid damage to the motor. • Remove the blade first then empty the bowl of the chopper. • Never overfill the chopper, always follow suggested capacity. • Avoid contact with all moving parts. • The motor needs to be securely locked in place before opera0ng appliance. Do not a@empt to remove cover un0l blade has stopped rota0ng. • Do not use outdoors. • SAVE THESE INSTRUCTIONS.
-
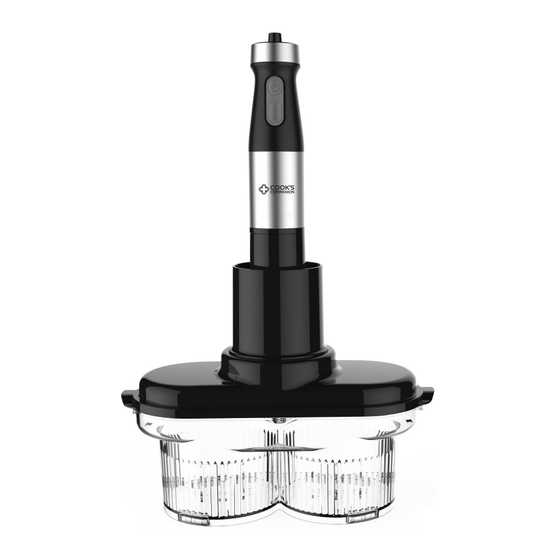
Page 4: Parts Identification
PARTS IDENTIFICATION Speed Knob Start Button Turbo/Pulse Button A. Motor G. Food Holder Gear Box & Spiralizer Holder B. Chopper Lid H. Food Chute C. Removable Food Plate Shredded Spiral Blade D. Inside Cover J. Wide Ribbon Spiral Blade E. Chopper Blades K. -
Page 5: Before First Use
BEFORE FIRST USE 1. Remove all packaging materials. 2. See page 11 for care instruc0ons and clean before use. 3. Wipe the inside and outside of the appliance with a cloth. USING THE APPLIANCE Chopping Blade: Assembly and Use: 1. Remove the blade cover, before using. 2. Place the two chopping blade inserts ver0cally into the blade guides provided in the chopping bowl. NOTE: If you want to use only one side, only install one blade. CAUTION: Blades are very sharp, handle with care and always hold the plas0c parts. - Page 6 3. Place the removable food plate in the chopping bowl. This must be installed for ingredients to chop properly. 4. Place the inside cover in posi0on. NOTE: It is correctly in place if the side support surfaces of the cover are on the frame of the chopping bowl. The two blade inserts are securely fixed if their upper ends protrude out of the two round openings in the inside cover. 5. Put the food into the chopping bowl, for best results, cut food no more than 1x1x1 inch. Each bowl should have no more than 0.55 lbs. inside. It is suggested to start at speed 3 then throughout processing move the knob leE or right to increase and decrease the speed.
- Page 7 6. Put the chopping bowl lid into the chopping bowl. 7. Install the motor unit into the chopping bowl lid and turn clockwise to lock into place. Then plug the appliance into an electrical outlet. Press the start bu@on to begin chopping, the start bu@on will need to be held throughout the processing. To pulse, select turbo un0l desired consistency is reached. 8. AEer using, unplug the motor unit and turn the motor unit counter clockwise un0l it releases. 9. Grasp the chopping bowl lid and liE straight up. Then remove the inside cover from the chopping bowl by liEing straight up. 10. Remove the chopping blade by holding the plas0c parts. Then spoon items out of the chopping bowl. CAUTION: The blades are very sharp, handle with care and always hold the plas0c parts.
- Page 8 Spiralizer: Assembly and Use: 1. Install the desired blade inside the spiralizer lid by aligning the tabs to the disc with the notches on the spiralizer lid and turning counter clockwise clockwise un0l it locks into place. CAUTION: Handle from the bo@om. The blades within the discs are very sharp. Use care when handling and do not place fingers inside discs. 2. Place the spiralizer lid with blade on top of the chopping bowl. 3. Install the food chute into the spiralizer lid by aligning the tabs of the food chute with the notches in the spiralizer lid and turn counter clockwise.
- Page 9 4. Install the motor unit into food holder gear box. 5. Place a single piece of food in the food chute. For best results, cut food to be no longer than the food chute’s height and no more than 2.8 inches wide. Both ends of the food should be cut flat to allow food chute to rotate the food. 6. Then plug the appliance into an electrical outlet. It is suggested to start at 3 and adjust throughout spiralizing. Press the start bu@on to begin spiralizing, the start bu@on will need to be held throughout the processing slowly push the food down with the motor un0l most of the food is processed. NOTE: There might be food that will remain unprocessed depending on the food.
- Page 10 7. AEer using, unplug the unit and grasp the food chute. Turn clockwise and liE straight up. 8. Remove the spiralizer lid from the chopping bowl by liEing straight up. 9. Release the blades by turning clockwise from underneath. CAUTION: The blades within the discs are very sharp. Use care when handling and do not place fingers inside discs.
- Page 11 CLEANING Clean aEer every use. 1. Before cleaning unplug the unit. 2. Wash chopper lid by cleaning with hot water and dish liquid, allow to dry throughly before storing. Place the lid on it’s side to allow water to fully drain out of the lid. Do not immerse in water or place in the dishwasher. 3. Wash all parts with hot water and dish liquid. Rinse and dry thoroughly. 4. Wipe the external surface of the motor with a soE damp cloth and dry surfaces with soE dry cloth. Do not use any abrasive detergent as this may scratch the outside. 5. Once all parts are dry place in a dry place. Note: Never immerse the motor housing in water.
-
Page 12: Troubleshooting
MAX AMOUNTS Type of Vegetable Example Max Amount DirecBons SoE Vegetables Celery, Onion 0.88 pounds Chop 8-10 0mes Hard Vegetables Potato, Carrot 1.1 pounds Press turbo 2-3 0mes, then chop 8-12 seconds Meat & Vegetables Pork, Onion 1 pound Press turbo 2-3 0mes, then chop 12-15 seconds TROUBLE SHOOTING Problem SoluBon Machine does not work Check and ensure that the motor unit is properly connected to the appropriate mixing tool; chopping bowl lid or spiralizier lid. Check and ensure that the appliance is properly connected to the wall outlet and that power is switched on at the outlet. Vegetables are inconsistent size aEer Make sure to cut vegetables into similar chopping. sized chunks before adding them to the chopping bowl for processing. Vegetables are not chopping properly. Make sure both ends of the vegetables are cut flat. -
Page 13: Recipe Notes
RECIPE NOTES _____________________________ _____________________________ _____________________________ _____________________________ _____________________________ _____________________________ _____________________________ _____________________________ _____________________________ _____________________________ _____________________________ _____________________________ _____________________________ _____________________________ _____________________________ _____________________________... - Page 14 RECIPE NOTES _____________________________ _____________________________ _____________________________ _____________________________ _____________________________ _____________________________ _____________________________ _____________________________ _____________________________ _____________________________ _____________________________ _____________________________ _____________________________ _____________________________ _____________________________ _____________________________...
- Page 15 RECIPE NOTES _____________________________ _____________________________ _____________________________ _____________________________ _____________________________ _____________________________ _____________________________ _____________________________ _____________________________ _____________________________ _____________________________ _____________________________ _____________________________ _____________________________ _____________________________ _____________________________...
-
Page 16: Limited One-Year Warranty
This warranty covers the original retail purchaser or giE recipient. During the applicable warranty period within normal household use, we will repair or replace, at our discre0on, any mechanical or electrical part which proves defec0ve, or replace unit with a comparable model. Shipping and handling costs are not included for warranty replacements and are the responsibility of the customer. To obtain service under the terms of this warranty, call our customer care department at 312-526-3760 (Monday- Friday 10:00AM-6:00PM CST), or send an email to customercare@alliedrich.net. Please provide the model number listed on the bo@om of this page when contac0ng us. THIS LIMITED WARRANTY COVERS UNITS PURCHASED AND USED WITHIN THE UNITED STATES AND DOES NOT COVER: • Damages from improper installa0on. • Damages in transit. • Defects other than manufacturing defects. • Damages from misuse, abuse, accident, altera0on, lack of proper care and maintenance, or incorrect current or voltage. • Damage from service by other than authorized dealer or service center. • Shipping and handling costs. • This warranty gives you special legal rights and you may also have other rights to which you are en0tled which may vary from state to state. Manufacturer does not assume responsibility for loss or damage for return shipment. We recommend that you keep your original packaging should you require repair service. Before returning product please contact our customer care department for return authoriza0on. When returning product for repair please include your full name, return address, and day0me phone number. Also include a brief descrip0on of the problem you are experiencing and a copy of your sales receipt or other proof of purchase in order to validate warranty status. MODEL CCDCS126...
Need help?
Do you have a question about the CCDCS126 and is the answer not in the manual?
Questions and answers