Table of Contents
Advertisement
Quick Links
Advertisement
Table of Contents

Related Manuals for DeFelsko PosiTector SHD


Summary of Contents for DeFelsko PosiTector SHD
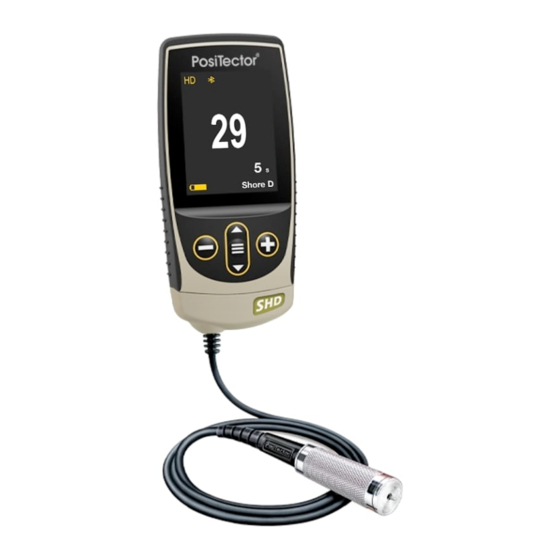
- Page 1 Shore Hardness Durometer Full Guide v. 1.1...
-
Page 2: Table Of Contents
Table of Contents Quick Start……………………………………………….….….. Page 1 Certification……………..……………………………………… Page 2 Why is Measurement Important?.……………………….…… Page 3 Probes……………………………………………………...…… Page 3 Calibration, Verification and Adjustment……………….…… Page 4 Menu Operation………………………………………………… Page 5 Cal Settings Menu……………………………………………… Page 5 - 1 Pt. Adjust…………………………………………… Page 5 Setup Menu………………………….…………………….……... -
Page 3: Quick Start
Replace the rubber cap to protect the indentor and presser foot when not in use. Damage to the indentor caused by measuring on hard materials is not covered by DeFelsko’s warranty. -
Page 4: Certification
Protective Cap PosiTector SHD probes are shipped with a protective rubber cap over the probe. Remove this cap prior to use. Replace the rubber cap to protect the indentor and presser foot when not in use. Wrist Strap We recommend attaching and wearing the supplied wrist strap. -
Page 5: Why Is Measurement Important
Two probe models are available for measuring on a variety of materials: PosiTector SHD-A (Shore A) - soft rubber, elastomers, neoprene, silicone, etc. PosiTector SHD-D (Shore D) - hard rubber, epoxies, hard plastics, PVC, acrylic, etc. -
Page 6: Calibration, Verification And Adjustment
Three steps ensure best accuracy… 1. Calibration - typically performed by the manufacturer. All probes include a Certificate of Calibration, Verification and Adjustment Calibration. 2. Verification of Accuracy - typically performed by the user on known reference standards such as the included test block. 3. -
Page 7: Menu Operation
Gage functions are menu controlled. To access the Menu, power-up the gage, then press the center navigation button. Below is a sample menu for a PosiTector SHD Advanced Model: Menu Operation To navigate, use the Up and Down buttons to scroll vertically and to SELECT. -
Page 8: Setup Menu
PosiSoft.net account. Test Time The PosiTector SHD has an on-screen timer to measure the hardness of a material after a given period of time as defined by international standards, typically 1, 3 or 15 seconds. Use the (-) and (+) buttons to adjust the test duration. When taking a reading, the timer starts... -
Page 9: Continuous Reading
When enabled, measurement results outside 20/90 will emit a low tone and will not be included in Memory or Statistics. NOTE: If values above 90 Shore A are measured, the PosiTector SHD-D probe should be used. If values below 20 Shore D are measured, use the PosiTector SHD-A probe. -
Page 10: Statistics Mode
SHORTCUT: Press the (+) button while viewing the measurement screen to Clear. Memory Management The PosiTector SHD has internal memory storage for recording measurement data. Stored measurements can be reviewed on- screen or accessed via computers, tablets and smart phones. All stored measurements are date and time-stamped. - Page 11 Standard model display with Memory ON shows measurement statistics: Advanced models store 100,000 readings in up to 1,000 batches. The Memory menu includes the following options: New Batch Closes any currently opened batch and creates a new batch name using the lowest available number.
- Page 12 (appears only if a batch is currently open) New Sub-Batch Creates a new sub-batch within the currently opened batch. NOTE: When a sub-batch is open, create a new sub-batch by pressing (+) This option will automatically create a new sub-batch after the required number of readings is stored in the current sub-batch.
-
Page 13: Accessing Stored Measurement Data
DeFelsko offers the following free solutions for viewing, analyzing and reporting data: PosiSoft USB Drive - Connect the Gage to a PC/Mac using the supplied USB cable. View and print readings and graphs using universal PC/Mac web browsers or file explorers. No software or internet connection required. - Page 14 Access Point Connect your smart device/computer to a PosiTector Advanced body wirelessly without the need for a separate network. Wirelessly import readings into legacy PosiSoft 3.0 Desktop Software or whenever a WiFi network is not available or out-of-range. To enable, select Access Point from the Connect > WiFi menu. The Access Point icon will display in the upper left of the PosiTector display.
-
Page 15: Usb
When USB Drive is checked , the PosiTector gage uses a USB mass storage device class which provides users with a simple interface to retrieve stored data in a manner similar to USB flash drives, digital cameras and digital audio players. USB Drive is also required to import stored measurements into PosiSoft Desktop software (pg.11). -
Page 16: Bluetooth Smart
Bluetooth Allows individual readings to be sent to a computer, printer or compatible device as they are taken using Bluetooth wireless technology. See www.defelsko.com/bluetooth Pairing The instrument and receiving device must be paired before stored or streamed datasets can be transmitted. -
Page 17: Updates
Updates Determine if a software update is available for your Gage. See www.defelsko.com/update To perform an update the Gage must be connected to an internet connected PC with PosiSoft Desktop Manager (pg. 11) or WiFi network. WARNING: Ensure that stored measurements are backed up to a PC or PosiSoft.net. -
Page 18: Troubleshooting
Most conditions can be cleared with a Hard Reset (pg. 6). If not, visit our Service & Support page for information on sending your instrument to us for a no charge evaluation. See: www.defelsko.com/service Probe attempts a measurement even while held in the air: Turn the Gage OFF, and then ON again. Finally try a Reset. -
Page 19: Returning For Service
DeFelsko, PosiSoft and PosiTector are trademarks of DeFelsko Corporation registered in the U.S. and in other countries. Other brand or product names are trademarks or registered trademarks of their respective holders. Every effort has been made to ensure that the information in this manual is accurate. DeFelsko is not responsible for printing or clerical errors.
Need help?
Do you have a question about the PosiTector SHD and is the answer not in the manual?
Questions and answers