DeFelsko PosiTector DPM Instruction Manual
Dew point meter
Hide thumbs
Also See for PosiTector DPM:
- Instruction manual (66 pages) ,
- Quick manual (60 pages) ,
- Full manual (32 pages)
Table of Contents
Advertisement
Quick Links
Advertisement
Table of Contents

Subscribe to Our Youtube Channel
Related Manuals for DeFelsko PosiTector DPM


Summary of Contents for DeFelsko PosiTector DPM
- Page 1 ® PosiTector Dew Point Meter Instruction Manual v. 3.1...
-
Page 2: Table Of Contents
Table of Contents Table of Contents Introduction............Operation Overview..........Probes ............... Menu Operation..........Alarm Mode........... 10 Setup Menu........... 11 Memory Management........14 Auto Log Mode..........17 Connecting to a Computer......... Power Supply / Battery Indicator......24 Returning For Service......... 24 Troubleshooting .......... -
Page 3: Introduction
- Two (2) year warranty on Body and Probe Protective Cap The PosiTector DPM is shipped with a protective plastic cap over the surface temperature sensor. Remove this cap prior to use. Replace it when the instrument is not in use to protect the sensor. -
Page 4: Operation Overview
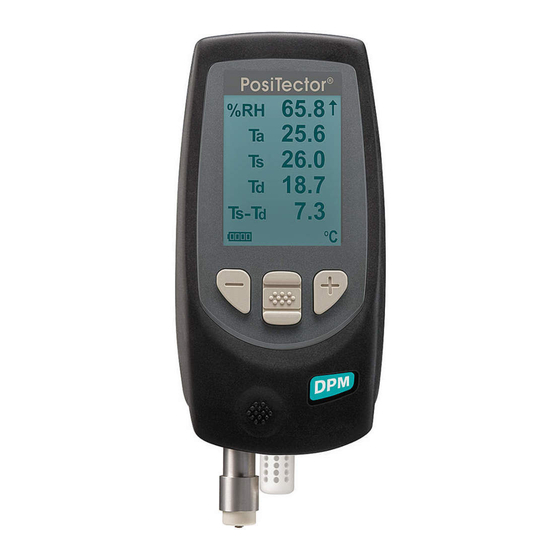
- Wet Bulb Temperature (calculated) (Advanced Models Only) Operation Overview Operation Overview The PosiTector DPM powers-up when the center navigation button is pressed. Readings are updated automatically each second. To preserve battery life, the instrument powers down after approximately 5 minutes of no button activity. All settings are retained. - Page 5 d - The surface minus dew point temperature is important in judging the risk of condensation, or dew, forming on a surface. For example, ISO 8502-4 recommends that, unless otherwise agreed, the temperature of a steel surface generally should be at least 3°C (5°F) above the dew point when paints are applied.
- Page 6 Gage manufacturer or by a certified calibration laboratory in a controlled environment using a documented process. The PosiTector DPM is shipped with a Certificate of Calibration showing traceability to a national standard. For organizations with re-certification requirements, the PosiTector DPM may be...
- Page 7 Why is Measurement Important? Why is Measurement Important? For industrial painters, the primary reason for measuring climatic conditions is to avoid rework and the premature failure of protective coatings. Recommendations and requirements are covered under various internationally recognized standards. Temperature – It is important to measure both surface and air temperatures as they are often different.
-
Page 8: Probes
Probes Probes Separate probe with magnetic Surface surface temperature temperature sensor sensor Air temperature and humidity sensors Optionally, the Magnetic Surface Temperature Probe can be dis- connected from the K-Type thermocouple connector (separate probe models only) and replaced with one of the following acces- sories: Hand-held Surface Temperature Probe -for spot checking hard-to-reach surfaces... - Page 9 CAUTION: To ensure optimal performance of your PosiTector DPM, do not obstruct the airflow near the air temperature and humidity sensors. Keep fingers away from the sensor, as body heat can cause incor- rect readings. Allow time for the instrument to acclimate and for the readings to stabilize when moving the instrument between different environments.
-
Page 10: Menu Operation
Menu Operation Instrument functions are menu controlled. To access the Menu, power-up the instrument, then press the center navigation button. Below is a sample menu for a PosiTector DPM Advanced Model: Memory Auto Log Some buttons have a tick box to their Alarm right to indicate current status. -
Page 11: Alarm Mode
Alarm Mode Alarm Mode Alarm The PosiTector DPM can automatically alert the user when cur- rent climatic conditions exceed pre-set values. When selected, the Alarm icon is displayed at the top of the screen. According to ISO 8502-4 and ASTM D3276, steel surfaces should generally be 3°C (5°F) above the dew point when painting. -
Page 12: Setup Menu
Setup Menu Setup Menu Setup Reset Reset (soft reset) restores factory settings and returns the instrument to a known condition. The following occurs: - All batches, stored datasets, images and batch names are erased. - Menu settings are returned to the following: Memory = OFF Bluetooth = OFF Auto Log = OFF... - Page 13 (Advanced models only) Wet Bulb Displays the wet bulb temperature (Tw) on the main screen. It is calculated from Ta and RH using an air pressure of 1.0 atmospheres (1013 mbar). Variations of Tw at other pressures could be greater than ±1°C (±2°F). NOTE: This menu item only appears when all memory functions are turned off.
- Page 14 AC charger. The battery state indicator icon is calibrated for the selected battery type. No damage will occur if the wrong battery type is selected. NOTE: DeFelsko recommends the use of eneloop (NiMH) rechargeable batteries. It may take as long as 12 hours to charge dead batteries. Units Converts the display from Celsius (°C) to Fahrenheit (°F) or vice...
-
Page 15: Memory Management
Memory Management Memory Management Memory The PosiTector DPM can record datasets in memory for printing to the optional Bluetooth wireless printer (pg. 22) , transfer to a computer (pg. 18) or synchronizing with PosiTector.net (pg. 18). Datasets can be stored manually using the (+) button, or automatically using the Auto Log mode (pg. - Page 16 Open Selects a previously created batch name to open and make current. Use the (+) and (-) buttons to scroll through pages of saved batches. When selected, the batch name and number of stored datasets will be displayed. Close Stops the recording process, closes the current batch, and removes batch information from the display.
- Page 17 -Remove the last dataset from the current open batch by pressing (-). -Batches can be renamed in the instrument using PosiTector.net Below is a PosiTector DPM sample screen with: - Memory mode on with one batch containing nine saved datasets - Chart of saved Ta, Ts, and Td readings displayed - White on Black mode (pg.
-
Page 18: Auto Log Mode
Auto Log Mode Auto Log Mode Auto Log The PosiTector DPM can automatically record datasets into mem- ory at user selected time intervals. When selected, the Auto Log icon will appear on the display with a timer counting down until the next dataset is stored. -
Page 19: Connecting To A Computer
Connecting to a Computer Connecting to a Computer The PosiTector can be connected to a computer using the included USB cable or Bluetooth wireless technology (pg. 21). The USB connection has the following capabilities: - Download datasets via USB Mass Storage (pg. 20) - Download readings and synchronize batch photos and notes via PosiTector.net (pg. - Page 20 Bluetooth Printer (sold separately) Stream datasets as they are taken or print batch readings and statistics. See pg. 22 for pairing information. Legacy PosiSoft Support - Existing PosiSoft users can continue using the familiar legacy PosiSoft software to download datasets. Upgrade your PosiSoft version at: www.DeFelsko.com/PosiSoft...
- Page 21 Connect Menu Connect Menu Connect Synchronizing (Sync) is the process whereby PosiTector stored measurement data uploads to PosiTector.net (from both Standard and Advanced models) while images and batch notes are down- loaded to the instrument (Advanced model only). This transfer occurs when the instrument is connected via USB or Bluetooth Wireless Technology to a web-enabled PC running the PosiTector Desktop Manager (pg.
- Page 22 To deactivate Bluetooth, select Off. Pairing: The instrument and receiving device must be paired before stored or streamed datasets can be transmitted. For pairing instructions, see www.defelsko.com/printer Info: Lists information about your current Bluetooth connection, including the currently paired device and MAC address.
- Page 23 - Print stored batch datasets and summaries. Begin by entering the Connect>Bluetooth menu. Turn Bluetooth ON and “Pair” the PosiTector to the printer. See: www.defelsko.com/printer Streaming: In the Connect>Bluetooth menu, select the “Stream” tick box. All datasets will now be simultaneously displayed on the LCD and sent to the printer.
-
Page 24: Rechargeable Batteries
Additional Probes A selection of K-type connector probes are available for your PosiTector DPM separate probe model. (If you have a built-in probe model, a lower unit may be purchased that allows the connection of K-type connector probes.) See: www.defelsko.com/dewmeter. -
Page 25: Power Supply / Battery Indicator
3 Ensure the holes in the white humidity/air temperature sensor are clear 4. Perform a Hard Reset (pg. 11) If you must return the instrument for service, please fill out and include the service form located at www.defelsko.com/support with the instrument. -
Page 26: Troubleshooting
If not, visit our Service & Support page for information on sending your instrument to us for a no charge evaluation. See: http://www.defelsko.com/service When the surface temperature probe is not on a surface, Air Temperature and Surface Temperature appear to be different... -
Page 27: Technical Data
the instrument was powered-on and the gage was not able to self power-down. If this message appears it will be followed by a full reset. All datasets in memory will be erased and gage settings will be reset to "out-of-the-box" settings. Gage will not print to the Bluetooth wireless printer: - Ensure the gage has been paired for use with the printer and the Gage menu option Connect>Bluetooth>Stream box is... - Page 28 DeFelsko and PosiTector are trademarks of DeFelsko Corporation registered in the U.S. and in other countries. Other brand or product names are trademarks or registered trademarks of their respective holders. Every effort has been made to ensure that the information in this manual is accurate. DeFelsko is not responsible for printing or clerical errors.
Need help?
Do you have a question about the PosiTector DPM and is the answer not in the manual?
Questions and answers