Table of Contents
Advertisement
Quick Links
Download this manual
See also:
Instruction Manual
Advertisement
Table of Contents

Subscribe to Our Youtube Channel
Related Manuals for DeFelsko PosiTector PC


Summary of Contents for DeFelsko PosiTector PC
-
Page 2: Table Of Contents
Table of Contents Table of Contents Introduction ............Kit Contents ............Quick Start ............Probes ..............Measurement Notes ..........How to Measure ..........Menu Operation ..........Verification of Accuracy ........Zero ..............Calibration and Adjustment ......... Adjustment Techniques ........Cal Settings Menu ..........10 1 Point Adjust .......... - Page 3 Connect Menu ............. 21 Sync Now ............21 Auto Sync ............21 USB Drive ............22 Bluetooth ............24 Bluetooth Wireless Printer ......24 WiFi ..............25 Powder Probes ..........26 List ............. 26 Change Order ..........26 Add New ............ 26 Probe Off ...........
-
Page 4: Introduction
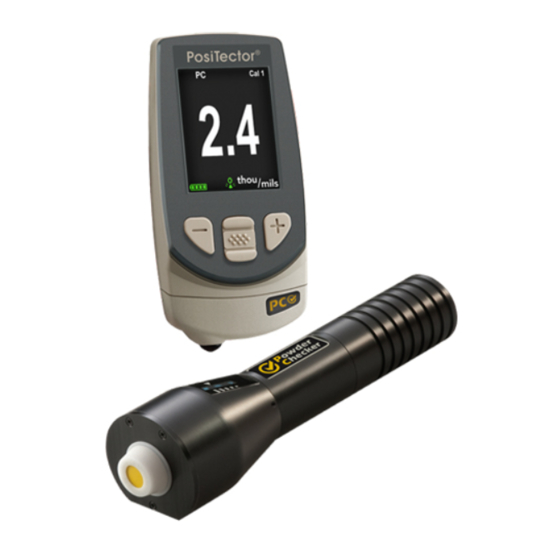
Introduction Introduction PosiTector PC Contents - PosiTector body (Advanced) - PosiTector probe (PC) - PC Probe Connector Cover - Probe zeroing fixture - Replacement screen - Protective lens shield - Carabineer - Wrist strap - Protective rubber holster with belt clip... -
Page 5: Quick Start
Quick Start Quick Start 1. POWER-UP both units (probe first). a) Power-up probe by pressing the button. b) Power-up PosiTector body by pressing the center navigation button. A beep and the letters “PC” will display on the upper left corner of the PosiTector LCD. -
Page 6: Probes
USB Port LCD Display Probe Connector Cover Probes Probes The PosiTector body accepts a number of probe types including magnetic, eddy current and ultrasonic coating thickness, surface profile, environmental and ultrasonic wall thickness probes. latest information probe interchangeability, see www.defelsko.com/probes... -
Page 7: Measurement Notes
Wireless Powder Checker probes: The PosiTector PC wireless probe connects to all Advanced PosiTector bodies. See Powder Probes (pg 26) for connection details. Physically connected PosiTector probes: To disconnect a probe from a PosiTector body, slide the plastic probe connector horizontally (in the direction of the arrow) away from the PosiTector body. -
Page 8: How To Measure
How to Measure How to Measure Power-up both units. Bring the probe to within 5 cm (2 inches) of the coating powder. Press and hold the button. Bring the probe closer to the powder. While watching the probe display, align the Distance Paddle with the Distance Target Bar. - Page 9 Wireless Indicator: The symbol indicates the PosiTector body and wireless probe are communicating properly. Results Indicator: When the probe is in the proper position and good samples are being taken, a solid blue dot blinks on the probe display, the PosiTector body displays a flashing green dot and emits a high beep.
-
Page 10: Menu Operation
Gage functions are menu controlled. To access the Menu, power-up the PC Probe and PosiTector body, then press the center navigation button. Below is a sample menu for a PosiTector PC: Some buttons have a tick box to their right to indicate current status. An empty box indicates that feature is not active. -
Page 11: Verification Of Accuracy
A successful verification requires that the average of a series of measurements by both instruments be within their combined tolerances. If not, adjust the PosiTector PC using one of the methods described on page 9. For best accuracy, perform a Zero at the beginning of every shift to compensate for temperature and humidity changes. -
Page 12: Calibration And Adjustment
(pg 8). If the average of a series of measurements by both instruments (PosiTector PC and dry film thickness instrument) is not within combined tolerances, the PosiTector PC can be adjusted using one of two methods... -
Page 13: Cal Settings Menu
Select 2 Pt Adjust then select Measure. Take at least 3 uncured powder measurements on the thin powder panel with the PosiTector PC. Results will be stored in the gage. Select OK. Take at least 3 uncured powder measurements on the thick powder panel with the PosiTector PC. - Page 14 Then, if you return to that part, the corresponding Cal setting can be conveniently and quickly restored. A “cal setting” is any calibration adjustment. The PosiTector PC always displays the current calibration setting (ex. Cal 3) in the upper right corner of the display.
-
Page 15: Setup Menu
ü Cal Lock When selected, the icon will appear and all calibration settings are “locked” to prevent further user adjustments. Uncheck to make further adjustments. Cal Reset Clears the calibration adjustments for the open Cal setting. The factory calibration icon will appear on the display. Setup Menu Setup Menu Reset... -
Page 16: Gage Info
Gage Info Displays the model number & serial number, probe type & serial number, PosiSoft.net registration key, the amount of remaining memory for storage of readings, date and time and software packages. For security purposes, the registration key is required to add the Gage to your PosiSoft.net account. -
Page 17: Statistics
AC charger. The battery state indicator icon is calibrated for the selected battery type. No damage will occur if the wrong battery type is selected. NOTE: DeFelsko recommends the use of eneloop (NiMH) rechargeable batteries. Statistics Mode Statistics Mode ü... -
Page 18: Memory Management
Memory Management Memory Management The PosiTector PC has internal memory storage for recording measurement data. Stored measurements can be reviewed on-screen or accessed via computers, tablets and smart phones. Measurements are date and time-stamped. Memory stores 100,000 readings in up to 1,000 batches. -
Page 19: Annotate
Open Selects a previously created batch name to open and make current. If it contains measurements, onscreen statistics will immediately reflect values calculated from this batch. Close Stops the recording process, closes the current batch, and removes batch information from the display. Delete Removes a batch completely from memory. - Page 20 Notes: Instructions, descriptions or notes see Annotate, pg 16 None: Default screen Image: Batch image shows statistics NOTES: • PosiSoft.net (pg 19) and PosiSoft Mobile (pg 20) are used to insert an Image and Notes into a batch. • Remove the last reading from the current open batch by pressing (-).
-
Page 21: Display
Displays a summary of all stored batches including the name, probe type, number of readings and type. In the following example, Batch 3 (B3) indicates an “F” 6000 coating thickness probe was used to record a total of “6” readings in “PA2” mode. S c r e e n C a p t u r e Press both (-)(+) buttons at any time to capture and save an image... -
Page 22: Posisoft Desktop Manager (Pdm)
Measurement data can be shared with authorized users via a secure login from any computer and most web enabled devices including smart phones. NOTE: A PosiSoft.net account is not required to Update (pg 27) your PosiTector. Simply download and install PosiSoft Desktop Manager at www.defelsko.com/downloads... -
Page 23: Posisoft 3.0
Reports and graphs with annotations and corporate logo can be generated. Data can be exported to XML or CSV (comma delimited) text files. NOTE: PosiSoft Software is available for use with DeFelsko’s complete line of electronic instruments and is available for download at www.defelsko.com/posisoft PosiSoft Mobile: Is a Gage-based software application featured in all PosiTector Advanced instruments (serial numbers 730,000+). -
Page 24: Connect Menu
Connect Menu Connect Menu Synchronizing (Sync) is the process whereby PosiTector stored measurement data uploads to PosiSoft.net while images and batch notes are downloaded to the Gage. This transfer occurs when the Gage is connected via USB, Bluetooth or directly through your WiFi router/hotspot via WiFi. -
Page 25: Usb Drive
ü USB Drive Universal Serial Bus (USB) is a specification for communication between devices and a host controller (usually a personal computer). USB has effectively replaced a variety of interfaces such as serial and parallel ports. The PosiTector uses a USB mass storage device class which provides a simple interface to retrieve data in a manner similar to USB flash drives, cameras or digital audio players. - Page 26 When your PosiTector is first connected to your Windows PC via a USB cable, an enumeration process is started that installs device drivers without re-booting your computer. You may see several pop-up windows in the taskbar at the bottom right of your screen. Wait for the entire process to be completed before proceeding.
-
Page 27: Bluetooth
To deactivate Bluetooth, select Off. Pairing: The Gage and receiving device must be paired before stored or streamed readings can be transmitted. For pairing instructions, see www.defelsko.com/bluetooth Info: Lists information about your current Bluetooth connection, including the currently paired device and MAC address. -
Page 28: Wifi
See www.defelsko.com/WiFi On/Off: Turns WiFi functionality On. When selected, the icon will appear on the display. To deactivate WiFi, select Off. Networks: The Gage will allow the user to add a new network and will automatically check for available local networks. Available... -
Page 29: Powder Probes
Powder Probes Displays menu options that enable the PosiTector body to communicate with wireless PosiTector PC probes. List Displays all previously connected PC probes. Change Order Select which PC probe the PosiTector body will connect to first during power-up. Add New Allows PosiTector body to pair with a wireless PC probe for the first time. -
Page 30: Updates
Updates Determines if a software update is available for your Gage. If an update is available, a prompt will appear allowing the user to choose to perform the update at this time or not. To perform an update the Gage must be connected to an internet connected PC with PosiSoft Desktop Manager (pg 19), or WiFi network (pg 25). -
Page 31: Temperature
Temperature Temperature Operating Range: +32° to +120°F (0 to +50°C) The PosiTector PC compensates automatically for temperature. Allow a few minutes for the probe to reach ambient temperature before measuring. Discard the first measurement taken in a notably different temperature condition. When measuring surfaces much hotter or colder than ambient, lift the probe at least 6 inches (15cm) and allow 1 second off the surface between measurements. -
Page 32: Additional Accessories
Rechargeable Battery Pack - 4 AAA eneloop batteries The PosiTector body can operate on rechargeable batteries and DeFelsko recommends the use of eneloop (NiMH) rechargeables. eneloop batteries combine the advantages of regular rechargeable batteries and disposable (Alkaline) batteries. They discharge very slowly and can be stored for long periods without having self discharge concerns. - Page 33 PosiTector Probes PosiTector 6000 - Magentic & Eddy Current Coating Thickness probes • measure coatings on ferrous and non-ferrous metal substrates. PosiTector 200 - Ultrasonic Coating Thickness probes • measure coatings on wood, concrete, plastics and more PosiTector SPG - Surface Profile probes •...
-
Page 34: Technical Data
Technical Data Technical Data Measuring Range: Body Size: 20-110 microns 137 x 61 x 28 mm 5.4 x 2.4 x 1.1 in. 0.8-4.3 mils Probe Size: Accuracy: 222 x Ø50 mm + 5 microns + 0.2 mil 8.75 x Ø2.0 in. Resolution: Body Weight: (without batteries) 140 g... -
Page 35: Returning For Service
Other brand or product names are trademarks or registered trademarks of their respective holders. Every effort has been made to ensure that the information in this manual is accurate. DeFelsko is not responsible for printing or clerical errors.
Need help?
Do you have a question about the PosiTector PC and is the answer not in the manual?
Questions and answers