Table of Contents
Advertisement
Advertisement
Table of Contents

Related Manuals for Silvercrest SWK 360 A1


Summary of Contents for Silvercrest SWK 360 A1
- Page 1 SWK 360 A1 User Manual...
- Page 2 Content Preparing For Using....................3 Parts Of The Camera.....................3 Charging The Battery.....................4 Inserting The Memory Card.................. 5 Installing The Mounts.....................6 Points For Attention....................12 Basic Operation......................15 Turning On And Off The Camera............... 15 Changing The Mode Of Camera................19 Recording Video....................19 Taking Still Photos....................
- Page 3 Windows PC Application..................24 Share Pictures In Smartphone APP..............25 Share Videos To Youtube And Facebook............27 Remote Control Connection................28 How To Use The PC Camera Function..............29 Specification....................... 30 FCC Warning......................32...
-
Page 4: Preparing For Using
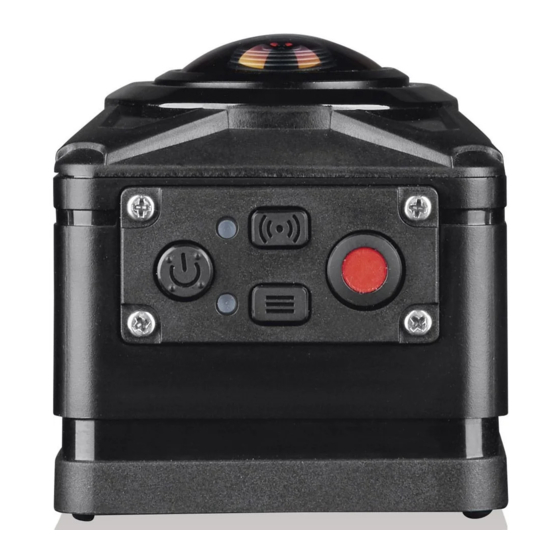
Preparing For Using Parts Of The Camera 1. WiFi/Up Button 2. Shutter/OK Button 3. Down Button 4.Charging/Status Indicator Light 5. Power/Mode Button 6. WiFi Indicator Light 7. Microphone 8. Jack/Card Slot Cover 9. Lens Cover 10. Battery Cover 11. LCD Screen 12. -
Page 5: Charging The Battery
Charging The Battery The camera has a dismountable and rechargeable lithium battery. Please follow below steps to charge the battery when in first use or in low power. 1. Long press the power button to turn off the camera. 2. -
Page 6: Inserting The Memory Card
Inserting The Memory Card This camera is not equipped with an internal memory card. For normal operation,please prepare a micro SD card (at least class 8) first and follow below steps to insert the card. 1. Turn off the camera. 2. -
Page 7: Installing The Mounts
Installing The Mounts In order to use the camera more convenient outdoors and in the water, we provide some mounts to fix the camera. There are four kinds of mounts packaged in this camera as below. A is helmet mount, B is bike mount, C is wrist mount, D is car suction cup mount. - Page 8 By installing these mounts, the camera can fix to helmets,bikes,cars and your wrist. Please refer to below steps to install the mounts. Fix the camera to a helmet 1. Fix connector to mount A. 2. Unscrew the cap of connector , then push the orbicular end of connector into connector .
- Page 9 Fix the camera to a bike 1. Find mount B, fix it to the handlebar of a bike by placing the rubber pad, and rotating screws. 2. Fix connector to mount B. 3. Unscrew the cap of connector , then push the orbicular end of connector into .
- Page 10 Fix the camera to your wrist 1. Unscrew the screw cap of mount C, push the orbicular end of connector into mount C. Then tighten up the screw cap of mount C. 2. Unscrew the cap of connector , then push the orbicular end of connector into .
- Page 11 . 3. Connect the camera to the screw end of connector 4. Adjust the strap of mount C and wear it on your wrist or arms. Fix the camera to a car 1. Unscrew the screw cap of mount D , push the orbicular end of connector (bigger ④...
- Page 12 3. Unscrew the cap of connector , push the orbicular end of connector into . . connecto r Screw the cap of connector . 4. Connect the camera to the screw end of connector 5. Install the suction cup to the front windshield of car. ...
-
Page 13: Points For Attention
Points For Attention 1. The waterproof depth of this camera is 2 meters within 10 minutes. 2. The camera should be stored in cool environment indoors. It can not be stored in high temperature higher than 45 C and the time can not be longer than 2 hours. 3. - Page 14 Waterproof frame...
- Page 15 B. For jack/card slot cover installation. 1) Check if the waterproof frame is damaged and if there is any attachments. Clean it carefully before using under water each time. Then close the cover.(picture e)2) Check if the waterproof slicone is damaged and if there is any attachments. Clean it carefully before using under water each time.
-
Page 16: Basic Operation
Basic Operation Turning On And Off The Camera 1. Long press the Power button to turn on the camera. 2. Long press the Power button to turn off the camera. Tips: The working indicator light will keep blue after turning on the camera. System Setup 1. - Page 17 7. Press Up/Down button to scan all submenu and press OK button to confirm the option. 8. Press Mode button to switch to icon ,the screen will show “ Press OK To Exit ”.Then press the OK button to exit. System setup menu list as below: Menu Function...
- Page 18 Firmware Look up the Firmware information including the model, version and Version manufacturer. Function Setup 1. Turn on the camera. 2. Press Mode button to switch to the setting screen. 3. Press OK button to enter the function setting screen. 4.
- Page 19 Function setup menu list as below: Menu Function Set the exposure value to compensate light.Solve the problems of Exposure shooting under poor or strong light. Options:【-3】/【-2】/【-1】/【0】/【1】/【2】/【3】. Set the white balance to adapt to different light sources. Options: White 【Auto】 / 【 Sunny】 / 【 Cloudy】 / 【 Incandescent Light】 / 【 Fluorescent Balance Light】.
-
Page 20: Changing The Mode Of Camera
For saving power,the camcorder will close automatically after a pried Auto of time if not using. Shutdown Options:【Close】/【1minutes】/【3minutes】/【5minutes】. Changing The Mode Of Camera The camera has 3 different modes : video mode, capture mode and slow motion mode. Repeatedly press the Mode button to select one mode. Video Mode For recording video. - Page 21 - Press the Shutter button again to stop recording. - The camcorder will stop recording automatically once capacity of the memory card is full. Video mode menu list as below: Menu Function Set the video resolution. Video Options: 【 2448P 30FPS】 / 【 2048P 30FPS】 / 【 1440P 60FPS】 / 【 1440P Resolution 30FPS】/【1072P 60FPS】/【1072P 30FPS】.
-
Page 22: Taking Still Photos
Taking Still Photos 1.Turn on the camera,press the Mode button to switch to capture mode. 2.Start to take a still photo. - Let the lens toward to the subject. - Press the Shutter button to take a photo. Capture mode menu list as below: Menu Function Photo... -
Page 23: Making Connections
Making connections Connecting The Camera To A PC There are two ways to download files from the memory card to a computer. 1. Insert the memory card into a card reader. 2. Connect the camera to a computer through the supplied USB cable. Using a Card Reader 1. -
Page 24: Wi-Fi Connecting
the folder named "Photo".Movie Clips are stored in the folder named "Video". 3.Copy the files to the chosen directory in the computer. Wi-Fi Connecting Download and install APP in Pad or smartphone, you can operate camera remotely.The functions include shooting, setting the camera and preview photos or videos, it will be more convenient to control. -
Page 25: Windows Pc Application
Step 4: After connection is successful, the Wi-Fi indicator light will keep red.Open APP "XDV360" on the smartphone or Pad.You can take photos,record videos, playback files and set the camera parameters on phone. Step 5: Press Wi-Fi button will exit Wi-Fi. Windows PC Application ... -
Page 26: Share Pictures In Smartphone App
3. You will find a download address in this text document. Open the url and download the application. 4. Open the camera’s Wi-Fi. Search its account on computer and click link. 5. Open application “XDV360.exe”,it will show connecting. 6. Once connection is successful,the application window will show the main interface.The operation is same as smartphone APP. - Page 27 3. Find pictures in “Media”-”Phone”. (If there is no picture in phone, please download pictures from the camera to your phone first.) 4. Open a picture and click the fish-eye icon “ ” to choose one mode. 5. Then click share icon ” ”...
-
Page 28: Share Videos To Youtube And Facebook
platforms which have already been installed in your smartphone. Share Videos To Youtube And Facebook Share videos to Youtube: 1. Visit the website at https://www.youtube.com/. 2. Landing Youtube account first.Then click “upload”,drag the video you want to share to the webpage. -
Page 29: Remote Control Connection
Remote Control Connection The remote control can be connected to the camera automatically when camera is in start-up status. Note: If the camera is in Wi-Fi mode, the remote control can not be connected. Please close the Wi-Fi function before using the remote control. Capture/Recording Button Turn On/Off The Screen Button Capture/Recording Button:... -
Page 30: How To Use The Pc Camera Function
Turn On/Off The Screen Button: In working mode, press this button once, the camera screen will turn off. Press this button again, the camera screen will turn on. How To Use The PC Camera Function 1. Connect camera to a computer through USB cable. 2. -
Page 31: Specification
Specification Image Sensor Sony 8Mega pixels Digital Camera LCD display 0.96" Lattice Screen Image:16M /12M /8M /5M Resolution Video: 2448×2448 30fps (1:1); 2048×2048 30fps (1:1); 1440×1440 60fps/30fps (1:1); 1072×1072 60fps/30fps (1:1) round , square, hemisphere, inner ring , annular , Unfold Mode 2 in 1 mode, 360 panoramicmode,... - Page 32 Exposure +3.0 EV ~ -3.0 EV in 1.0EV increment PC Camera PC interface Micro USB 2.0 Microphone Built-in Speaker Built-in Storage Micro SD card, up to 64GB Dismountable Li-ion rechargeable battery 1050mAh (Battery Power source model: S007; Manufacturer: SHENZHEN KAILIANYIN TECHNOLOGY CO.,LTD) Android APK, Search "XDV-360"...
-
Page 33: Fcc Warning
Statement This device complies with part 15 of the FCC Rules. Operation is subject to the following two conditions: (1) This device may not cause harmful interference, and (2) this device must accept any interference received, including interference that may cause undesired operation. - Page 34 — Reorient or relocate the receiving antenna. — Increase the separation between the equipment and receiver. — Connect the equipment into an outlet on a circuit different from that to which the receiver is connected. — Consult the dealer or an experienced radio/TV technician for help. MODIFICATION: Any changes or modifications not expressly approved by the grantee of this device could void the user’s authority to operate the device.
Need help?
Do you have a question about the SWK 360 A1 and is the answer not in the manual?
Questions and answers