
Subscribe to Our Youtube Channel
Related Manuals for Gefen GTB-HD-1080PS-BLK


Summary of Contents for Gefen GTB-HD-1080PS-BLK
- Page 1 High Defi nition 1080p Scaler GTB-HD-1080PS GTB-HD-1080PS-BLK User Manual www.gefentoolbox.com...
- Page 2 Chatsworth, CA 91311 www.gefentoolbox.com support@gefentoolbox.com Notice Gefen, LLC reserves the right to make changes in the hard ware, packaging and any accompanying doc u men ta tion without prior written notice. HDMI, the logo, and High-Defi nition Multimedia Interface are trademarks or registered trademarks of HDMI Licensing in the United States and other countries.
- Page 3 CONTENTS Introduction Operation Notes Features Panel Layout Panel Descriptions IR Remote Control Layout / Descriptions Installing the IR Remote Control Unit IR Remote Control Unit Configuration 10 Connecting and Operating the High Defi nition 1080p Scaler Wiring Diagram 11 Menu System Video Menu Color Menu Output Menu...
-
Page 4: Introduction
Congratulations on your purchase of the GefenToolBox High Defi nition 1080p Scaler. Your complete satisfaction is very important to us. Gefen We specialize in total integration for your home theater, while also focusing on going above and beyond customer expectations to ensure you get the most from your hardware. -
Page 5: Operation Notes
OPERATION NOTES READ THESE NOTES BEFORE INSTALLING OR OPERATING THE HIGH DEFINITION 1080P SCALER • The High Defi nition 1080p Scaler will convert between digital and analog audio formats. • Compatible with all HDMI and DVI* displays. *When used with a DVI to HDMI adapter. -
Page 6: Features
FEATURES Features • Scales digital video output up to 1080p Full HD and 2K • Can be used as a down-scaler to support lower-resolution displays in multi- display distribution systems • Supports DVI-D signals via appropriate adapters • Supports standard and high bit-rate audio and up to eight channels of LPCM audio via HDMI. -
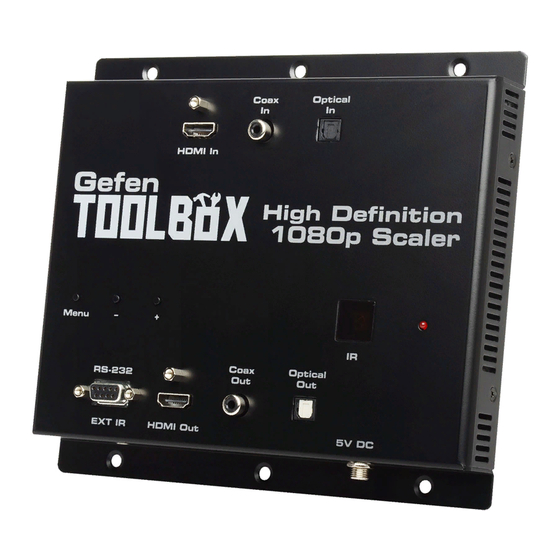
Page 7: Panel Layout
PANEL LAYOUT Top Panel Side Panel... -
Page 8: Panel Descriptions
PANEL DESCRIPTIONS Menu Navigation Buttons The Menu button is used to enable the on-screen Menu System. The [-] and [+] buttons are used to change values and navigate within the Menu System. HDMI In Connect a Hi-Def source device to this port using the included HDMI cable. Coax In Connect a digital audio source using a coax cable to this S/PDIF port. -
Page 9: Ir Remote Control Layout / Descriptions
IR REMOTE CONTROL LAYOUT / DESCRIPTIONS RMT-SR-IR Remote Control Unit Input Cycles through the available audio inputs: HDMI, Coaxial, or Optical. Output Cycles through the available output resolutions. See the Output Menu section on page 14 for the resolution table. Power Turns the unit ON or OFF (standby). -
Page 10: Ir Remote Control Descriptions
IR REMOTE CONTROL DESCRIPTIONS Left Cursor Used to navigate to the left within the on-screen Menu System. Down Cursor Used to navigate downwards in the on-screen Menu System. 10 Right Cursor Used to navigate to the right within the on-screen Menu System. 11 Up Cursor Used to navigate up within the on-screen Menu System. -
Page 11: Installing The Ir Remote Control Unit
INSTALLING THE IR REMOTE CONTROL UNIT Installing the IR Remote Control Battery Remove the battery cover on the back of the IR Remote Control unit. Insert the included battery into the open battery slot. The positive (+) side of the battery should be facing up. Replace the battery cover. -
Page 12: Ir Remote Control Unit Configuration
IR REMOTE CONTROL UNIT CONFIGURATION Setting the IR Remote Control Channel In the event that IR commands from other remote controls interfere with the supplied IR Remote Control unit, changing the IR channel on the IR Remote Control unit will fi x the problem. The IR Remote Control unit has a bank of DIP switches used for setting the IR channel. -
Page 13: Wiring Diagram
Connect the included 5 V DC locking power supply to the locking power connector on the Scaler then connect the AC power cord to an available electrical outlet. Wiring Diagram for the GefenToolBox High Defi nition 1080p Scaler Gefen DIGITAL AUDIO TOSLINK CABLE or DIGITAL AUDIO S/PDIF CABLE RS-232 CABLE... -
Page 14: Menu System
MENU SYSTEM Video Menu To access the Video Menu, press the Menu button. Use the + or - buttons to highlight the Video Menu icon. Press the Menu button to enter the Video Menu. Use the + or - buttons to scroll through each of the parameters. Press the Menu button to change the selected parameter. - Page 15 MENU SYSTEM Scale Sets the scaling adjustment. Options are: Full, Overscan, Underscan, Letterbox U.S. (Underscan), PanScan U.S. (Underscan), Letterbox Full, and PanScan Full. Full Stretches the image to fi ll the screen Overscan Stretches the image to fullscreen and just beyond the border of the display Underscan Stretches the image to fullscreen and just within the border of the screen Letterbox U.S.
-
Page 16: Color Menu
MENU SYSTEM Color Menu To access the Color Menu, press the Menu button. Use the + or - buttons to highlight the Color Menu icon. Press the Menu button to enter the Color Menu. Use the + or - buttons to scroll through each of the parameters. Press the Menu button to change the selected parameter. -
Page 17: Output Menu
MENU SYSTEM Output Menu To access the Output Menu, press the Menu button. Use the + or - buttons to highlight the Output Menu icon. Press the Menu button to enter the Output Menu. Use the + or - buttons to select the desired output resolution. Press the Enter button to enable the selected output resolution. -
Page 18: Osd Menu
MENU SYSTEM OSD Menu To access the OSD Menu, press the Menu button. Use the + or - buttons to highlight the OSD Menu icon. Press the Menu button to enter the OSD Menu. Use the + or - buttons to scroll through each of the parameters. Press the Menu button to change the selected parameter. -
Page 19: Audio Menu
MENU SYSTEM Audio Menu To access the Audio Menu, press the Menu button. Use the + or - buttons to highlight the Audio Menu icon. Press the Menu button to enter the Audio Menu. Use the + or - buttons to scroll through each of the parameters. Press the Menu button to change the selected parameter. -
Page 20: Rs-232 Serial Control Interface
RS-232 SERIAL CONTROL INTERFACE 5 4 3 2 1 1 2 3 4 5 9 8 7 6 6 7 8 9 Only Pins 2 (RX), 3 (TX), and 5 (Ground) are used on the RS-232 serial interface RS232 Settings Bits per second .................... - Page 21 RS-232 SERIAL CONTROL COMMANDS Command Code Response Description OUT 1080P60 OUT 1080P60 1080P60 RESOLUTION OUTPUT OUT 576I OUT 576I 576I RESOLUTION OUTPUT OUT 576P OUT 576P 576P RESOLUTION OUTPUT OUT 720P50 OUT 720P50 720P50 RESOLUTION OUTPUT OUT 1080I50 OUT 1080I50 1080I50 RESOLUTION OUTPUT OUT 1080P50 OUT 1080P50...
- Page 22 RS-232 SERIAL CONTROL COMMANDS Command Code Response Description CLRTMP USER COLORTEMP USER SET COLORTEMP TO USER RED [1 - 100] RED [1 - 100] ADJUST RED COLOR COMPONENT GRN [1 - 100] GREEN [1 - 100] ADJUST GREEN COLOR COMPONENT BLU [1 - 100] BLUE [1 - 100] ADJUST BLUE COLOR COMPONENT...
- Page 23 RS-232 SERIAL CONTROL COMMANDS Command Code Response Description OSDVPOS? OSDVPOS [VALUE] RETURNS OSD VERTICAL POSITION OSDTMOUT? OSDTMOUT [VALUE] RETURNS OSD TIMEOUT VALUE IN SECONDS OSDBKGRND? OSDBKRND [VALUE] RETURNS OSD TRANSPARENCY VALUE HELP? [COMMANDS] LISTS ALL COMMANDS IRC [CHANNEL] RETURNS THE IR CHANNEL STAT? STAT [VALUE] RETURNS THE STATUS...
-
Page 24: Main Menu System Summary
MAIN MENU SYSTEM SUMMARY (Exit Menu) Video Color Output Audio Information Menu... -
Page 25: Video Menu System Summary
VIDEO MENU SYSTEM SUMMARY Video Menu Picture Mode Standard Menu Movie Vivid User Contrast Menu Min: 1 Max: 100 Menu Brightness Menu Min: 1 Max: 100 Menu... - Page 26 VIDEO MENU SYSTEM SUMMARY Menu Min: 1 Max: 100 Menu Saturation Menu Min: 1 Max: 100 Menu Sharpness Menu Min: 1 Max: 100 Menu...
- Page 27 VIDEO MENU SYSTEM SUMMARY Scale Full Menu Overscan Underscan Letterbox US PanScan US Letterbox Full PanScan Full Menu Menu Exit Menu...
-
Page 28: Color Menu System Summary
COLOR MENU SYSTEM SUMMARY Color Menu Color Tone Normal Menu Warm Cool User Menu Min: 1 Max: 100 Menu Green Menu Min: 1 Max: 100 Menu... - Page 29 COLOR MENU SYSTEM SUMMARY Blue Menu Min: 1 Max: 100 Menu Exit Menu...
-
Page 30: Output Menu System Summary
OUTPUT MENU SYSTEM SUMMARY Output Menu SVGA 576p SXGA 720p50 UXGA 1080i50 1080p50 1080p-1 1080p-3 480i NATIVE 480p WXGA 720p60 WSXGA 1080i60 WUXGA 1080p60 1080p-2 EXIT 576i Menu... -
Page 31: Osd Menu System Summary
OSD MENU SYSTEM SUMMARY Menu H-Position Menu Min: 1 Max: 100 V-Position Menu Min: 1 Max: 100 Menu TimeOut Menu Min: 5 Max: 100 Menu... - Page 32 OSD MENU SYSTEM SUMMARY Background Menu Min: 0 Max: 8 Remote Channel Menu Min: 0 Max: 3 Menu Exit Menu...
-
Page 33: Audio Menu System Summary
AUDIO MENU SYSTEM SUMMARY Audio Menu Source HDMI Menu Coaxial Optical Sound Menu Mute Exit Menu... -
Page 34: Information Menu System Summary
INFORMATION MENU SYSTEM SUMMARY Information Source [Audio Source] [Color Space] Input [Input Resolution] Output [Output Resolution] Version [Software Version] Menu... -
Page 35: Specifications
SPECIFICATIONS Maximum Pixel Clock................225 MHz Input DDC Signal................5 V p-p (TTL) Input Video Signal..................1.2 V p-p HDMI Input...............(1) Type A 19-pin, female HDMI Output..............(1) Type A 19-pin, female Audio Input...............(1) TOSLINK, (1) S/PDIF Audio Output..............(1) TOSLINK, (1) S/PDIF RS-232 Serial Port................DB-9, female IR Extender................3.5 mm mini-stereo jack Power Supply.................5 V DC, Locking Dimensions..................8”... -
Page 36: Specifi Cations
Gefen warrants the equipment it manufactures to be free from defects in material and workmanship. If equipment fails because of such defects and Gefen is notifi ed within two (2) years from the date of shipment, Gefen will, at its option, repair or replace the equipment, provided that the equipment has not been subjected to mechanical, electrical, or other abuse or modifi... - Page 37 Rev A1 20600 Nordhoff St., Chatsworth CA 91311 1-800-545-6900 818-772-9100 fax: 818-772-9120 www.gefentoolbox.com support@gefentoolbox.com This product uses UL listed power supplies.
Need help?
Do you have a question about the GTB-HD-1080PS-BLK and is the answer not in the manual?
Questions and answers