Advertisement
Quick Links
Download this manual
See also:
User Manual
Advertisement

Related Manuals for Amprobe TMA-21HW


Summary of Contents for Amprobe TMA-21HW
- Page 1 TMA-21HW Hot-Wire Anemometer Users Manual • Mode d’emploi • Bedienungshandbuch • Manual d’Uso • Manual de uso GlobalTestSupply www. .com nd Quality Products Online at: sales@GlobalTestSupply.co...
- Page 2 TMA-21HW Hot-Wire Anemometer Users Manual June 2010, Rev.1 ©2010 Amprobe Test Tools. All rights reserved. Printed in Taiwan GlobalTestSupply www. .com nd Quality Products Online at: sales@GlobalTestSupply.co...
- Page 3 “Where to Buy” section on www.amprobe.com for a list of distributors near you. Additionally, in the United States and Canada In-Warranty repair and replacement units can also be sent to a Amprobe® Test Tools Service Center (see next page for address). Non-Warranty Repairs and Replacement – US and Canada Non-warranty repairs in the United States and Canada should be sent to a Amprobe®...
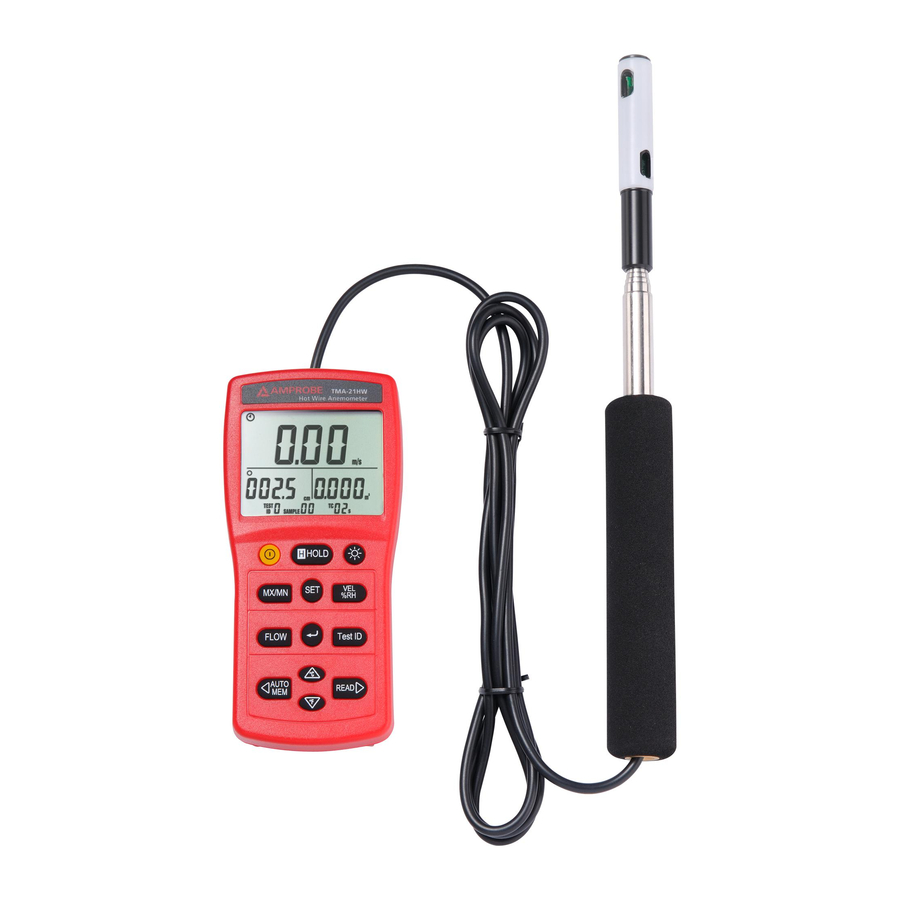
- Page 4 TMA-21HW Hot-Wire Anemometer Air velocity sensor. Temperature and RH sensor. Telescoping probe. Display. Power key : Push power key to turn the meter on or off. H Hold key : Push H Hold key to freeze or unfreeze the display reading.
- Page 5 key : Push key to turn on and off the backlight. MX/MN key : Push “MX/MN” key to circulate the reading of Maximum, Minimum, Average and Current record mode. Push “MX/MN” key for 2 seconds to exit this mode. SET key : Push “SET” key to enter setting mode. •...
- Page 6 It is based upon charts available from the U.S. National Weather Service. The Heat Index represents how an average person feels relative to climate conditions. For a given temperature, the higher the humidity, the higher the heat index will be. The Heat Index is defined over a temperature range of 70°F to 120°F (21°C to 49°C) and a relative humidity range of 30% to 99%.
- Page 7 • In the setting mode, push this key move flashing cursor to left. • In the TEST ID 0 to 4 mode, push this key one time store the one data to memory. • In the TEST ID number 5 to 9 mode, push this key to start auto data memory mode, push this key again to exit this mode.
- Page 8 Description of Display AIR VELOCITY & HUMIDITY DISPLAY TEMPERATURE & AIR FLOW FLOW SET UP DISPLAY DISPLAY MEMORY DISPLAY Air Velocity Display : : Auto power off indication. H : Data hold indication. SET : Setting mode indication. REC : Record mode and current air velocity measured display indication. REC MAX : Maximum air velocity measured display indication.
- Page 9 km/hr : Kilometers per hour ft/min : Feet per minute Bft : Beaufort scale m/s : Meters per second Temperature & Flow Set Up Display : : Round Duct diameter dimension indication. X : Rectangle Duct X dimension indication. Y : Rectangle Duct Y dimension indication. D.H : Day –...
- Page 10 AVG : Average mode is selected indication. : Current mode is selected indication. WET : Wet bulb temperature indication. WCT : Wind chill temperature indication. HD : Humidex temperature indication. x 10 : Multiply reading by ten. x 100 : Multiply reading by one hundred. x 1000 : Multiply reading by one thousand.
- Page 11 CONTENTS SYMBOLS .......................1 UNPACKING AND INSPECTION ................1 INTRODUCTION .....................2 Applications .......................2 Feature .......................2 OPERATION ......................3 Getting Started ....................3 Settings and Calibrations ..................3 Air Velocity Measurement ................8 Air Flow Measurement ..................8 Humidity and Temperature Measurement ............9 MAX/MIN/AVG Recording Measurement ............9 Manual Data Memory and Read Mode ............9 Manual Data Memory and Read Mode ............10 Air Flow Auto Data Memory and Read Mode ..........10 Clearing Memory ....................11...
- Page 12 UNPACKING AND INSPECTION Your shipping carton should include: 1 TMA-21HW Hot-Wire Anemometer 1 Users Manual 6 AAA batteries 1 Carrying case If any of the items are damaged or missing, return the complete package to the place of purchase for an exchange.
- Page 13 INTRODUCTION The TMA-21HV Portable Air Velocity Meter is a lightweight versatile instrument that can be used anywhere to measure air velocity, temperature, and relative humidity. It can also calculate the volumetric flow rate, dew point temperature, wet bulb temperature, wind chill temperature, humidex temperature and Heat index temperature.
-
Page 14: Getting Started
• Telescoping probe. • Simple and safe to use. • U.S. Pat. No. Des. 446,135 OPERATION Getting Started 1. Installing the Batteries Insert (6) AAA batteries as indicated by the diagram located on the inside of the battery compartment. 2. Extending the Probe To extend the probe, hold the handle in one hand while pulling on the probe tip with the other hand. - Page 15 • Push “SET” key several times until the “ SET ” symbol is disappeared to exit the setting mode. Flow Set Up mode • Push key to turn on the meter. • Push “UNIT” key to select the desired measurement unit. •...
- Page 16 Real – Time Setting mode • Push key to turn on the meter. • Push “SET” key three times to enter this mode, the “ SET ” and D-H, m:s symbol are displayed. • Push key three times move to the two flicking digits to day. •...
- Page 17 • Push “” and “” keys to scroll through the log interval choices. The choice are : 1, 2, 3, 4, 5, 6, 7, 8, 9, 10, 15, 20, 25 and 30 seconds, and 1, 2, 3, 4, 5, 6, 7, 8, 9, 10, 15, 20, 25, 30 and 60 minutes. Push “↵” key to store the choice.
- Page 18 Calibration mode • Push “SET” key six times to enter this mode, the “USEr CAL no” symbol is displayed. • Push “” and “” keys to select “ ” symbol is displayed. • Push “↵” key to enter the temperature calibration mode, the current temperature reading and the current temperature scale factor value are displayed.
- Page 19 • Push “” or “” key to select “ ” or “ ”, if select “ ” then push “↵” key will reset to factory default calibration value and exit setting mode. Air Velocity Measurement • Push key to turn on the meter. •...
- Page 20 • The display will show the air velocity reading on the air velocity display. • Push “VEL %RH” key to circulate the display of the following reading : Relative Humidity measurement value (%RH), Temperature measurement value (°C, °F), Wet bulb temperature calculated value (WET), Dew point temperature calculated value (DEW), Wind chill temperature calculated value (WCT), Heat index temperature calculated value (HI),...
- Page 21 Manual Data Memory and Read Mode TEST ID 1 ~ 4 Memory Mode : • Push “Test ID” key to select the “TEST ID 1” memory. • Push “AUTO MEM” key each time, one set of reading to will be stored to the memory.
-
Page 22: General Specifications
air velocity and air flow reading and the memory address number, the minimum (MIN) air velocity and air flow reading and the memory address number, and the average (AVG) air velocity and air flow reading and the total average samples. •... - Page 23 Accuracy : ±0.5°C (±0.9°F) Resolution : 0.1°C (0.1°F) Relative Humidity : Ranges : 10 to 95%RH Accuracy : ±3%RH (at 25°C, 30 to 95%RH) ±5%RH (at 25°C, 10 to 30%RH) Resolution : 0.1%RH Wet Bulb Temperature : Ranges : 5 to 60°C (40 to 140°F) Resolution : 0.1°C (0.1°F) Dew Point Temperature : Ranges : -15 to 49°C (5 to 120°F)
- Page 24 Power Supply : 6 pcs 1.5V size AAA batteries. Battery Life : Approx. 10 hours. Probe Dimensions / Weight : Wire length : 2.2 meter (7.2 ft) Probe length : 1.2 meter (3.9 ft) Probe diameter of tip : 15.0 mm (0.59 in.) Probe diameter of base : 28.0 mm (1.1 in.) Probe weight : 165 g (0.36 lbs) Meter Weight / Dimensions :...
-
Page 25: Trouble Shooting
Except for the replacement of the battery, repair of the meter should be performed only by a Factory Authorized Service Center or by other qualified instrument service personnel. The front panel and case can be cleaned with a mild solution of detergent and water. Apply sparingly with a soft cloth and allow to dry completely before using. - Page 26 GlobalTestSupply www. .com nd Quality Products Online at: sales@GlobalTestSupply.co...
Need help?
Do you have a question about the TMA-21HW and is the answer not in the manual?
Questions and answers