SATO MB200 Quick Manual
Hide thumbs
Also See for MB200:
- Operator's manual (52 pages) ,
- User manual (49 pages) ,
- Quick manual (10 pages)
Table of Contents
Advertisement
Quick Links
Advertisement
Table of Contents

Related Manuals for SATO MB200


Summary of Contents for SATO MB200
- Page 1 Barcode Printer MB200 MB200 Quick Guide SATO#MB200#E#Hyo_1.p65 02.5.17, 2:50 PM...
- Page 2 -Increase the separation between the equipment and receiver. -Connect the equipment into an outlet on a circuit different from that to whcih the receiver is connected. -Consult the dealer or an experienced radio/TV technician for help. SATO#MB200##E.p65 02.5.17, 2:23 PM...
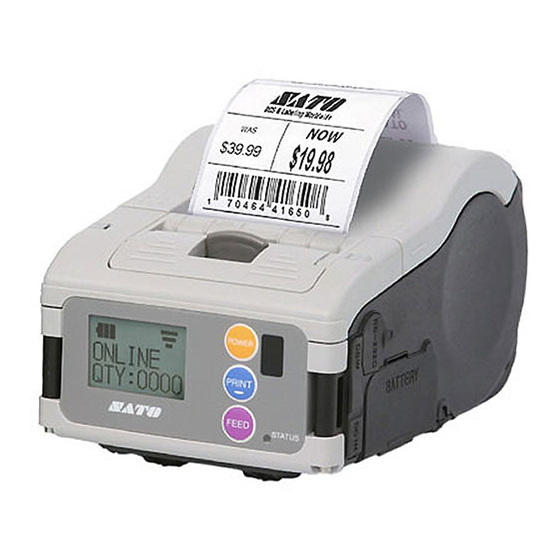
- Page 3 Features of the MB200 With compact and lightweight body combined with high performances, this printer prints barcodes clearly on various types of thermal paper. ÐExcellent Printing Performance Not only does this printer print barcodes clearly, but it can also enlarge and print various types of fonts and Kanji characters in a free layout.
- Page 4 3. Parts Name ..........15 Name and Function of Operating Parts .. 17 4. Before Starting ........... 18 Charging the Battery Pack ...... 18 Installing and removing the Battery Pack .. 20 Setting Labels ......... 22 SATO#MB200##E.p65 02.5.17, 2:23 PM...
-
Page 5: Safety Precautions
This symbol indicates information that, if ignored or applied incorrectly, creates the Warning danger of death or serious personal injury. This symbol indicates information that, if ignored or applied incorrectly, creates the Caution possibility of personal injury or property damage. SATO#MB200##E.p65 02.5.17, 2:23 PM... - Page 6 A black circle ( ) indicates something you need to do. The symbol on the left indicates you should unplug the unit from the wall outlet. SATO#MB200##E.p65 02.5.17, 2:23 PM...
- Page 7 Dropping and Damage Should the printer ever fall or otherwise become damaged, immediately turn off the power and contact your nearest dealer or service center. Continued use creates the danger of fire or electrical shock. SATO#MB200##E.p65 02.5.17, 2:23 PM...
- Page 8 • Never expose the battery to direct flame, throw it into fire, or take any actions that may lead to shorting. • When charging the battery pack, make sure to use the specified battery charger. SATO#MB200##E.p65 02.5.17, 2:23 PM...
- Page 9 Continued use of such a cord creates the danger of fire or electrical shock. • Never modify, excessively bend, twist, or pull the power cord. Doing so creates the danger of fire or electrical shock. SATO#MB200##E.p65 02.5.17, 2:23 PM...
- Page 10 Supply marked"LPS"or UL1950 Power Supply marked "LPS"and rated 7.2V to 9.0Vdc,3000mA;and B.CB certified AC adapter,Model SA130A-0930U-S rated 8.4Vdc or 9.0Vdc,or an alternate CB certified AC Adapter which will be added in the CB certification of the product. SATO#MB200##E.p65 02.5.17, 2:23 PM...
- Page 11 • Do not try to replace the thermal head by yourself. Doing so creates the danger of injury, burns or electric shock. Easy Cutter This part contains a blade. Take care to avoid cutting your hands. SATO#MB200##E.p65 02.5.17, 2:23 PM...
- Page 12 AC adapter from the wall outlet if you do not plan to use the printer for a long time. Maintenance and Cleaning • For safety during maintenance and cleaning, make sure to remove the battery pack and the AC adapter from the printer. SATO#MB200##E.p65 02.5.17, 2:23 PM...
-
Page 13: Precautions In Use
RF field in excess of Health Canada limits for the general population;consult Safety Code 6,obtainable from Health Canada's website www.hc-sc.gc.ca/rpb" CE Caution: Hereby,SATO CORPORATION,declares that this MB200 is in compliance with the essential requirements and other relevant 0560 provisions of Directive 1999/5/EC. -
Page 14: Unpacking
2. Unpacking After opening the box, make sure that all the printer’s accessories are included. If there are any accessories missing, contact your nearest dealer or service center. Quick Guide Printer Battery pack SATO#MB200##E.p65 02.5.17, 2:23 PM... -
Page 15: Parts Name
3. Parts Name Easy cutter Open cover Label ejection Dispenser unit Cover Open/ Close lever Dispense / Continuous switch lever Power switch Protection case Interface cover Interface connector (RS-232C) Belt hook DC input jack cap DC input jack SATO#MB200##E.p65 02.5.17, 2:23 PM... - Page 16 Label guide (Left) Label width scale Label guide (Right) Status indicator (LED) Print key Feed key Battery cover IrDA filter IrDA angle lever SATO#MB200##E.p65 02.5.17, 2:23 PM...
-
Page 17: Name And Function Of Operating Parts
For setting the printer to online or Power switch: offline. Used for turning the power on Status indicator (LED) and off. For displaying the status of the Battery cover: printer. The battery pack is inserted here. SATO#MB200##E.p65 02.5.17, 2:23 PM... -
Page 18: Before Starting
(Fully charged). 3 Remove the battery pack from the charger after it has finished charging. Slide the battery pack from the charger in the opposite direction to when placed on the charger. SATO#MB200##E.p65 02.5.17, 2:23 PM... - Page 19 When attaching the battery pack on the charger once and then removing it, a green black box (I) will appear on the back of the pack. By looking at the confirmation mark, you can check if the battery is charged or not. SATO#MB200##E.p65 02.5.17, 2:23 PM...
-
Page 20: Installing And Removing The Battery Pack
2 After releasing the battery cover lock, open the battery cover in the direction of the arrow. 3 Insert the battery pack. After that, take the above procedure in reverse order to close the battery cover. SATO#MB200##E.p65 02.5.17, 2:23 PM... - Page 21 * If, after turning the power off, you remove the battery pack while the status indicator is lit in green, the information stored in the printer may not be updated. SATO#MB200##E.p65 02.5.17, 2:23 PM...
-
Page 22: Setting Labels
* Slide the Open/Close lever until the L mark on the lever is covered. Cover Open/ Close lever 2 When the open cover pops open, fully open the cover in the direction of the arrow. SATO#MB200##E.p65 02.5.17, 2:23 PM... - Page 23 Label guide (Left) 5 Place your fingers on the open cover ribbed area and close the open cover. Label set position This completes the setting of labels when using the Continuous mode. SATO#MB200##E.p65 02.5.17, 2:23 PM...
- Page 24 Q 0 0 3 1 9 0 0 2 SATO#MB200#E#Hyo_4.p65 02.5.17, 2:51 PM...
Need help?
Do you have a question about the MB200 and is the answer not in the manual?
Questions and answers