Advertisement
Table of Contents
Advertisement
Table of Contents

Related Manuals for INOKIM LIGHT 2 Super


Summary of Contents for INOKIM LIGHT 2 Super
- Page 1 USER GUIDE MANUAL MODEL : LIGHT...
- Page 2 We now present the LIGHT 2, which has all the advantages of the INOKIM LIGHT model, plus extra features to make your life easier and safer when you go about your daily tasks.
- Page 3 Table of Contents: Warnings & General information ..………..…....……...…...2-3 LIGHT Features ..………..….………………………….….….……5 LIGHT Main Parts .................6-7 Serial Number ……………………….……..……………….………………...8 Technical Parameters ....…………..……...…..…....….9 Opening & Folding ....…..…………..……...…..…..….10-15 Operation ..……………………………………………………………..…16 Charging & Battery ...……………………………………….….…..………17 Throttle ....................18-21 Safety and Tire Pressure ..………...…………………….………..…..22 Driving Technique .....…….…..…………...……..…....23-24 LIGHT Maintenance ................25 Folding mechanism adjustment ............28-29...
-
Page 4: Warnings & General Information
This Manual was written to help you understand the proper use and maintenance of INOKIM LIGHT electric scooter. It is important for you to understand your new INOKIM; its features and performance, so that you will enjoy the most from your first and every ride. -
Page 5: Warnings & General Information
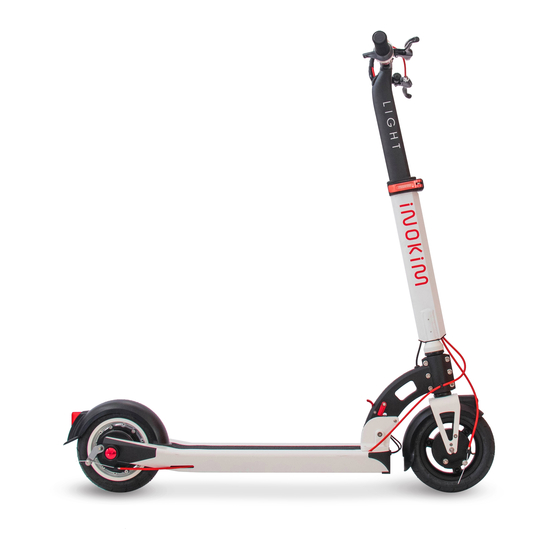
Always follow the local laws and regulations. • Never ride your scooter in conditions of poor visibility. • Do not do stunts, wheelies or jumps. They will increase your • chances of injury and damage your INOKIM. Do not carry passengers. •... - Page 6 LIGHT APPEARANCE...
- Page 7 LIGHT FEATURES MULTI-FUNCTIONAL LCD DISPLAY / THROTLE BATTERY INDICATOR EVA GRIPS MAIN FOLDING FOLDING T-BAR MECHANISM REAR DISC BRAKE LEVER SAFETY LOCK QUICK RELEASE WITH SAFETY LOCK POSITION SELF LOCKING RELEASE PEDAL LI-ION BATTERY ALUMINUM DECK FRONT DRUM BRAKES ANTI SKID GRIP MUDGUARD FRONT LIGHT REAR LIGHT...
- Page 8 LIGHT MAIN PARTS QUICK FOLDING MECHANISM MAINTENANCE PLASTIC COVER SELF LOCKING / RELEASE BUTTON SPEED CONTROL THROTTLE WITH LCD DISPLAY AND FUNCTIONS BATTERY CHARGER CONNECTOR QUICK RELEASE...
- Page 9 LIGHT NEW FEATURES FRONT DRUM BRAKE REAR BUILT IN LIGHT INOKIM KICKSTAND...
-
Page 10: Serial Number
Write down the serial number of your LIGHT scooter. Keep this information separately and in a safe place. Each INOKIM has a unique serial number. These numbers can provide information that may be useful later on for insurance claims and in case of loss or theft. -
Page 11: Technical Parameters
TECHNICAL PARAMETERS LIGHT 2 Super Model Battery 36V 10.4 AH Charging time 5 hours Tire Size 8.5 inch pneumatic tires 36V 300W brushless gearless motor , max output torque 15N.M, Electric Motor efficiency 84% Weight 13.7KG | 30.2lb Material Aluminium T6061... - Page 12 OPENING LIGHT Press down the Pedal using your hand Self Locking Pedal Pull up and push out the steering rod until you hear the click of the locking mechanism...
- Page 13 OPENING LIGHT Unfold handlebars and lock them with the side rings See tightening direction Open the quick release and slide the steering rod up to its locking position Make sure the safety latch is inserted into its place...
- Page 14 OPENING LIGHT The last step is to ensure SAFETY LOCK is securing the FOLDING MECHANISM SAFETY lock positions...
- Page 15 OPENING LIGHT Parking position Folding mechanism at Kickstand position...
- Page 16 FOLDING LIGHT To fold INOKIM LIGHT, depress the safety lock first Push the steering bar firmly forward while at the same time using your foot to push pedal down to release the folding mechanism Push pedal down using your foot...
- Page 17 FOLDING LIGHT Folding the LIGHT Scooter is as simple as Opening it. (see page 10) Parking position Folded...
-
Page 18: Operation
BATTERY: Do not operate the scooter while charging! • Do not store the INOKIM for long periods of time with a fully charged • battery. If scooter is not in use for more than one month, keep it under half way charged. -
Page 19: Charging & Battery
OPERATION CHARGING AND BATTERY: Your INOKIM scooter has an external charger. Connect the charging cable to INOKIM's charging socket on top of foot-board, on the left front side. Then connect the chargers electric cable to an electrical outlet. Charging Light Red - Battery is charging. -
Page 20: Throttle
THROTTLE OPERATION LCD DISPLAY THROTTLE FUNCTIONS • travel speed • cruise control • distance • battery status • speed mode • total trip • background light • automatic power-off • ODO THROTTLE BUTTONS INTRODUCTION Button ON/OFF button Button ACCELERATE thumb button... - Page 21 THROTTLE OPERATION THROTTLE POWER ON Press to power the scooter on. THROTTLE POWER OFF Press for three seconds to shut down the system. AUTO POWER OFF After five minutes of non using any function, the scooter will automatically shut down. DRIVE / SPEED CONTROL Start twisting the thumb throttle with your thumb for accelerating.
- Page 22 THROTTLE OPERATION SPEED MODE When power is on SPEED The default display is mode (appear at top right). You may change it using the buttons. Speed mode: this function is to limit the maximum speed of the scooter, either for a beginner user or for more accurate riding in a crowded surrounding: •...
-
Page 23: Throttle
THROTTLE OPERATION DISPLAY MODES • CRUISE CONTROL (third mode) The default setting is Cruise Control off (letter "n" for No Cruise Control to indicate). Press or choose enable Cruise Control to indicate Yes Cruise Control). (Letter "Y" Long touch to save setting. Short touch to enter first mode. - Page 24 Tires and wheels: check the tires for signs of wear. To do this- spin them to make sure that they are not yet in need of replacing. Make sure that the wheels are freely rotating from the brakes. If not, take your INOKIM to the authorized distributor.
-
Page 25: Driving Technique
It will help you gain more stability. NOTICE Riding, like most sports, involves risks of injury and damage. By choosing to ride INOKIM the responsibility and all inherent risk is on you. It is crucial that you know, understand and act according to safety rules. -
Page 26: Driving Technique
DRIVING TECHNIQUE DRIVING TECHNIQUE: Turns - The turns on INOKIM are done as on surf/ski/snowboard. The handlebar should be in parallel to the body. Before turning look at the approaching direction and make sure turning is safe. Braking - Tilt your weight backwards so that the brake action will come through the feet and not through the handlebar and steering system. - Page 27 I N OK IM LIG HT MA I N TEN AN CE...
- Page 28 INOKIM LIGHT MAINTENANCE REQUIRED TOOLS Allen keys set 19 mm ring key Professional spoons Tire Pump...
- Page 29 NOTICE INOKIM was assembled by professional people. Any attempt to independently fix or change INOKIM or parts of it in any way, will cause damage to the INOKIM “LIGHT” E-Scooter, and will cancel the manufacturer warranty given upon delivery.
-
Page 30: Folding Mechanism Adjustment
FOLDING MECHANISM ADJUSTMENT For more rigid feel: Use Allen Key number 2.5 to release tension on both sides of M4 screws as shown on Figure 1. Then use Allen Key number 2 and gently tighten both screws as shown on Figure 2. Test the function and only then, tighten back both sides of M4 screws (Figure 3) For easier folding:... -
Page 31: Folding Mechanism Adjustment
FOLDING MECHANISM ADJUSTMENT Figure 1 Use Allen key to release outer screw on both sides Figure 2 Slightly tight or release screws in order to get a rigid or easy action Figure 3 Use Allen key to tight outer screw on both sides... - Page 32 INOKIM LIGHT MAINTENANCE To get access to the rear wheel, motor and connectors, Use a coin and unscrew the special locker lid, then remove rear plastic covers.
- Page 33 INOKIM LIGHT MAINTENANCE Replacing inner tube front wheel: Drum brake rim can be easily disassembled into two halves. See picture below. Tire Rim half Inner tube Rim half Screws Replacing inner tube Rear Motor: Rear motor rim also can be easily disassembled into two halves.
- Page 34 A word from the designer Congratulations on your new INOKIM Light. When I started the design of the MYWAY and INOKIM brand, I envisioned a world where the car would be a secondary vehicle and such lightweight PEVs will be elevated to become a primary vehicle for daily commuters.
- Page 36 OPERATION & MANAGEMENT NINGBO MYWAY INTELLIGENT TECHNOLOGY CO.,LTD. 17# PUTUOSHAN ROAD, BEILUN, NINGBO, ZHEJIANG PROVINCE, CHINA 315806 WWW.INOKIM.COM | INOKIM@MYWAYI.CN...
Need help?
Do you have a question about the LIGHT 2 Super and is the answer not in the manual?
Questions and answers