
Related Manuals for Holy Stone F181W


Summary of Contents for Holy Stone F181W
- Page 1 F181W Instructions for use usa@holystone.com (America) +1(855) 888-6699 ca@holystone.com (Canada) eu@holystone.com (Europe) jp@holystone.com (Japan)
- Page 2 Contents 1. Preface ................1 2. Warnings ............... 3. Parts of the Drone ............4. Drone Assembling ............5. Transmitter Functions ............ 6. Setting up the Transmitter ..........7. Charging the Battery ............8. Assemble the Camera ............ 9. Mode 2 ................10.
-
Page 3: Preface
3. Use and maintain the product according to the instructions for use a. Operate this device legally in accordance with instructions provided and with local laws and regulations. b. Always use original parts made by Holy Stone for maintenance and repair. 4. Do not operate the device alone. -
Page 4: Warnings
Pay attentation to the device at all times while in flight. 4. Neither Holy Stone nor any distributors or agents accept any responsibility for loss, injury or damage caused by incorrect operation of the drone. -
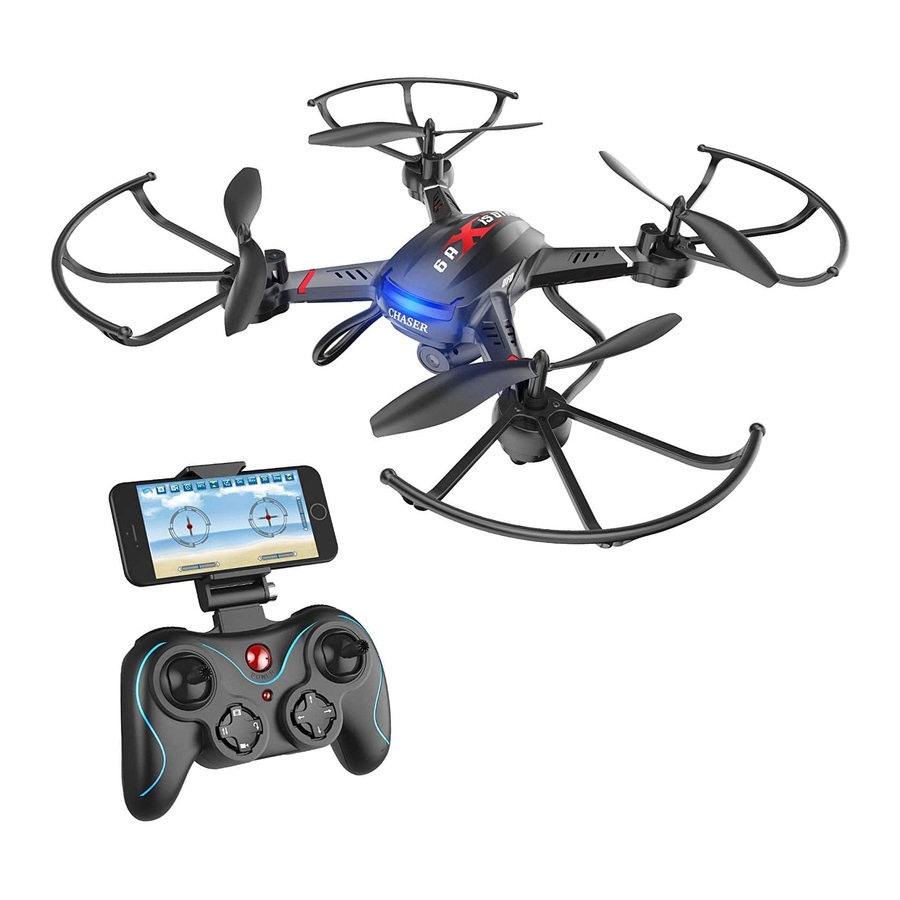
Page 5: Parts Of The Drone
Parts of the Drone Propeller Guard Propeller Landing Gear Lightweight Frame Clockwise Motor Counterclockwise Motor (Red and Blue Wire) (Black and White Wire) Please Note: letter is printed on each propeller; Make sure all propellers are assembled in correct orientation according to the image above. Drone Assembling 1. -
Page 6: Transmitter Functions
Transmitter Functions Smart Phone Holder Power Indicator Power On/Off Flip Mode: When pressed, the Power Indicator on the transmitter will beep continuously. Fly the drone at least 3 meters above the ground, then, push the right control lever to any direction and release. -
Page 7: Setting Up The Transmitter
Engine Start/ Stop: Press this button to start the motors and get ready for take off. When flying, press this button to land. Take Photo: Press this button to take photos. The camera will take a photo every time you press this button. -
Page 8: Charging The Battery
2. This model uses Wi-Fi and HD camera to display real-time images on smartphone. To do this, you need a smartphone with Android or iOS system and the correct APP installed. Charging the battery Insert the USB charging cable (including in the box) into the USB port (5V/0.5-1A). The red indicator light will turn on. -
Page 9: Mode
Transmitter Operation Mode In order to meet the needs and preferences of any pilot, this drone offers two modes of controlling the device that have been defined by industry standards. 1. Power on the transmitter, Left hand throttle MODE 2 will be default setting. (Recoomended Mode!) Left Stick Right Stick... -
Page 10: Mode
2 . To enter MODE 1, turn on the transmitter while holding the upleft button. (Please do not release the upleft button until the transmitter is powered on) Right Stick Left Stick (Direction: Forward/ (Throttle: Ascending/Descending) Backward) (MODE 1) Left Stick Right Stick (Rotate to Left/Right) (Direction: Leftleaning/Rightleaning) -
Page 11: Flying The Drone
Flying the Drone All of the following operations on this manual are taking mode 2 for example. 1. Preparing: a. Fly the drone in a spacious indoors area, or an outdoors area free of obstacles, rain, snow, animals, and people. When flying outdoors, please choose a windless environment. b. -
Page 12: Flip Mode
Important Tips: The range of the communication between the drone and the transmitter is about 100 meters, and the range of Wi-Fi siginal is about 30~50 meters. The range was measured on a wide open field and a windless sunny day, no Wi-Fi signal or radio signal interference. If the drone goes beyond the range of the transmitter or phone, it will attempt to out of control or drop from sky by itself. - Page 13 Tips:(Important!) 1. When pairing the transmitter to the drone, make sure the head of the drone is facing forward, and the tail of the drone is facing towards the pilot (and the transmitter) as seen in the diagram below. 2. When flying in Headless Mode/ One Key Return, the pilot should not move around. This is because the drone will fly relative to the point where it was paired( to the transmitter), not relative to where the transmitter is.
- Page 14 APP Functions Power on the drone. On your phone, go into settings, Wi-Fi, then connect to “HolyStone FPV ”, which corresponds to the camera Wi-Fi connection. When successfully connected, exit settings and open the APP “Deerc FPV”, press the “PLAY” icon to enter the control interface to see real-time images from the drone.
- Page 15 4. The use is shown as below. In the Video folder, you can slide leftward the selected file to save or delete it. iOS Interface iOS Interface APP Control The drone can be controlled with the APP without using a transmitter. Hold the mobile phone horizontally when using the Gravity Sensor Mode.
-
Page 16: Parts Name
Parts Name 1. Upper Cover 2. Lower Cover 3. CW Propellers 4. CCW Propellers 5. CW Motors 6. CCW Motor 7. Battery 8. USB Charging (Red and Blue wire) (White and Black wire) Cable 9. TF Card and 10. Gear Assembly 12. - Page 17 Problems Reasons Solutions 1. Check the propeller order. 1. Propellers not installed in the correct 2. Replace propellers with new ones. positions. 3. Reset the gyro. Press trim buttons to 2. Damaged propellers. The drone doesn’t fly properly fine tune the direction. 3.
- Page 18 FCC Information This device complies with Part 15 of the FCC Rules. Operation is subject to the following two conditions: (1) This device may not cause harmful interference. (2) This device must accept any interference received, including interference that may cause undesired operation. NOTE: This equipment has been tested and found to comply with the limits for a Class B digital device, pursuant to Part 15 of the FCC Rules.
- Page 19 IC Notice: This device complies with Canada Industry licence-exempt RSS standard(s). Operation is subject to the following two conditions: (1) this device may not cause interference; and (2) this device must accept any interference. Including interference that may cause undesired operation of the device.
- Page 20 Please separate your device from other types of waste to recycle it responsibly. This will help to foster the sustainable re-use of material resources. We invite you to contact your retailer or inquire at your local town hall to find out where and how the drone can be recycled.
- Page 21 Caution 1.The max operating of the EUT is 45°C. and shouldn’t be lower than -10°C. 2.The device complies with RF specifications when the device used at 0mm form your body. 3.Declaration of Conformity We, Xiamen Huoshiquan Import & Export CO., LTD hereby, declare that the essential requirements compliance with the Directive 2014/53/EU, the RoHS Directive 2011/65/EU and Safety Directive 2009/48/EC have been fully fulfilled on our product with indication below:...
Need help?
Do you have a question about the F181W and is the answer not in the manual?
Questions and answers