
Related Manuals for Holy Stone HS180


Summary of Contents for Holy Stone HS180
- Page 1 HS180 INSTRUCTIONS FOR USE usa@holystone.com (America) 1(626)-465-7134 ca@holystone.com (Canada) eu@holystone.com (Europe) jp@holystone.com (Japan) www.holystone.com...
-
Page 2: Table Of Contents
Table of Contents Preface ..................1 Warnings ................. 3 Maintenance ................5 Package Contents ..............6 Parts Details ................7 Battery for Transmitter............8 Transmitter Functions ............8 Flight ..................13 Emergency Stop ..............17 Speed Switch ................17 Flip Mode ................. 18 Headless Mode .............. -
Page 3: Preface
3. In case of having difficulties on any aspect of the product, operation or maintenance, please contact your local sales agent or contact customer support here at Holy Stone. Safety Guidelines This product is Mini RC Drone that offers easy, controllable flight when in good working order, however, there is also a significant risk to property and people if flown irresponsibly or within confined spaces. - Page 4 3. Use and maintain the product according to the instructions for use: a. Operate this device legally in accordance with instructions provided and with local laws and regulations. b. Always use original parts manufactured by Holy Stone for maintenance and repair. 4. Do not operate the device alone.
-
Page 5: Warnings
Always keep at least 2 meters between the user or viewers and the model to avoid risk of injury. Pay attention to the device at all times while flying. 4. Neither Holy Stone nor any distributors or agents accepts any responsibility for loss, injury or damage caused by incorrect operation of the drone. - Page 6 14. The charger is not a toy. 15. Always pay close attention to battery polarity when inserting any batteries to make sure they are fitted correctly. 16. Use either rechargeable or nonrechargeable ”AA” batteries in the transmitter. Do not mix battery types. 17.
-
Page 7: Maintenance
<MAINTENANCE> 1. Clear the product after each use with a clean, soft cloth. 2. Avoid prolonged exposure to direct sunlight and avoid buildup of heat on the drone. 3. This device is not waterproof and must not be submerged in water under any circumstance. -
Page 8: Package Contents
Package Contents Name QTY. RC Drone Transmitter Propeller USB Charging Cable Screwdriver... -
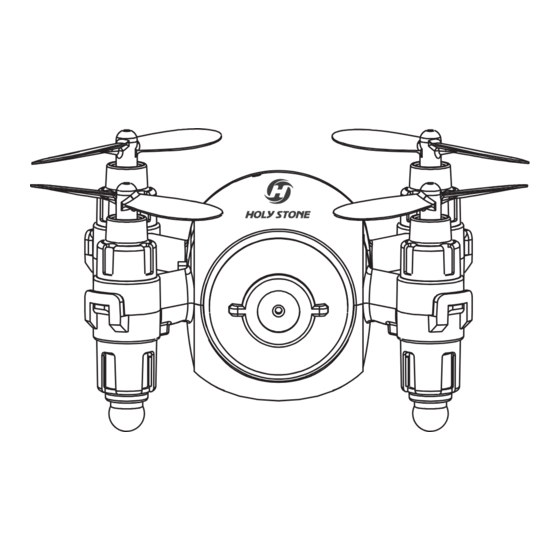
Page 9: Parts Details
Drone HEAD Camera Propeller A Propeller B Power Button Propeller A Propeller B TAIL Charging the Drone Charger the drone as shown on the diagram above. Connect the drone to the USB charging cable (Included in the box), and insert the USB chargingr plug into USB port (5V/0.5~1A). -
Page 10: Battery For Transmitter
Battery for Transmitter 1. Unscrew the screw and open the battery cover on the back of the transmitter. 2. Install 2 AAA batteries according to electrode instruction. Do Not mix new and old batteries, and Do NOT use different types of batteries.(Batteries are not included in the box) (Not included) Note: Always pay great attention to battery polarity when inserting any batteries to make sure they are fitted correctly. -
Page 11: Transmitter Functions
Transmitter Functions MODE 2(Recommend!) MODE 1... - Page 12 Throttle Joystick: Push this joystick up/down to Ascend/Descend the drone; Push it to Left/Right to rotate the drone to Left/Right. Direction Joystick: Push this joystick Up/Down/Left/Right to make drone fly Forward/Backward/Leftward/Rigthward. Power On/Off Power Indicator One Key Take Off/Landing Phone Holder One Key Return/Headless Mode: One Key Retrun: Press this button during the flight, the drone will enter One...
- Page 13 Forward/Backward Trimmer If the entire body of the drone moves forward or backward during take off, press this button to correct. (Trim forward “ ” if it moves back; trim backward “ ” if it moves forward). Rotate Left/Right Trimmer When the drone rotates to left or right side, press this trim button to the opposite direction to re-balance the drone.
- Page 14 Throttle Joystick: Push this joystick up/down to Ascend/Descend the drone; Push it to Left/Right to make drone fly Leftward/Rightward. Mode 2 switch Button(Default mode, recommend!) Press this button and power button at the same time to power on the drone. The drone will enter Mode 2. In Mode 2, left joystick is throttle joystick(refer to Right joystick is direction joystick(refer to Forward/Backward Trimmer(Mode 1)
-
Page 15: Flight
Flight 1. Preparation: a. Fly the drone in a spacious and windless area . b. Install 2 AAA batteries into the battery compartment on the back of the transmitter. 2. Pairing the Drone: a. Power on the drone, b. Power on the transmitter. the indicators on the drone will keep flash. - Page 16 3. Calibrate the Gyro: Push the Left and Right joysticks to the bottom left at the same time to calibrate the Gyro. (To ensure a stable flight, we suggest the pilot calibrate the gyro after pairing the drone every time and after a crash. ) 4.
- Page 17 5. One Key Take Off: One Key Take Off Press the One Key Take Off button, the drone will fly up and hover about 1.5 meters above the ground. 6. Control the Drone: Left Joystick Left Joystick a. Push this joystick up/down to Ascend/Descend the drone; Push it to Left/Right to rotate the drone to Left/Right.
- Page 18 Right Joystick Right Joystick b. Push this joystick Up/Down/Left/Right to make drone fly Forward/Backward/Leftward/Rigthward. One Key Landing c. Press One Key Landing button, the drone will land slowly by itself until it touch the ground. Tip: The range for the reliable communication between the drone and the transmitter is around 45 feet depending on terrain and conditions.
-
Page 19: Emergency Stop
<EMERGENCY STOP> Only stop motors mid-flight in emergency situations when doing so can reduce the risk of damage or injury. Press the UP LEFT(One Key Start/Landing ) and UP RIGHT(Headless Mode) buttons at the same time, the motors will stop immediately. This is Emergancy Stop. <SPEED SWITCH>... -
Page 20: Flip Mode
<FLIP MODE> When you become familiar with all the functions of the drone, you can try this amazing flip mode. When you fly the drone at least 10 feet high, press the right joystick to enter Flip Mode, then push the Right Control Lever Forward/ Backward/Left/Right, and the drone will do a flip towards the corresponding direction. -
Page 21: Headless Mode
<HEADLESS MODE> Do not use the Headless Mode until you totally comprehend this instruction for use. Flying in Headless Mode without sufficient experience might result in loss or damage of the device. HEAD ........TAIL 1. Place the drone in front of the pilot before pairing the drone to the transmitter. - Page 22 2. Push the throttle joystick up then down to pair the transmitter to the drone. 3. Press Headless Mode button for 2 seconds, the transmitter will beep three times and the lights on the drone will flash quickly, indicating this drone is under Headless Mode now. Headless Mode Button (Press 2 seconds) Under Headless Mode, the forward direction is the direction...
-
Page 23: One Key Return
<ONE KEY RETURN> Short press this One Key Return button during the flight, the transmitter will beep three times every 2 seconds, and the drone will fly toward to the pilot. This is One Key Return. One Key Return (Short press) When flying in the One Key Return/Headless Mode, the pilot should not to move around. - Page 24 APP Control: This drone is equipped with FPV real-time camera function as well as gravity sensor control function. Please download the “HS_G1”App to use these functions. Android Connect to the App Store™ or Google Play™ and download the “HS_G1” application for free. Power on your drone, then go into your phone settings, select Wi-Fi, then connect to “HolyStoneFPV_****”, which is the camera connection.
-
Page 25: App Functions
<APP FUNCTIONS > Phone Holder: The phone holder has been installed on the transmitter. Below are the details about how to install the phone to the phone holder: 1) Open the phone holder from the transmitter: 2)Pull up the phone holder to fit the width of the phone, and install the phone to the phone holder. -
Page 26: General Information
GENERAL INFORMATION FCC Notice: This device complies with Part 15 of the FCC Rules. Operation is subject to the following two conditions: (1) this device may not cause harmful interference, and (2) this device must accept any interference received, including interference that may cause undesired operation. NOTE: This equipment has been tested and found to comply with the limits for a Class B digital device, pursuant to Part 15 of the FCC Rules. - Page 27 ---Increase the separation between the equipment and receiver. ---Connect the equipment into an outlet on a circuit different from that to which the receiver is connected. ---Consult the dealer or an experienced radio/TV technician for help. WARNING: Changes or modifications not expressly approved by the party responsible for compliance could void the user's authority to operate the equipment.
Need help?
Do you have a question about the HS180 and is the answer not in the manual?
Questions and answers