
Subscribe to Our Youtube Channel
Related Manuals for Show Tec Dancefloor Sparkle RGB V1


Summary of Contents for Show Tec Dancefloor Sparkle RGB V1
- Page 1 MANUAL ENGLISH Dancefloor Sparkle RGB Ordercode: 42330 Highlite International B.V. – Vestastraat 2 – 6468 EX – Kerkrade – the Netherlands...
- Page 2 Dancefloor Sparkle RGB Table of contents Warning ....................................2 Safety Instructions ................................. 2 Operating Determinations ............................4 Connection with the mains ............................4 Return Procedure ................................5 Claims ....................................5 Description of the device ..............................6 Optional accessories ..............................6 Overview ..................................
-
Page 3: Warning
Dancefloor Sparkle RGB Warning Unpacking Instructions Immediately upon receiving this product, carefully unpack the carton and check the contents to ensure that all parts are present, and have been received in good condition. Notify the dealer immediately and retain packing material for inspection if any parts appear to be damaged from shipping or the carton itself shows signs of mishandling. - Page 4 Dancefloor Sparkle RGB IMPORTANT: The manufacturer will not accept liability for any resulting damages caused by the non-observance of this manual or any unauthorized modification to the device. Never let the power cord come into contact with other cables! Handle the power cord and all connections with the mains with particular caution! ...
-
Page 5: Operating Determinations
Dancefloor Sparkle RGB Operating Determinations ● This device is not designed for permanent operation. Regular operation breaks will ensure that the device will serve you for a long time without defects. ● The minimum distance between light-output and the illuminated surface must be bigger than 0,5 meter. -
Page 6: Return Procedure
Dancefloor Sparkle RGB Return Procedure Returned merchandise must be sent prepaid and in the original packing, call tags will not be issued. Package must be clearly labeled with a Return Authorization Number (RMA number). Products returned without an RMA number will be refused. Highlite will not accept the returned goods or any responsibility. Call Highlite 0031-455667723 or mail aftersales@highlite.nl and request an RMA prior to shipping the fixture. -
Page 7: Description Of The Device
Dancefloor Sparkle RGB Description of the device Features The Showtec Dancefloor Sparkle RGB is a stylish yet user friendly dancefloor which is ideal for wedding, corporate events, dance parties etc. The dancefloor has a safe low voltage DC connection which makes it very easy to connect. -
Page 8: Overview
Dancefloor Sparkle RGB Overview Fig. 01 01) 16x RGB (5050SMD) LEDs Backside Fig. 02 02) 2,5 mm DC connection cable male 03) 2,5 mm DC connection cable female Installation Remove all packing materials from the Dancefloor Sparkle RGB. Check that all foam and plastic padding is removed. -
Page 9: Connecting Multiple Floor Tiles
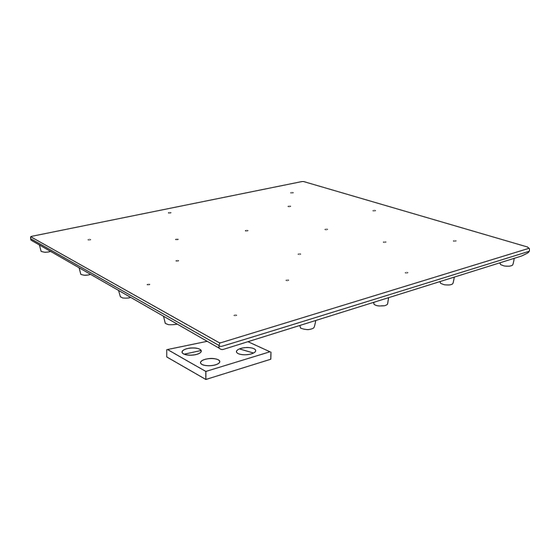
Dancefloor Sparkle RGB Connecting multiple floor tiles With the included Dancefloor Connection Plate you can connect multiple tiles and ramps. You can connect a maximum of four tiles to one Connection Plate. Take the first tile and place it on the Connection Plate, see figure 03 and 04. Fig. -
Page 10: Connect The Powersupply With The Dancefloor
Dancefloor Sparkle RGB Then take the second tile and place it on the first and second Connection Plate, see figure 05. Fig. 05 Proceed this till you have made your desired dancefloor size (figure 05). To protect the edge of the floor and make a visible boundary, you can use a ramp (42335, 42337), see figure 06, or a ramp including a corner (42336, 42339), see figure 07. - Page 11 Dancefloor Sparkle RGB Fig. 08 If all tiles are properly connected you have to connect the powersupply to the dancefloor. Always connect the outer tile to the powersupply. Connect one of the five female connectors from the powersupply to the male connector from the outer tile, see figure 09. Fig.
-
Page 12: Installation Example
Dancefloor Sparkle RGB Installation example 9,2 m Dancefloor Sparkle RGB The list of needed items: (A) 25 x Dancefloor Sparkle RGB 0,607 m x 0,607 m (42330) (B) 36 x Dancefloor Connection Plates (42338) (C) 16 x Ramp 61 cm for Dancefloor Sparkle (42335) ... -
Page 13: Control Modes
Dancefloor Sparkle RGB Control Modes There are 2 control modes: Controlled by the remote control (included with the power supply 42331 or separate available ordercode 42333) Controlled by the Dancefloor Sparkle DMX Box (42332) Controlled by the remote control 01) Setup and link the tiles as shown in the previous paragraphs (page 8-11). 02) Use the remote control to operate the dancefloor, see figure 11. -
Page 14: Controlled By The Dancefloor Sparkle Dmx Box
Dancefloor Sparkle RGB Controlled by the Dancefloor Sparkle DMX Box 01) Setup and link the tiles as shown in the previous paragraphs (page 8-11). 02) Link the DMX lightcontroller with the Dancefloor Sparkle DMX Box by using a DMX-cable. 03) Use the Dancefloor Sparkle DMX Box or DMX lightcontroller to operate the dancefloor, see figure 12. 04) For more information about Dancefloor Sparkle DMX Box, see the chapter Dancefloor Sparkle DMX Box. -
Page 15: Remote Control
Dancefloor Sparkle RGB Remote control With the remote control you can control your dancefloor (max distance 20 m). The remote control is not included with the tile. If you purchase the powersupply (42331), the remote control is included or separate available ordercode 42333. When no button is pressed for 10 seconds, the remote control will turn off. -
Page 16: Color Selection
Dancefloor Sparkle RGB Color selection With this function you can select a preset color. Press the button, the third LED indicator will light up. To select the next color you have to press the A-button. Press the C-button to return to the previous color. You can choose 16 preset colors. -
Page 17: Dancefloor Sparkle Dmx Box
Dancefloor Sparkle RGB Dancefloor Sparkle DMX Box With the optional Dancefloor Sparkle DMX Box (42332) you can choose between two options to control your dancefloor. The first option is to use the menu options 2-5 inside the Dancefloor Sparkle DMX Box. These will be explained in this chapter. -
Page 18: Control Panel
Dancefloor Sparkle RGB Control Panel A) LED display MENU + button C) MENU - button D) UP button DOWN button Fig. 16 Control Mode The devices are individually addressed on a data-link and connected to the controller. The devices respond to the DMX signal from the controller. (When you select the DMX address and save it, the controller will display the saved DMX address, next time.) DMX Addressing The control panel on the front side of the device allows you to assign DMX fixture addresses, which is the... -
Page 19: Menu Overview
Dancefloor Sparkle RGB Menu Overview Main Menu Options DMX address Built in programs Color selection Interval time/speed Intensity DMX Addressing With this menu you can set the DMX address. 01) Press the MENU+ button until the display shows 02) You can choose 512 different DMX addresses. 03) Use the UP/DOWN buttons to select the required address from 04) Press the MENU+ and MENU- buttons simultaneously to save the desired DMX address. -
Page 20: Color Selection
Dancefloor Sparkle RGB Color selection With this menu you can choose a desired color. 01) Press the MENU+ button until the display shows 02) You can choose 16 preset colors. 03) Use the UP/DOWN buttons to select the desired color from 04) Press the MENU+ and MENU- buttons simultaneously to save the desired color. -
Page 21: Dmx Channels
Dancefloor Sparkle RGB DMX Channels 5 Channels Channel 1 – Dimmer intensity 0-15 Intensity 0 (Dark) 16-31 Intensity 1 32-47 Intensity 2 48-63 Intensity 3 64-79 Intensity 4 80-95 Intensity 5 96-111 Intensity 6 112-127 Intensity 7 128-143 Intensity 8 144-159 Intensity 9 160-175... - Page 22 Dancefloor Sparkle RGB Channel 3 – Auto program speed (CH1 must be set between 16-255 and CH2 between 28-216 0-15 Speed 1 (slowest) 16-31 Speed 2 32-47 Speed 3 48-63 Speed 4 64-79 Speed 5 80-95 Speed 6 96-111 Speed 7 112-127 Speed 8 128-143...
-
Page 23: Maintenance
Dancefloor Sparkle RGB Maintenance The operator has to make sure that safety-related and machine-technical installations are to be inspected by an expert after every year in the course of an acceptance test. The operator has to make sure that safety-related and machine-technical installations are to be inspected by a skilled person once a year. - Page 24 Dancefloor Sparkle RGB Problem Probable cause(s) Solution No power to the tile • Check if power is switched on and One or more cables are plugged in fixtures do not function at all Internal fuse blown • Return the device to your Showtec dealer Fixtures reset The controller is not connected.
-
Page 25: Product Specifications
Dancefloor Sparkle RGB Product Specifications Model: Showtec Dancefloor Sparkle RGB Input Voltage power supply: 120-250V 50/60 Hz Power consumption: Protection rate: IP20 back, IP44 top. Dimensions: 607 x 607 x 30 mm (LxWxH) Weight: 8,5 Kg Operating and Programming: Control: Programs, Colors, Speed, Brightness, DMX DMX channels: Control Protocol:... -
Page 26: Dimensions
Dancefloor Sparkle RGB Dimensions (separately available ordercode 42338) Ordercode: 42330... -
Page 27: Notes
Dancefloor Sparkle RGB Notes Ordercode: 42330... - Page 28 ©2016 Showtec...
Need help?
Do you have a question about the Dancefloor Sparkle RGB V1 and is the answer not in the manual?
Questions and answers