Table of Contents
Advertisement
Advertisement
Table of Contents

Related Manuals for CareCo victory


Summary of Contents for CareCo victory
- Page 1 VICTORY Owner’s Manual CareCo (UK) Ltd Hubert Road Brentwood Essex CM14 4JE...
- Page 2 We ask that you read this manual completely before operating your new VICTORY scooter. CareCo (UK) Ltd is not, and cannot be held responsible for, any damage or injury incurred due to improper or unsafe use of the CareCo VICTORY scooter.
- Page 3 CareCo (UK) Ltd cannot be held responsible for personal injury or property damage resulting from the unsafe or the improper use of any of our broad range of health and personal mobility products. Also, CareCo (UK) Ltd cannot be held responsible for personal injury or property damage resulting from attempts to follow instructions, suggestions, and guidelines presented in this Owner’s Manual.
-
Page 4: Table Of Contents
CONTENTS PREFACE…………………………………………………...………..4 SAFETY NOTICE……………………………………………………..5 2.1 Before driving 2.2 While driving 2.3 Labelling PARTS INTRODUCTION…………………...………………………8 3.1 Parts description OPERATION…………………………………………………………..9 4.1 Control panel 4.2 How to operate your scooter 4.3 How to set to freewheel mode DRIVING ..…………………………………………………….. ……..12 BATTERY CHARGING AND CARE……………………………...14 6.1 Charging the battery 6.2 Charger 6.3 Battery... -
Page 5: Preface
1 . P R E FA C E A N D I N T R O D U C T I O N Please carefully read this owner’s manual before using the vehicle. Improper use of the vehicle could result in harm, injury or traffic accidents. This owner’s manual includes operating instructions for every aspect of the vehicle. -
Page 6: Safety Notice
2 . S A F E T Y N O T I C E 2.1 Before Driving The user should become familiar with the usage and operation of this vehicle before driving. Please follow the recommendations in this safety notice. ■... -
Page 7: While Driving
2.2 While Driving ■ Do not alight from the vehicle whilst it is moving Such action may cause you to lose balance and risk injury from falling. Ensure that your clothes do not tangle in the wheels. ■ Do not use your vehicle under the following conditions:- ... - Page 8 WARNING ! Do not set in the freewheel mode when driving on a gradient. Always re-engage the anti-freewheel device before use. Failure to do so may result in injury. To protect your safety, the power will automatically cut off and electromagnetic brake system will activate while driving down a steep gradient (over 10°).
-
Page 9: Labelling
2.3 Labelling WARNING DRIVE Emergency freewheel device. Please carefully read all labels on the scooter Always re-engage the emergency before driving it. For your future reference, freewheel device after use. Failure do not remove them. to do so may result in injury. NEUTRUAL WARNING ※Please hold the tiller before loosening the... -
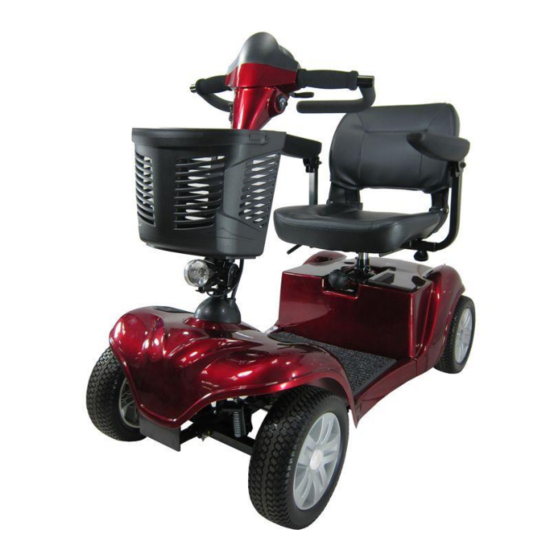
Page 10: Parts Introduction
PA R T S I N T R O D U C T I O N PARTS DESCRIPTION 1. Speed Dial. 2. Charger Socket Cover. 3. Basket. 4. Tiller Adjust Bolt. 5. Arm Rest. 6. Seat. 7. Circuit Breaker Button. 8. -
Page 11: Operation
4 . O P E R AT I O N 4.1 CONTROL PANEL 1. Speed Dial 2. Horn Button 3. Wigwag paddle 4. Battery Indicator 5. Key Ignition 6. Power Eye 7. Head Light/Rear Light Button 4.2 HOW TO OPERATE YOUR SCOOTER ■... - Page 12 ■ Horn Button Press the horn button to sound the horn. Release the button to stop the horn. ■ Braking Electro-magnetic brake: Release speed control lever completely, electromagnetic brake will be activated automatically, and the scooter will stop. Warning When on a gradient NEVER set the vehicle to the freewheel mode.
-
Page 13: How To Set To Freewheel Mode
50% of that when they were new, it is time to replace them. Please contact CareCo about replacement batteries. If you continue to use old batteries when they should be replaced, the performance of your scooter could be affected. - Page 14 ■ Tiller Adjustment The Tiller can be adjusted into many different positions to suit each driver. The tiller can be adjusted by following the steps below. 1. Loosen the knob so the tiller can move. (Fig.4.3) 2. Move the tiller into the required position then tighten the knob to secure the tiller (Fig 4.4) Fig 4.3 Fig 4.4...
-
Page 15: Driving
5 . D R I V I N G ■ Starting and Driving 1. Make sure the seat is installed properly. 2. Make sure the tiller has been secured properly. 3. Fold down the armrests so you can rest your arms on them. 4. - Page 16 Main Circuit Breaker (Reset Button) strained When the voltage in your scooter’s batteries becomes low or the scooter is heavily because of excessive loads or steep inclines, the main circuit breaker may trip to protect the motor and electronics from damage. The location of the circuit breaker is shown by the arrow on the photograph (below).
-
Page 17: Battery Charging And Care
6 . B AT T E R Y C H A R G I N G A N D C A R E CHARGING THE BATTERIES Follow the procedure below step by step: 1. Turn the power switch to ‘OFF’. 2. - Page 18 Suggestion Do not disconnect the charger cord if charging is not completed. The battery life will be seriously shortened or decayed if the battery is repeatedly used without being fully charged. Therefore be sure to charge the battery fully every time. Always complete the charging until the orange LED light turns green.
-
Page 19: Charger
There is a red LED present on the charger to illustrate operation. If this LED does not illuminate the charger is faulty, please contact CareCo. BATTERIES Do not expose the batteries to temperatures below 10°C or above 50°C when charging or storing the vehicle. - Page 20 Suggestions If necessary, ask for help from CareCo for advice about maintaining and replacing the batteries. Suggestions 1. Make sure the terminals are installed properly and put the cover back on. 2. Do not use the battery to charge telecom equipment or other items.
-
Page 21: Inspection And Maintenance
7 . I N S P E C T I O N A N D M A I N T E N A N C E 7.1 DAILY CHECKING Check the following items before driving. If you find anything abnormal, contact CareCo for advice before using the scooter. -
Page 22: Regular Checking Record
7.2 REGULAR CHECKING RECORD To make sure your scooter is correctly serviced, take it to your dealer for regular maintenance checks. This should be at intervals of six months after an initial inspection after one month. There may be a charge for servicing. ... -
Page 23: Maintenance
If the battery charger is turned on and no LED lights are illuminated, check the battery charger fuse. Suggestion Ask for help from CareCo to inspect or replace the fuse, since the tiller shroud has to be removed prior to replacing the fuse. Contact Customer Services on 0845 611 8022 or email: cs@careco.co.uk ▓... -
Page 24: Storage
Please store the scooter in a location where it is out of direct sunlight, or damp conditions. When storing for a long time, please charge the battery to full power and then disconnect the battery terminal. For details contact CareCo. 7.6 MANUALLY MOVING THE SCOOTER ... - Page 25 DISASSEMBLING THE SCOOTER ♦ The scooter can be disassembled into five pieces without tools - the seat (weight 6.2 kg), the front section (weight 25 kg), the rear section (weight 20 kg), and batteries (weight 11 kg ) Please follow the steps and photographs: 1.
-
Page 26: Assembling The Scooter
7.8 ASSEMBLING THE SCOOTER Suggestions The assembly process is essentially the disassembly process in reverse. First study the text and photographs in the disassembly procedure before re-assembling the scooter. 1. Position the front and rear sections of the scooter 2. -
Page 27: Trouble Shooting
˙Motor in freewheel mode ˙Re-engage the freewheel lever The LED lights will ‘blink’ if there is a problem with your Victory scooter. The list below will assist you in identifying any possible malfunction. 1 blink... - Page 28 Ensure all connections are secure. 10 blinks An excessive voltage has been applied to the control system. This is usually caused by a poor battery connection. Check the battery connections.
-
Page 29: Specification
9 . S P E C I F I C AT I O N VICTORY Model Reference Dimension 125 x 5670 cm (L x W) Total Weight 80 kg Propulsion motor 350W x 1 Battery 35 AH x 2 Charger Front Tyre 10”... -
Page 30: Warranty Declaration
Quality / Warranty Declaration Products are to be fit for purpose and of excellent quality and performance. For valid warranty claims CareCo (UK) Ltd will, at their discretion, replace / repair / refund items mutually agreed to be defective. The scooter’s warranty is as follows:- ...
Need help?
Do you have a question about the victory and is the answer not in the manual?
Questions and answers