
Subscribe to Our Youtube Channel
Related Manuals for CareCo ECLIPSE


Summary of Contents for CareCo ECLIPSE
- Page 1 WT-T4J II ECLIPSE Owner’s Manual CareCo (UK) Ltd Hubert Road Brentwood Essex CM14 4JE...
- Page 2 DISCLAIMER We ask that you read this manual completely before operating your new Eclipse scooter. CareCo (UK) Ltd cannot be held responsible for any damage or injury incurred due to improper or unsafe use of the CareCo Eclipse scooter. CareCo (UK) Ltd specifically disclaims responsibility for any bodily injury or property damage that may occur...
- Page 3 CareCo (UK) Ltd cannot be held responsible for personal injury or property damage resulting from the unsafe or the improper use of any of our broad range of health and personal mobility products. Also, CareCo (UK) Ltd cannot be held responsible for personal injury or property damage resulting from attempts to follow instructions, suggestions, and guidelines presented in this Owner’s Manual.
-
Page 4: Table Of Contents
TABLE OF CONTENTS PREFACE AND INTRODUCTION ……..………………………….. SAFETY NOTICE………………………………………………………. 2.1 Before Driving 2.2 While Driving 2.3 Labelling PARTS INTRODUCTION……………..……………….. ……………... OPERATION………………………………………………………………. 4.1 Control Panel 4.2 How to Operate your Scooter 4.3 How to Set to Freewheel Mode 4.4 Tiller Adjustment 4.5 Disassembling the Scooter DRIVING ON THE ROAD………………………………………………... -
Page 5: Preface And Introduction
1 . P R E FA C E A N D I N T R O D U C T I O N Please carefully read this owner’s manual before using the vehicle to ensure that you get the most from your scooter. Improper use of the vehicle could result in harm, injury or traffic accidents. -
Page 6: Safety Notice
2 . S A F E T Y N OT I C E 2.1 BEFORE DRIVING The user needs to be familiar with the operation of this vehicle before driving. Therefore, please follow the recommendations in this safety notice. ■ The same traffic rules apply to the use of this vehicle as apply to pedestrians ... -
Page 7: While Driving
2 . S A F E T Y N OT I C E 2.2 WHILE DRIVING ■ Do not use your vehicle under the following circumstances:- On surfaces that are muddy, gravelly, bumpy, narrow, snowed over, icy, or canal towpaths not guarded by any fence or hedge. -
Page 8: Parts Introduction
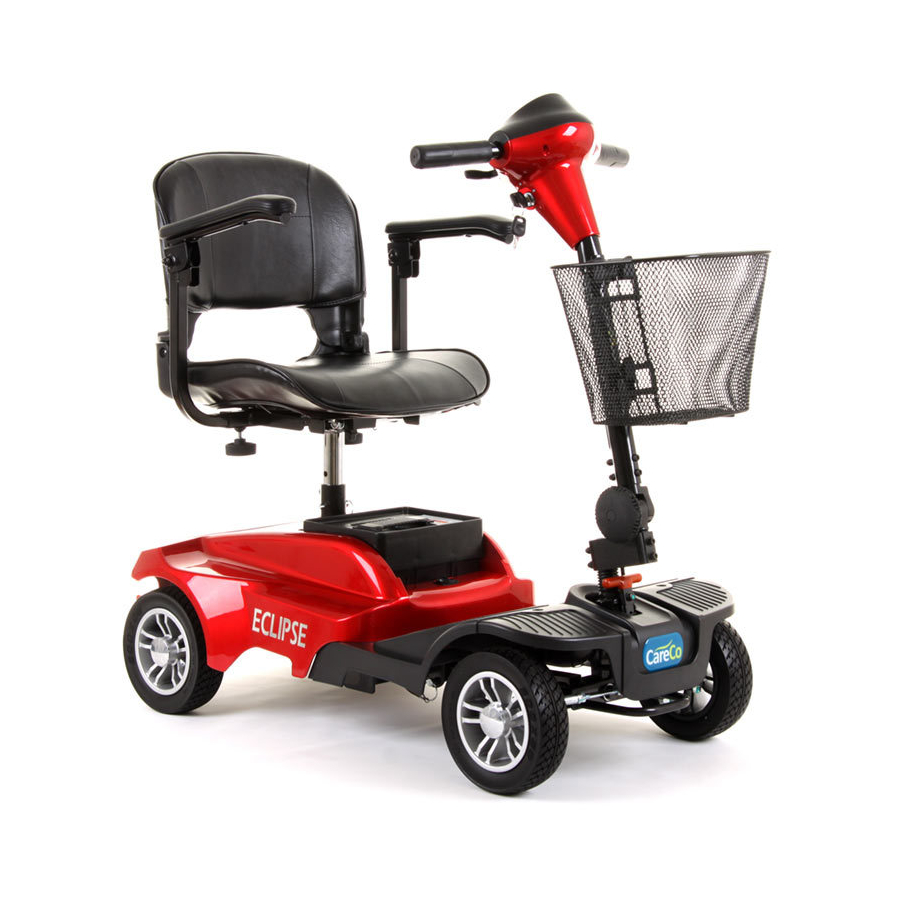
3 . PA R T S I N T R O D U C T I O N PARTS DESCRIPTION 1. Control panel 2. Tiller Adjustment Knob 3. Seat 4. Battery Pack 5. Freewheel Lever 6. Anti-tip wheels 7. Seat Post Knob... -
Page 9: Operation
4 . O P E R AT I O N 4.1 CONTROL PANEL 1. Speed Dial 2. Battery Indicator 4.2 HOW TO OPERATE YOUR SCOOTER ■ Power switch To switch the power on, turn the key clockwise in the ignition. The power eye should ... - Page 10 4 . O P E R AT I O N Warning When on a hill or slope NEVER set the vehicle to the freewheel mode as the electromagnetic brakes will not be applied – this could result in injury or damage. ■...
-
Page 11: How To Set To Freewheel Mode
When the batteries’ range is approximately 50% of that when they were new, it is time to replace them. Please contact CareCo about replacement batteries. If you continue to use old batteries when they should be replaced, the performance of your scooter may be affected. -
Page 12: Tiller Adjustment
4 . O P E R AT I O N Warning Never operate the freewheel lever while seated on the scooter or on a slope or hill! TO OPERATE THE FREEWHEEL LEVER: Always pull UP FIRMLY for freewheel mode Always push DOWN FIRMLY for drive mode 4.4 TILLER ADJUSTMENT The tiller can be adjusted into many different positions to suit each driver. -
Page 13: Disassembling The Scooter
4 . O P E R AT I O N 4.5 DISASSEMBLING THE SCOOTER 1. Lift the tiller to stand the scooter in an upright position (Fig. 4.1) 2. Push the front frame and then pull out the connecting pin (Fig. 4.2) 3. -
Page 14: Driving On The Road
5 . D R I V I N G O N T H E R O A D ■ Starting and Driving 1. Make sure the seat is installed properly. 2. Make sure the tiller has been secured properly. 3. Turn the power switch to ‘ON’. 4. -
Page 15: Battery Charging And Care
6 . B AT T E R Y C H A R G I N G A N D C A R E 6.1 CHARGING THE BATTERY ■ Off-board Charging (see photograph below) 1. Turn the power switch to ‘OFF’ 2. - Page 16 6 . B AT T E R Y C H A R G I N G A N D C A R E ■ Batteries (Inside the Pack) 1. The Scooter is powered by two sealed lead-acid deep-cycle batteries. 2. The batteries supplied with the scooter are 12 V 12AH batteries. ...
-
Page 17: Replacing Batteries
6 . B AT T E R Y C H A R G I N G A N D C A R E Suggestion – How to maximise the batteries’ efficiency and service life 1. Fully recharge your new batteries before their first time use. 2. - Page 18 If the vehicle is not used for a long time, please charge the battery at least every week. 4. Replace both batteries together. If necessary, ask for help from CareCo for advice about maintaining and replacing the batteries on 0845 611 8022 or email: cs@careco.co.uk...
-
Page 19: Inspection And Maintenance
7.2 REGULAR CHECKING RECORD To make sure your scooter is correctly serviced, contact CareCo regarding regular maintenance checks. This should be at intervals of six months following an initial inspection after one month. -
Page 20: Battery, Fuse And Tyres
If the battery charger is turned on and the LEDS are not lit, check the fuse. Suggestion Ask for help from CareCo to inspect or replace the fuse, as the tiller shroud has to be removed before you can replace the fuse. Contact Customer Services on 0845 611 8022 or email: cs@careco.co.uk... -
Page 21: Manually Moving The Scooter
7 . I N S P E C T I O N A N D M A I N T E N A N C E 7.5 MANUALLY MOVING THE SCOOTER Switch off the power with power key before moving the scooter. Always dismount from the scooter before moving. -
Page 22: Troubleshooting
8 . T R O U B L E S H O OT I N G ■ TROUBLE SHOOTING If you have problems with your scooter, check the information below. If you cannot solve the issue, contact CareCo Customer Services on 0845 611 8022 or email: cs@careco.co.uk Problem... - Page 23 8 . T R O U B L E S H O O T I N G LED lights will appear if there is a problem with your Eclipse scooter. The list below should assist in identifying any possible malfunction.
-
Page 24: Specification
The manufacturer reserves the right to modify the specification if necessary. The final specification is subject to the individual scooter you purchase from CareCo. Note: Maximum driving distance is based on an ambient temperature of 20C, a 75kg driver and... -
Page 25: Warranty
The scooter or part having been altered from the manufacturer’s specifications or repairs having been attempted before CareCo is notified Please note CareCo’s contact details in the box below. In the event of your scooter requiring attention, contact them and give all relevant details so they can act quickly. - Page 26 CareCo Eclipse Motor serial number: Identification Number ………………………………………………………………………………………………………………………….. Warranty Application Form Name 口 Male 口 Female Date of Birth Day: Month: Year: Address Model 口 CareCo Eclipse Scooter VIN: Motor Serial No: Date of Purchase Day: Month: Year: Purchaser’s signature...
Need help?
Do you have a question about the ECLIPSE and is the answer not in the manual?
Questions and answers