
Subscribe to Our Youtube Channel
Related Manuals for RTA RTA-3803


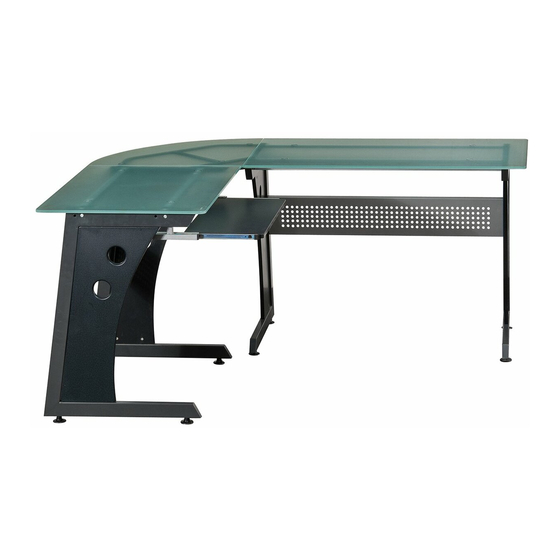
Summary of Contents for RTA RTA-3803
- Page 1 ASSEMBLY INSTRUCTIONS MODEL RTA - 3803 Thanks for purchasing one of our products. Please read carefully the assembly instructions before the installation. Please save this manual for future reference. MODEL RTA-3803...
- Page 2 RTA-3803 DIMENSIONS Product Size: 55"W x 65"D x 30"H MAXIMUM WEIGHT CAPACITIES DO NOT exceed this limit Please use care and good judgement when placing objects on wood surface...
-
Page 3: Parts List
RTA-3803 PARTS LIST Right Structure Right Panel Left Structure Left Panel Short Back Panel Studs Short Horizontal Tube Long Horizontal Tube Long Back Panel Connecting Tube T Structure... -
Page 4: Screws List
RTA-3803 Short Table Top Conner Table Top Long Table Top Right Slider Base Left Slider Base Right Left x 1 SET Keyboard Panel Metal Slider Guides SCREWS LIST PART QTY. ITEM PART QTY. ITEM 6X75 MM 4X14 MM 6X35 MM... -
Page 5: Assembly Steps
RTA-3803 ASSEMBLY TIPS ARE LOCATED AT THE END OF THE MANUAL. ATTENTION: HOLES ON PANELS MAY BE HIDDEN UNDERNEATH PVC LAMINATE!!! DO NOT TIGHTEN THE SCREWS UNTILL ALL OF THEM ARE IN THE RIGHT POSITION. ASSEMBLY STEPS: SCREWS 6X35 MM Use Screws (B) to assemble the “T”... - Page 6 RTA-3803 Right Left SCREWS 4X14 MM Use Screws (E) to assemble the Keyboard Panel (18) to the Metal 4PCS Slider Guides (17) as shown. Please refer to the Assembly Tips at the end of the manual for troubleshooting this step.
- Page 7 RTA-3803 SCREWS 6X35 MM Use Screws (B) to assemble the Short Back Panel (7) between the 4PCS Left & Right Structure (1&2). SCREWS Use Screws (F) to assemble the Long Horizontal Tubes (8) between 6X40 MM the Left & Right Structure (1&2).
- Page 8 RTA-3803 ** There are 4 options in which to assemble this L-desk. Please select below according to your preference: Left short table with keyboard panel+ Right A1-A4 long table Left short table + Right long table with keyboard B1-B4 panel...
- Page 9 RTA-3803 LONG TABLE SHORT TABLE SCREWS Use Screws (F) to fix the “T” Structure (10) and the Connecting 6X40 MM Tube (11) to the Right Structure (2) and the Left Structure (1). 4PCS SCREWS Use Screws (B) to assemble the Left & Right Slider Base (15&16) to the Short Horizontal Tubes (6).
- Page 10 RTA-3803 P.10 SCREWS Use Screws (C) to assemble the Short Table Top (12), the Corner Table Top (13) and the Long Table Top (14). 6X30 MM 11PCS Tighten all the screws and enjoy your unit.
- Page 11 RTA-3803 P.11 LONG TABLE SHORT TABLE SCREWS Use Screws (F) to fix the “T” Structure (10) and the Connecting 6X40 MM Tube (11) to the Right Structure (2) and the Left Structure (1). 4PCS SCREWS Use Screws (B) to assemble the Left & Right Slider Base (15&16) to the Long Horizontal Tubes (8).
- Page 12 RTA-3803 P.12 SCREWS Use Screws (C) to assemble the Short Table Top (12), the Corner Table Top (13) and the Long Table Top (14). 6X30 MM 11PCS Tighten all the screws and enjoy your unit.
- Page 13 RTA-3803 P.13 LONG TABLE SHORT TABLE SCREWS Use Screws (F) to fix the “T” Structure (10) and the Connecting 6X40 MM Tube (11) to the Right Structure (2) and the Left Structure (1). 4PCS SCREWS Use Screws (B) to assemble the Left & Right Slider Base (15&16) to the Long Horizontal Tubes (8).
- Page 14 RTA-3803 P.14 SCREWS Use Screws (C) to assemble the Short Table Top (12), the Corner Table Top (13) and the Long Table Top (14). 6X30 MM 11PCS Tighten all the screws and enjoy your unit.
- Page 15 RTA-3803 P.15 LONG TABLE SHORT TABLE SCREWS Use Screws (F) to fix the “T” Structure (10) and the Connecting 6X40 MM Tube (11) to the Right Structure (2) and the Left Structure (1). 4PCS SCREWS Use Screws (B) to assemble the Left & Right Slider Base (15&16) to the Short Horizontal Tubes (6).
- Page 16 RTA-3803 P.16 SCREWS Use Screws (C) to assemble the Short Table Top (12), the Corner Table Top (13) and the Long Table Top (14). 6X30 MM 11PCS Tighten all the screws and enjoy your unit.
- Page 17 GLIDE TABLETOP 6x20mm SCREW 6x30mm SCREW TOOL - FOLLOW THE ASSEMBLY INSTRUCTIONS STEP BY STEP, AND DO NOT SKIP ANY, UNLESS ADVICED TO DO SO BY AN RTA PRODUCT’S TECHNICIAN. SCREWS 6X50 MM 2PCS SCREWS SCREWS 6X30 MM 6X65 MM...
- Page 18 - MAKE SURE TO USE THE CORRECT SCREWS OR BOLTS SCREW WILL DAMAGE THE PART! AND DO NOT OVERTIGHT THEM. CORRECT SIZE OF SCREW. DOING SO MIGHT CAUSE DAMAGE TO THE PARTS OR PRODUCTS WHICH IS NOT COVERED BY THE PRODUCT’S WARRANTY. DOES THE HOLE LOOK TOO SMALL? - IN SOME WOOD PANELS THE LAMINATE MIGHT BE COVERING THE HOLES.
-
Page 19: Warranty
CARE AND MAINTENANCE English - DO NOT EXPOSE THE SURFACES TO DIRECT SUNLIGHT, OR EXTREME ENVIRONMENTAL CONDITIONS. EXPOSURE WILL DAMAGE THE PRODUCT, WHICH IS NOT COVERED BY THE WARRANTY. - DO NOT USE SOLVENTS OVER SURFACES OR STRUCTURAL TUBES. SURFACES MUST BE CLEANED WITH A SOLUTION OF A SMOOTH SOAP AND WATER, THEN CLEARED WITH A DRY TOWEL.
Need help?
Do you have a question about the RTA-3803 and is the answer not in the manual?
Questions and answers