
Related Manuals for Heatmiser PRT-WTS


Summary of Contents for Heatmiser PRT-WTS
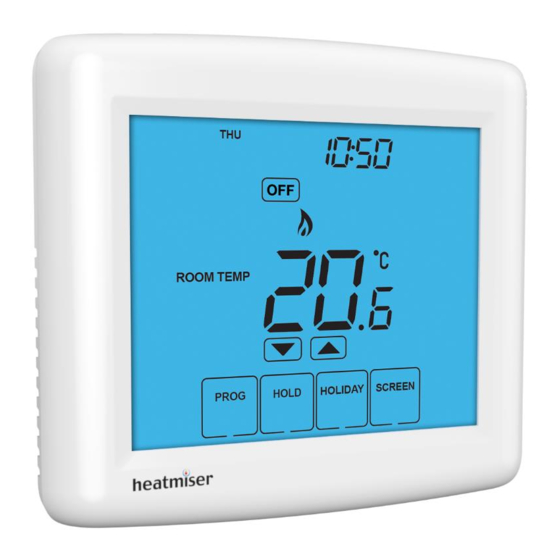
- Page 1 Heatmiser PRT-WTS Wireless Touchscreen Programmable Thermostat Ref: PRT-WTS Rev: 1.0...
-
Page 2: Table Of Contents
Contents Page Installation Procedure Pairing the Thermostat with the Receiver Temperature Display Setting the Clock Comfort Levels Explained Locking the Thermostat Temperature Override Temperature Hold Holiday Heat On/Off Clean Screen Factory Reset Calibration Recharging the Battery Optional Feature Setup 12-16... -
Page 3: Installation Procedure
Installation Procedure Do’s Do mount the thermostat at eye level, or if using the desk stand, ensure the thermostat is away from any heat sources. Don’ts Do not push hard on the LCD otherwise you will damage the liquid crystal display and this is not repairable. Wall mounting The wall plate is supplied loose. -
Page 4: Pairing The Thermostat With The Receiver
Press Zone 1 or Zone 2 to select the relevant zone. (Two PRT-WTS can work with a single receiver, offering a two zone system) In the centre of the LCD, you will see 01. This is the channel address. -
Page 5: Temperature Display
Note: You need to finish pairing the thermostat before the receiver pair LED goes out. Pair Successful The Comms LED on the receiver should flash and then go out to indicate the pair is successful. The thermostat will then display the communication icon. -
Page 6: Setting The Clock
Setting the Clock To set the clock in your thermostat, follow the steps below; With the thermostat turned on, press PROG Press Clock Use the Up and Down keys to set the correct time Press Day to set the correct day ... - Page 7 Factory Programmed Comfort Levels The following comfort levels are programmed already, however you can change them easily. Weekday Level Time Temp Wake 07.00 21°C Leave 09.00 16°C Return 16.00 21°C Sleep 22.00 16°C Weekend Level Wake 09.00 21°C Leave 22.00 16°C Return --.--...
-
Page 8: Locking The Thermostat
Changing the Comfort Levels Press PROG and select Wake Use the Up/Down keys to set the time for the 1 Comfort Level Use the Up/Down keys to set the temperature for the 1 Comfort Level You should now repeat for the Leave, Return and Sleep levels. ... -
Page 9: Temperature Override
Temperature Set Using the Up and Down keys allows you to adjust the set temperature. When you press either of these keys, you will see the word SET and the desired temperature. Press Done to accept. Temperature Hold The temperature hold function is ideal for parties or when you will be going out for a number of hours. -
Page 10: Holiday
Holiday The Holiday function reduces the set temperature in your home to the frost temperature setting. The thermostat will maintain this temperature for the duration of the holiday and will then automatically return to the program mode on your return. Assume you program a holiday on Monday for 1 day, the holiday will start immediately will count the next day (Tuesday) as the holiday. -
Page 11: Heat On/Off
Frost Protect Mode: Pressing the Power button once will place the thermostat in frost protect mode. In this mode, the thermostat will display the frost icon and will only turn the heating on should the room temperature drop below the set frost temperature (see pages 13-14 ) Should the heating be turned on whilst in frost mode, the flame symbol will be displayed. -
Page 12: Factory Reset
Factory Reset Turn off the thermostat by pressing the Power button. Press and hold the Power button for 10 seconds. You will see all the icons appear for 2 seconds and then disappear. The thermostat has been reset to the factory defaults. -
Page 13: Optional Feature Setup
Feature Setup Feature 01 – Temperature Format: This function allows you to select between °C or °F Feature 02 – Switching Differential: This function allows you to adjust the switching differential of the thermostat. This is the number of degrees the thermostat will switch on below the set temperature. This can be adjusted in order to obtain optimum switching of the heating in your home. - Page 14 Feature 04 – Output Delay: To prevent rapid switching, an output delay can be entered. This can be set from 00-15 minutes. The default is 00 which means there is no delay. Feature 05 – Pairing Function: Allows the thermostat to be paired with the receiver.
- Page 15 Feature 08 – Rate of Change: This is the number of minutes the thermostat has calculated it takes to raise your building 1°C The thermostat will continue to learn the heat up time of your home and will adjust this setting to suit. Feature 09 –...
- Page 16 Adjusting the Feature Settings To adjust the settings, follow these steps; With the thermostat turned on. Press Prog Press Setup Use the Up/Down keys at the top of the screen to select the feature number (Shown on page 14) ...
- Page 17 Feature Table Feature Description Setting Temperature Format Switching 0.5 – 03 Differential 1°C Default Frost Protect 07-17°C Temperature 12°C Default Output Delay 00-15 Minutes 00 Default Pairing Used to Pair with Receiver Fail Safe 00=Disabled 01=Enabled 00=Default Preheat 00-03 Hours 00 Default Rate of Change 20 Minutes Default...
- Page 18 00 = Default...
- Page 19 Support Tel: 01254 870303...
Need help?
Do you have a question about the PRT-WTS and is the answer not in the manual?
Questions and answers