Table of Contents
Advertisement
Quick Links
Advertisement
Table of Contents

Related Manuals for Heatmiser PRT-EW


Summary of Contents for Heatmiser PRT-EW
- Page 1 Operating Instructions Model: PRT-EW Compatible with RC2-W Revision 1 11/09...
-
Page 2: Table Of Contents
Contents Page Install Procedure Pairing the Thermostat Icons Explained Temperature Display Setting the Clock Locking the Thermostat Comfort levels Explained Setting the Temperature Holiday Feature Factory Reset Optional Features Explained 14-18 Optional Feature Setup 19-20... -
Page 3: Install Procedure
Installation Procedure Mount the thermostat at eye level. Installation Carefully separate the front half of the thermostat from the back plate by placing a small flat head terminal driver in to the slots on the bottom face of the thermostat. Fix the back plate to the wall. - Page 4 Installing the Batteries 2 AAA batteries are supplied with the thermostat. To access the battery holder, push and release the compartment door (located on the bottom face of the thermostat) Install the batteries in the holder, following the polarity of the batteries.
-
Page 5: Pairing The Thermostat
Pairing the Thermostat With the thermostat turned off Press the Clock button until the LCD comes on. You will now see a small number 01 in the top right corner of the LCD. This is feature 01 Press Clock again until you see feature 07 (Receiver Address) Use the Up/Down keys to set the address. - Page 6 Pairing the thermostat On the receiver, press and hold the pairing button until the Comms LED comes on Turn off the thermostat by holding down the power button. On the thermostat, press the A key for 5 seconds. The thermostat will send a signal for 1 minute, and will flash the RF signal icon.
-
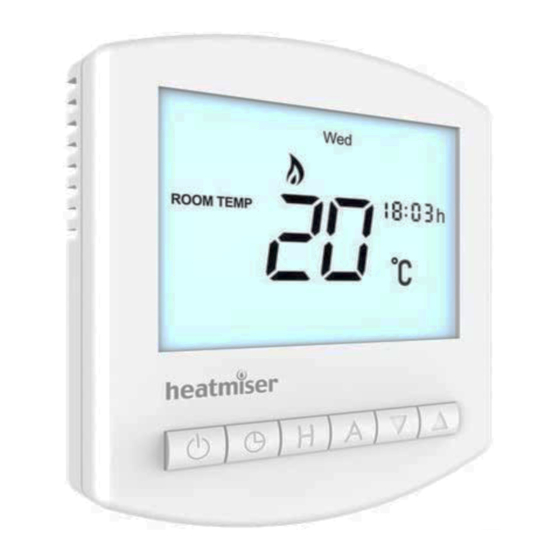
Page 7: Icons Explained
Icons Explained Heating On Heating Off – Frost Mode Key Lock RF Signal Active Battery Holiday Active Temperature Display Room Temp = This is the current room temperature. Set = This is the temperature you are trying to achieve in your home. -
Page 8: Setting The Clock
Setting the Clock To set the clock, follow the steps below. With the thermostat turned on, press the Clock button twice You are now able to set the minutes using the Up/Down keys Press H to accept ... -
Page 9: Comfort Levels Explained
Press and hold the A and Down key for 10 seconds You will see the lock symbol appear To unlock, repeat the steps above. Comfort Levels Explained The thermostat provides Weekday/Weekend or 7 Day programming. You should consult the Configuration Menu section to select the required mode. - Page 10 If you only want to use 2 levels, you should program the unused levels to --.— To begin programming the comfort levels, press Clock Once If your thermostat is setup for Weekday/Weekend programming, you will see Mon-Fri shown. For 7 day programming you will see Monday, you need to use Up/Down arrow keys to select which day you would like to program and then press H key to confirm...
- Page 11 You should repeat the programming for each period, entering --.—for unused periods. Note: For weekday/weekend programming, the 4 comfort levels are the same for all weekdays. For 7 day programming, each day can have 4 different comfort levels. Temperature Hold The temperature hold function is ideal for parties or when you will be going out for a number of hours.
-
Page 12: Setting The Temperature
You will see the Hold indication is displayed which will countdown the hold duration. To cancel, reduce the Hold time to 00 hours Temperature Set Using the Up/Down arrow keys allows you to adjust the set temperature. When you press either of these keys, you will see the word SET and the desired temperature. -
Page 13: Holiday Feature
Thermostat off: To turn the thermostat off completely, press and hold the power button. The display and heating output will be turned off. To turn the thermostat back on, press the power button. Holiday The thermostat has a holiday function. This allows you to enter a holiday setting. -
Page 14: Factory Reset
Factory Reset The thermostat has a factory reset function. This will reset all settings back to their factory default. To perform a factory reset, follow these steps; Turn the thermostat off Press and hold the Power and Up arrow key until the LCD powers up. -
Page 15: Optional Features Explained
THE FOLLOWING SETTINGS ARE OPTIONAL AND IN MOST CASES NEED NOT BE ADJUSTED Optional Features Explained Feature 01 – Temperature Format: This function allows you to select between C/F Feature 02 - Switching Differential: This function allows you to increase the switching differential of the thermostat. The default is 1C which means that with a set temperature of 20C, the thermostat will switch the heating on at 19C and off at 20C. - Page 16 Feature 04 – Frost Protect Temperature: This is the temperature maintained when the thermostat is in frost mode. The range is 07-17C. The default is 12C and is suitable for almost all applications. Feature 05 – Output Delay: To prevent rapid switching, an output delay can be entered.
- Page 17 If enabled, the thermostat will send a signal to the receiver every 20 minutes. Should the receiver fail to receive two signals, the receiver will activate the output for 20% of the time. This is to protect the system against a loss of wireless signal or should the thermostat battery fail whilst you are away.
- Page 18 Feature 13 – Floor Limit This thermostat uses the floor limiting sensor connected to the receiver to protect the floor surface from overheating. The floor limit is set from the thermostat but stored in the receiver. Should the RF link fail, the receiver will limit the floor from overheating.
- Page 19 Feature 16 – Programming Mode The thermostat offers two programming methods. Weekday/Weekend allows you to program 4 comfort levels for the weekday and 4 different comfort levels for the weekend. In 7 day program mode, each day has 4 comfort levels that can be programmed independently. Adjusting the Optional Settings To access the configuration menu, turn off the thermostat by pressing and holding down the power...
-
Page 20: Optional Feature Setup
Feature Table Feature Description Setting Temperature Format 00=C 01=F Switching Differential 01-03C 00C Default Frost Mode 00= Disabled 01 =Enabled (01= Default) Frost Temperature 07-12C (12C Default) Output Delay 00-15 Minutes (00 Default) Not used on this model Receiver Board Standalone = 01-32 Address 01-32, 00 default... - Page 21 Not used on this model Fail Safe 00 Disabled 01 Enabled Default 00 Up/Down Limit 00-10C 00C Default Sensor Selection 00 = Built in air sensor 01 = Remote air sensor Floor Limit 20-45C Default = 28C Preheat Setting 00-03 hours 00 default Rate of Change Non adjustable...
Need help?
Do you have a question about the PRT-EW and is the answer not in the manual?
Questions and answers