dji Osmo Action GPS User Manual
Bluetooth remote controller
Hide thumbs
Also See for Osmo Action GPS:
- User manual ,
- Safety manuallines (92 pages) ,
- Quick start manual (9 pages)
Table of Contents
Advertisement
Quick Links
Advertisement
Table of Contents

Subscribe to Our Youtube Channel
Related Manuals for dji Osmo Action GPS


Summary of Contents for dji Osmo Action GPS
- Page 1 Osmo Action GPS Bluetooth Remote Controller User Guide 使用说明 v1.0 2023.08...
- Page 2 Contents User Guide 使用说明...
-
Page 3: Safety Guidelines
Disclaimer By using this product, you signify that you have read, understand, and accept the terms and conditions of this guideline and all instructions at https://www.dji.com/osmo-action-4. EXCEPT AS EXPRESSLY PROVIDED IN AFTER-SALES SERVICE POLICIES AVAILABLE AT HTTPS://WWW. DJI.COM/SERVICE/POLICY, THE PRODUCT AND ALL MATERIALS AND CONTENT AVAILABLE THROUGH THE PRODUCT ARE PROVIDED "AS IS"... - Page 4 With the wrist strap, the remote controller can be installed in different places such as the handlebar of the bicycle, which can be flexibly adjusted to shoot in various sports scenes. * Support for DJI devices will be updated continuously. Visit the corresponding DJI Osmo Action camera product page for a complete list. Overview 1. Quick Switch Button...
-
Page 5: Button Features
Button Features Link Button Shutter/Record Button Quick Switch Button Quick Switch Button • Press and hold: power on or off the remote controller. • Press once: switch between shooting modes when connected to the camera. Link Button • Press and hold: link the remote controller and the camera. • Press once: power on the camera when the camera is in sleep mode and connected to the remote controller. During the linking process, press once to cancel linking. -
Page 6: Screen Description
Screen Description The screen displays the status of the connected camera, the battery level of the remote controller, and other information. When controlling multiple cameras, the screen displays the number of cameras connected. The display on the screen varies depending on the camera mode. -
Page 7: Operation
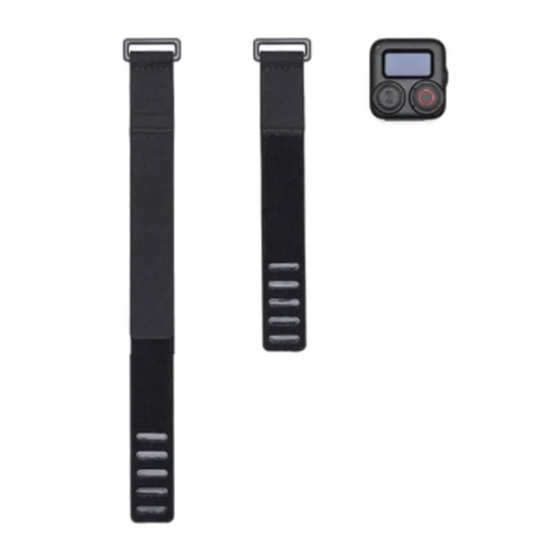
Operation Installation Methods The package includes two wrist straps of different lengths. The remote controller can be fixed to the wrist using the long wrist strap and can also be fixed to the bicycle handlebar, motorcycle handlebar, backpack strap, and other locations using the short wrist strap. Installing the Long Wrist Strap Fix the remote controller in a suitable position on the wrist and fasten the hook-and-loop fastener properly, as shown below. Installing the Short Wrist Strap 1. Remove the buckle from the hole of the long wrist strap, as shown below. 2. Thread the short wrist strap through the strap slot on the back of the remote controller. Make sure that the side with the raised surface is facing upward. 3. Adjust the position of the remote controller on the wrist strap until one end of the strap slot reaches the raised surface. Thread the buckle through the hole on the short wrist strap. -
Page 8: Controlling The Cameras
4. Thread the strap through the buckle and fasten the hook-and-loop fastener properly. Linking Linking in Single-Camera Control Mode When powered on, the remote controller automatically searches for and connects to any Osmo Action 4 cameras. Follow the prompts on the camera screen to link the devices. Linking in Multi-Camera Control Mode When powered on, the remote controller will be in single-camera control mode by default. Press and hold the shutter/record and link buttons for four seconds to switch into multi-camera control mode. Then the remote controller searches for the cameras and starts the linking process. Follow the prompts on the camera screen to link the devices. When controlling multiple... -
Page 9: Charging The Battery
Dashboard The built-in satellite positioning modules enable users to record fitness data accurately when shooting. When used with DJI Mimo, users can add a host of collected data to enrich the video, such as speed, route, direction, and elevation. • Make sure to use the remote controller in an open outdoor environment to avoid signal interference and wait 1-2 minutes until the GPS signal is strong. Make sure the remote controller faces upward for the optimal GPS signal. DO NOT block the top of the remote controller with your hands or other objects. • The remote controller does not have a GPS signal underwater. DO NOT use the remote controller underwater. -
Page 10: Specifications
Blinks green twice Charging, 26%-50% Blinks green Charging, 0%-25% System Status Blinks red three times Power on or off Blinks blue Linking Operation Status Solid green Ready to use Temporarily off Take a photo Blinks red Recording a video Specifications Model OSMO-AF-336 Dimensions 40.5×38.6×20.5 mm Weight 26 g Waterproof Level IPX7 Effective Remote Control Distance* 25 m GNSS GPS+BeiDou+Galileo+GLONASS Bluetooth Protocol BLE 5.0 Operating Frequency 2.4000-2.4835 GHz... - Page 11 免责声明和警告 使用本产品前,请您仔细阅读并遵守本安全概要、访问 https://www.dji.com/osmo-action-4 阅读《用户手册》和其他指引。使用本产品视为您已经阅读并接受与本产品相关的全部条款。 安全操作指引 1. 若产品起火,请根据实际情况按以下推荐顺序使用灭火器材:水、水雾、沙、灭火毯、干粉、 二氧化碳灭火器。 2. 请在温度为 -10℃至 45℃之间的环境中使用产品。 3. 禁止以任何方式拆解产品。若拆解过程中刺破电池,将会导致电池内部电解液泄漏、甚至引 发起火、爆炸。 4. 禁止机械撞击、碾压或抛掷产品。请勿在产品上放置重物。 5. 切勿对产品进行加热。请勿将产品放置于微波炉或压力锅中。 6. 禁止将产品放在靠近热源(火炉或加热器等)的地方以及将产品置于热天的汽车内。切勿将 产品存储在超过 45℃的环境下。理想的存储环境温度为 22℃ -28℃。 7. 切勿将电池彻底放完电后长时间存储,以避免电池进入过放状态而造成电芯损坏,将无法恢 复使用。 8. 每隔 3 个月左右重新充放电一次以保持电池活性。...
- Page 12 OSMO Action GPS 蓝牙遥控器(以下简称“遥控器”)使用无线蓝牙的方式与 Osmo Action 4* 连接,实现操控相机进行远程拍摄。遥控器支持单机控制和一控多机,最多可同时控制 16 台相 机进行拍摄。遥控器内置多模卫星定位模块,可精准记录运动数据,连接 DJI Mimo App 后, 可添加实时运动数据(如速度、路线、方向及海拔等)至拍摄素材中并导出。 遥控器安装方式简单,支持通过腕带固定于手腕、自行车车把等位置,以便帮助更好完成各种 运动场景下的拍摄。 * 适用的 DJI 设备会持续更新,请访问 Osmo Action 系列运动相机产品页面查看详细列表。 部件介绍 1. 快速切换按键 6. 对频按键 2. 拍摄按键 7. 挂绳孔 3. USB-C 接口 8. 腕带槽位 4. 状态指示灯...
- Page 13 按键功能 对频按键 拍摄按键 快速切换按键 快速切换按键 • 长按:开启或关闭遥控器。 • 短按:当遥控器与相机连接时,可切换相机拍摄模式。 对频按键 • 长按:遥控器与相机开始配对。 • 短按:当遥控器与相机连接时,唤醒相机。当处于配对过程时,取消对频。 拍摄按键 • 长按:使相机休眠或唤醒相机。 • 短按:拍照或开始 / 停止录像。当相机处于休眠状态时,唤醒相机并进行 SnapShot 录制。 注意:在遥控器与相机保持连接的情况下,使用拍摄按键控制相机相关功能。 组合按键 • 同时长按拍摄按键与对频按键 4 秒:切换一控多机或单机控制,并进入配对状态。 • 同时长按快速切换按键与拍摄按键 4 秒:查看遥控器当前的固件版本信息。 • 同时长按快速切换按键与对频按键 4 秒:清除当前所有相机的连接信息,并进入配对状态。...
- Page 14 显示屏说明 Osmo Action GPS 蓝牙遥控器的显示屏可显示已连接相机状态和遥控器电量等信息。一控多机 时,可显示当前连接相机数量。不同状态显示的内容不同,请以实际显示为准。 1. 相机验证码:显示遥控器与相机连接的验证码。当找到相机后,遥控器屏幕和相机屏幕会显 示验证码,在相机屏幕点击“接受”。 2. GPS 定位状态:显示当前的 GPS 信号强度。当遥控器正在搜索 GPS 信号时,将显示 。 3. 遥控器电量:显示遥控器的剩余电量。 4. 连接状态:显示与相机的蓝牙连接状态。 5. 相机 microSD 卡信息:与相机连接成功后,显示相机内 microSD 卡可存储的照片数量或可 拍摄时长。 6. 界面信息:与相机连接成功后,同步相机拍摄信息。 如果 3 分钟内无按键动作,显示屏将熄屏省电;未连接相机且非充电状态时,显示屏熄屏后 10 分钟内如果依旧无按键动作,蓝牙遥控器将自动关机。显示屏熄屏期间按任意按键可重新点亮 屏幕,蓝牙遥控器正常工作。...
- Page 15 使用方法 固定方式 包装内含有长度不同的两根腕带。通过长腕带可以把遥控器固定至手腕处,通过短腕带可以把 遥控器固定至自行车车把、摩托车车把、背包带等位置。 安装长腕带至手腕 如下图所示,将遥控器固定至手腕合适位置后扣紧魔术贴。 安装短腕带至自行车车把 1. 如下图所示,先将口字扣从长腕带的孔位取下。 2. 将短腕带穿过遥控器背面的腕带槽位,注意将有凸起限位的一面朝上。 3. 调整遥控器在腕带上的位置,直至槽位的一端抵住凸起限位。将口字扣穿过短腕带的孔位。 4. 将腕带的另一端穿过口字扣后扣紧魔术贴。...
- Page 16 配对 单机配对 遥控器开机后默认进入单机配对模式,将自动搜索相机并进行配对。根据相机界面提示进行配 对授权操作。 多机配对 遥控器开机后默认进入单机配对模式,同时长按拍摄按键与对频按键 4 秒可进入一控多机模式。 遥控器将自动搜索相机并逐个进行配对。根据相机界面提示进行配对授权操作。一控多机时, 遥控器的显示屏将显示当前连接相机数量。 配对过程中遥控器机身持续闪烁蓝灯,直至配对成功。配对完成后,可以通过遥控器控制相机 拍照、录像等操作。 控制拍录 单机控制 单机控制模式下,短按快速切换按键可控制相机切换拍摄模式。可供切换的拍摄模式与相机内 的设置一致。短按拍摄按键可控制相机拍照或开始 / 停止拍摄。 多机控制 一控多机模式下,默认情况下遥控器可以控制各相机使用各自的拍摄模式进行拍摄。短按快速 切换按键,可以将全部相机切换至统一的拍摄模式。短按拍摄按键控制相机开始拍摄,双击拍 摄按键控制相机停止拍摄。拍摄规格参数将以各相机在该模式的预设下为准。 仪表盘功能 遥控器内置多模卫星定位模块,可精准记录运动数据。连接 DJI Mimo App 后,可添加实时运动 数据(如速度、路线、方向及海拔等)至拍摄素材中并导出。 • 为避免 GPS 信号受到干扰,在室外空旷环境下使用遥控器。等待 1-2 分钟直至确认 GPS 信号满格后再使用。使用时保持遥控器正面朝上,请勿用手或其他物体挡住遥控器 的顶部。 • 由于遥控器信号在水下会受到影响,请勿在水下环境使用。...
- Page 17 充电 打开遥控器机身的 USB-C 保护盖后,连接遥控器的 USB-C 接口与充电器充电。 状态指示灯 状态指示灯 指示灯 描述 关机状态下充电 绿灯常亮 6 秒后熄灭 充电完成 绿灯四闪 充电中,76%-100% 绿灯三闪 充电中,51%-75% 绿灯双闪 充电中,26%-50% 绿灯闪烁 充电中,0%-25% 系统状态 红灯三闪 关机 蓝灯闪烁 进入配对状态 工作状态 绿灯常亮 进入拍摄就绪状态 绿灯灭一次 拍照 红灯闪烁 录像中...
- Page 18 规格参数 OSMO-AF-336 产品型号 40.5 x 38.6 x 20.5 mm 蓝牙遥控器尺寸 26 g 重量 IPX7 防水等级 25 米 * 遥控距离 GNSS GPS+BeiDou+Galileo+GLONASS 蓝牙 BLE 5.0 协议 2.402-2.480 GHz 工作频率 < 4 dBm 发射功率 电池 270mAh 容量 电池类型 可充电锂离子电池组 连接 USB-C 接口(电压为 4.4V) 充电方式 0 ℃至 45℃ 充电环境温度 -10℃至 45℃ 工作环境温度...
- Page 19 微信扫一扫 Contact DJI SUPPORT 获取技术支持 https://www.dji.com/osmo-action-4/downloads This content is subject to change without prior notice. DJI and OSMO ACTION are trademarks of DJI. Copyright © 2023 DJI OSMO All Rights Reserved.
Need help?
Do you have a question about the Osmo Action GPS and is the answer not in the manual?
Questions and answers