Table of Contents
Advertisement
Quick Links
Car Navigation System
OWNER'S MANUAL
LNN2010IWUM/LNN2010EWUM
LAN4200EKUM
Please read this manual carefully before operating your set and retain it for future reference.
Designs and specifi cations are subject to change without prior notice.
ENGLISH
DEUTSCH
FRANÇAIS
ESPAÑOL
ITALIANO
NEDERLANDS
РУССКИЙ
SVENSKA
PORTUGUÊS
DANSK
Čeština
POLSKI
SLOVENČINA
TÜRKÇE
KOREAN
Advertisement
Table of Contents

Related Manuals for Kia LNN2010IWUM


Summary of Contents for Kia LNN2010IWUM
- Page 1 DEUTSCH FRANÇAIS ESPAÑOL Car Navigation System OWNER’S MANUAL ITALIANO LNN2010IWUM/LNN2010EWUM NEDERLANDS LAN4200EKUM РУССКИЙ Please read this manual carefully before operating your set and retain it for future reference. SVENSKA Designs and specifi cations are subject to change without prior notice.
-
Page 2: Navigation System
Thank you for purchasing this Navigation system. This user’s manual explains how to use the Motor Navigation system. Before using the product, read the contents of this user’s manual carefully and use this product safely. • The screens shown in this manual may diff er with the actual screens of the product. •... -
Page 3: Precautions For Safety
Precautions for safety Precautions for safety Safety notes CAUTION Always operate the vehicle in a safe manner. When driving your vehicle, be sure to keep the Do not become distracted by the vehicle while volume of the unit low enough to allow you to RISK OF ELECTRIC driving and always be fully aware of all driving hear sounds coming from the outside. - Page 4 Precautions for safety WARNING: • The navigation system does not take the relative safety of the suggested routes into • Don’t use a cellular phone when you are consideration. driving. You must stop at a safe place to use Road blocks, building sites, height or weight a cellular phone.
- Page 5 Precautions for safety CAUTION: Disposal of your old appliances Disposal of waste batteries/ • Do not keep the navigation system running accumulators with the engine stopped. Doing so may discharge the vehicle battery. When you use the navigation system, always keep the 1.
-
Page 6: Table Of Contents
Table of contents Table of contents Precautions for safety Using the Touch screen ... . . 16 USB Operation Safety notes ..... . 3 Playing USB music . - Page 7 Table of contents Seek ............26 Acquiring satellite signals ...30 Home, Office, Favourite (1~6) ..40 List ............26 Operating Navigation Screen ..31 Registering Home, Office, or Favourite Setting iPod option .
- Page 8 Table of contents ..............48 Guidance ..........54 General ......63 Deleting Bluetooth Devices ....48 Route ............55 Language ..........
- Page 9 Table of contents AVM (Around View Monitor) - Specification Option About AVM (Around View Monitor) . . . 70 Operating front AVM ....70 Operating rear AVM ....70 AVM setting .
-
Page 10: General Information
General information General information • Repeated connecting/disconnecting of USB • Charging through the USB may not work for About USB devices within short periods of time may some mobile devices. Connect the USB device after turning on the result in product malfunction. •... -
Page 11: Mp3 File Information
General information MP3 file Information Using iPod Devices Supported iPod devices iPhone5 • Sampling frequency: 8 ~ 48 KHz (MP3), 22.5 Precautions upon using iPod ~ 48 KHz (WMA) iPhone4S iPod® is a registered trademark of Apple Inc. • Bit rate: 8 ~ 320 Kbps (MP3), 20 ~ 320 Kbps iPhone4 (WMA) •... -
Page 12: Cautions Upon Using Sd Cards
General information Cautions upon using SD Cards Ejecting and Inserting SD Cards • Ejecting and inserting SD cards while the system is operating may result in SD Card or System errors. To eject or insert the SD card, fi rst turn off the system and the vehicle ignition. -
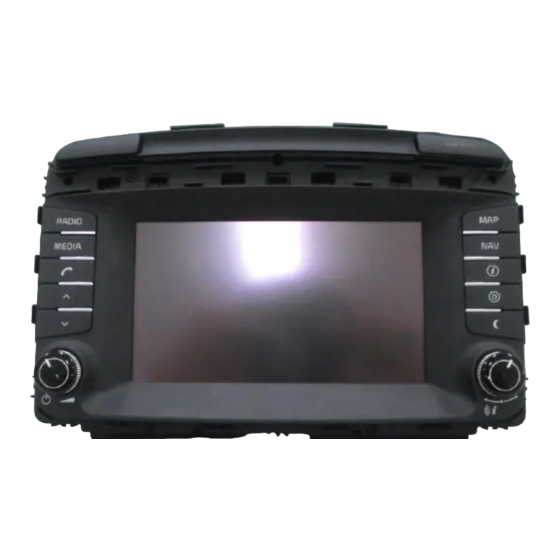
Page 13: Name Of Each Component
Name of each component Name of each component Head unit 1. RADIO button button 5. • button Converts to FM/AM/DAB mode. - When it is pressed shortly (less than 0.8 sec.) - Power on • FM/AM/DAB mode: plays previous/next Each time the button is pressed, the mode Press this button in system OFF status. - Page 14 Name of each component 6. • button button • [ ]: shows the GPS satellite status. - FM/AM/DAB mode: turn left/right to - Press to move to the [Setup] menu. change the station. - Press and hold to check Software version, 10.
-
Page 15: Steering Wheel Remote Control
Name of each component Steering wheel remote control 4. Seek up/down (W/S) button - When it is pressed shortly (less than 0.8 sec.) • FM/AM/DAB mode: plays previous/ next station. • MEDIA mode: plays previous/next fi le. - When it is pressed and held (0.8 sec. or longer) •... -
Page 16: Basic Operation
Basic operation Basic operation Start-up screen Turning the system on Using the Touch screen Press the engine start button or set the Press “1” on the head unit in system OFF Press the desired menu on the screen to select ignition key to On or ACC. -
Page 17: Radio Operation (Fm/Am)
Radio operation (FM/AM) Radio operation (FM/AM) Manual tuning: Listening to FM/AM radio Autostore (AM only) Turn “ ” on the head unit in 1. Press "RADIO" on the head unit. This function lets you automatically store the clockwise or counter-clockwise direction. strong broadcast stations. -
Page 18: Presetting Fm/Am
Radio operation (FM/AM) Presetting FM/AM Deleting FM/AM preset Setting the FM/AM option Select FM or AM. Saving FM/AM preset Scan 2. Press [Preset] > [ preset stations each for FM/AM modes can This function scans all stations and plays only be saved manually. -
Page 19: (Fm Only)
Radio operation (FM/AM) Region (FM only) Sound settings TA function allows the system to switch to When the receiving signals from the current 1. Press [Option] > [Sound settings] in the traffi c announcement (TA) from the current station become weak, the station switches to radio screen. -
Page 20: Radio Operation (Dab)
Radio operation (DAB) Radio operation (DAB) Listening to DAB Viewing station list Presetting DAB 1. Press "RADIO" on the head unit. You can see station list with superior reception. Saving DAB preset Each time the "RADIO" button on the head Select the DAB band. -
Page 21: Service Following
Radio operation (DAB) L-Band Sound settings TA function allows the system to switch to This function sets whether to receive the 1. Press [Option] > [Sound settings] in the traffi c announcement (TA) from the current L-Band or not. radio screen. source. -
Page 22: Playing Usb Music
USB Operation USB Operation Playing USB music Skip Seek You can play the previous or next fi le. You can play the fi le directly by searching for You can play music fi les saved in a USB the desired fi le. memory device. -
Page 23: Setting Usb Music Option
USB Operation Setting USB music option Repeat Shuffle The current playing fi le is played repeatedly. All fi les are played randomly. Scan 1. Press [Option] > [Repeat]. 1. Press [Option] > [Shuffle]. This function scans the beginning parts of each fi les for 10 seconds. -
Page 24: Viewing Usb Image
USB Operation Viewing USB image Skip Rotating image 1. Press [ ] in menu screen. You can view the previous or next image. You can play image fi les saved in a USB memory device. Position Description Connect a USB device to the USB port and Screen Press [C playback starts automatically. -
Page 25: List
USB Operation List Setting USB image option Display Settings You can view the desired image by searching 1. Press [Option] > [Display Settings]. File Info for image list included in USB. 2. For details, refer to the “Display” on the This menu shows the folder name, fi le name, 1. -
Page 26: Playing Ipod
iPod Operation iPod Operation Playing iPod List Setting iPod option You can play the desired fi le by searching for Connect an iPod to the USB port by using the Setting audiobook playback speed fi le list included in iPod. iPod cable and playback starts automatically. -
Page 27: Repeat
iPod Operation Repeat Shuffle Sound settings The current playing fi le is played repeatedly. All fi les are played randomly. 1. Press [Option] > [Sound settings]. 1. Press [Option] > [Repeat]. 1. Press [Option] > [Shuffle]. 2. For details, refer to the “Sound” on the page 2. -
Page 28: Auxiliary Device Operation
Auxiliary device operation Auxiliary device operation Playing an AUX source Switching to menu screen or full screen 1. Connect an auxiliary device to the AUX terminal. Press the screen repeatedly during video playback. Note If there is no operation for 5 seconds in menu screen, it switches to full screen. -
Page 29: Bluetooth Audio
Bluetooth audio Bluetooth audio Playing Bluetooth audio Starting the Bluetooth audio Skip 1. Press [MEDIA] > [Media ] > [Bluetooth You can play the previous or next fi le. Before playing the Bluetooth audio Audio]. For details, refer to the “Skip” on the page 30. •... -
Page 30: Getting Started With Navigation
Getting started with navigation Getting started with navigation • The position of the vehicle within the Precautions for safe driving About satellite signals navigation may diff er from your actual Please observe and comply with local traffi c Your unit must acquire satellite signals to location depending on various reasons, rules and regulations. -
Page 31: Operating Navigation Screen
Getting started with navigation Operating Navigation Screen 6. [ ] button The navigation system displays various information on the screen. Moves to quick menu screen. For details, refer to the "General operations of quick Map screen menu" on the page 63. 7. - Page 32 Getting started with navigation 11. Vehicle position display C[Manoeuvre] Position Description • Displays distance and Displays current vehicle position and direction information A[Map] Moves to the map screen. direction. for the upcoming B[Route info] intersection when the • Displays distance and direction information route is activated, 12.
-
Page 33: Zoom In / Zoom Out
Getting started with navigation Zoom In / Zoom Out Scrolling map Traffic information list Turn “ “ left/right unit to set the zoom 1. Press and drag the map area on the The current traffi c/road event information is level on the map screen. screen. -
Page 34: Navigation Volume
Getting started with navigation Navigation volume General operations of quick General operations of [Nav] menu menu Press the [ ] or [ ] to adjust the volume and mute or unmute on the map screen. Press [NAV] on the head unit. Press [ ] on the map... -
Page 35: Searching For Destination Of Navigation
Searching for destination of navigation Searching for destination of navigation 3. Press [Start]. • [Fast]: Calculates the route based on the Address Search fastest arrival time. • Press [Save] to save the destination to You can fi nd the destination by searching for [Favourite] menu. -
Page 36: Last Destinations
Searching for destination of navigation Last destinations Searching for POI by name 1. Press [MENU]> [Destination] > [POI name]. You can fi nd the destination to a location that You can fi nd a destination from various Or press [NAV] > [Destination] > [POI] > you have recently as the destination. -
Page 37: Searching For Poi By Phone Number
Searching for destination of navigation 2. Press the desired item from the list. Searching for POI by phone number Address book 3. Follow the steps 3-5 of the " Address If you know the phone number of the You can fi nd the destination to a location Search"... -
Page 38: Editing Address Book
Searching for destination of navigation Editing Address book Hyundai service Service name 1. Press [MENU] > [Edit] in address book list. 1. Press [NAV] > [Destination] > [Hyundai You can fi nd the facilities of Hyundai service as service] > [Service name]. the destination. -
Page 39: Service Phone Number
Searching for destination of navigation Service phone number Load tour Deleting load tour 1. Press [NAV] > [Destination] > [Load tour]. 1. Press [NAV] > [Destination] > [Hyundai You can fi nd the destination to a location service] > [Service phone number]. 2. -
Page 40: Coordinates
Searching for destination of navigation Coordinates Home, Office, Favourite (1~6) You can fi nd a destination by inputting the If your home location, offi ce location, and coordinates of latitude and longitude. Favourite locations have been already saved in the [Favourite] menu, it can be easily retrieved 1. -
Page 41: Using The Route Menu
Using the route menu Using the route menu - [Auto]: Calculates the route Route menu overview Route option automatically based on the system. This allows you to change the route conditions You can modify the route conditions or • Main road, Ferry, Toll road, Vignette, Time by using the route menu when the route is confi rm the route information. -
Page 42: Plan Tour
Using the route menu 4. If you want to add an waypoint, follow Plan tour Saving the plan tour in the [Load tour] steps 2~3. menu The plan tour allows you to travel through the If the plan tour have been already saved in the 5. -
Page 43: Avoid Street
Using the route menu Avoid street Route overview Route information This allows you to search for new route by You can check the entire route between your This allows you to view the distance to the avoiding the selected street(s). current location and your destination. -
Page 44: Route Scan
Using the route menu Route scan This allows you to check the detailed turn-by- turn list. 1. Press [NAV] > [Route] > [Route scan]. 2. Press the desired item. • [ ]: Move to the departure location. • [ ]: Move to the previous maneuver. •... -
Page 45: Bluetooth® Wireless Technology
Bluetooth® Wireless Technology Bluetooth® Wireless Technology • Park the vehicle when pairing the head unit Before Using the Bluetooth Precautions for Safe Driving with the mobile phone. Handsfree • Bluetooth Handsfree is a feature that enables • Some Bluetooth features may occasionally drivers to practice safe driving. -
Page 46: Pairing And Connecting The Unit And A Bluetooth Phone
Bluetooth® Wireless Technology supported, input the passkey on your 6. When your phone is successfully Pairing and connecting the Bluetooth device. (The default passkey connected, the phone screen is displayed unit and a Bluetooth phone is 0000.) on the screen. When the connection fails, To use the Bluetooth feature, make sure the 2) If the SSP (Simple Secure... -
Page 47: When A Phone Is Already Paired
Bluetooth® Wireless Technology 2) If the SSP (Simple Secure Pairing) is When a phone is already paired supported, press [Yes] on the pop-up 1. Press [HOME] > [Settings] > [Bluetooth] > screen of the your Bluetooth device. [Bluetooth connection]. (The pop-up screen may diff er from the actual information of the Bluetooth device.) 5. -
Page 48: Disconnecting The Connected Phone
Bluetooth® Wireless Technology Disconnecting the connected phone Deleting Bluetooth Devices Making a call by entering phone number 1. Press [MENU] > [Connection settings] > If you no longer need to use a phone, you can delete the Bluetooth devices. Note that [Bluetooth connection] on the phone Connect your unit and Bluetooth phone before deleting a Bluetooth device will delete all call... -
Page 49: Making A Call With Speed Dial Numbers
Bluetooth® Wireless Technology Making a call with speed dial Answering/Rejecting a call Switching call to the mobile numbers phone 1. If there is an incoming call, a popup message will appear. Press and hold speed dial number using the 1. If you want to switch the call to the mobile 2. -
Page 50: Using The Menu During A Phone Call
Bluetooth® Wireless Technology Using the menu during a phone Call history Downloading call history call You can download the call history information Making a call from call history from your mobile phone. When making a call, you can use the following 1. -
Page 51: Deleting Call History
Bluetooth® Wireless Technology Deleting call history Contacts Downloading mobile phone contacts You can delete the items that you select from Up to 5,000 mobile phone contacts can be 1. Press [ ] on the phone screen. your call history Information. downloaded. -
Page 52: Searching For Contacts
Bluetooth® Wireless Technology Searching for contacts Adding as a Favourite Favourites 1. Press [ ] > [MENU] > [Search Contacts] 1. Press [ ] on the phone screen. Calling Favourites on the phone screen. The contacts is displayed on the screen. If the phone number have been already stored 2. -
Page 53: Adding As A Favourite
Bluetooth® Wireless Technology Adding as a Favourite Deleting favourites Setting Bluetooth Connection 1. Press [ ] on the phone screen. 1. Press [ ] on the phone screen. 1. Press [ ], [ ], [ ], or [ ] on the phone screen. -
Page 54: Settings
Settings Settings 2. Select the desired items. 2. Select the desired items. Settings menu overview • [Unit]: Changes the unit between the • [Address book symbol]: Sets whether to Settings menu “km” and “mile”. display a symbol on the map about the •... -
Page 55: Route
Settings • [Speed limit]: Sets whether to display the 2. Select the desired items. speed limit or not. • [Traffi c event]: Sets the traffi c event to • [Dynamic guidance]: Sets whether to “On”, “Off ” or “Auto”. execute the dynamic guidance or not. - On/Off : Selects whether to display •... -
Page 56: Sound
Settings Sound Fader/Balance Treble/Middle/Bass This menu allows you to set the sound This menu allows you to set the Treble/Middle/ This menu describes sound settings. position. For example, you can set the sound Bass. Volume control close to the driver-seat so that the volume is 1. -
Page 57: Display
Settings Surround effect Touch Tone Display This menu allows you to turn the surround This menu allows you to play a beep sound This menu describes display settings. whenever you operate the touch screen. eff ect on/off . Set Video image Press [HOME] >... -
Page 58: Set Lcd Brightness
Settings Set LCD Brightness Illumination Settings Ratio This menu is used to set the LCD brightness. This menu is used to set the screen brightness The screen ratio can be set in video modes, by illumination. such as DVD, VCD, Jukebox video, USB video, 1. -
Page 59: Bluetooth
Settings Reset Bluetooth Auto connection priority This menu is used to reset all [Display] settings. If auto connection priority is turned on, This menu describes Bluetooth settings. a Bluetooth device will automatically be 1. Press [HOME] > [Settings] > [Display] > Bluetooth connection connected according to the option setting [Reset]. -
Page 60: Auto Download
Settings Auto download Audio Streaming Device Information When the Bluetooth device is connected, When audio streaming is set, you can play the This menu allows you to control additional contacts and call history are automatically music stored on a mobile device. When this Bluetooth®... -
Page 61: Voice Recognition
Settings 2. Input the passkey using the keypad. Device name Voice recognition 1. Press [HOME] > [Settings] > [Bluetooth] > This menu describes voice recognition settings. Note [Device Information] > [Device name]. 1. Press [HOME] > [Settings] > [Voice The passkey is a 4-digit authentication code recongnition]. -
Page 62: Clock
Settings Clock Time Settings Daylight Savings Time 1. Press [HOME] > [Settings] > [Clock] > [Time This menu is used to turn on/off daylight This menu describes clock settings. Settings]. saving time feature. GPS time Press [HOME] > [Settings] > [Clock] > [Daylight Savings Time]. -
Page 63: Clock Type
Settings Clock Type Time Format General This menu is used to set the type of clock This function is used to convert the digital Language displayed when the system power is turned clock display between 12 hour/24 hour off . systems. -
Page 64: Keyboard
Settings Keyboard Agreement Screen Korean Keyboard similar to the one This menu allows you to change the type of keyboard used in Korea. It sets the Agreement Screen displayed during keyboard used within the system. the system booting to automatically disappear after 5 seconds. -
Page 65: Lock Rear Controls
Settings Lock Rear Controls E-Manual Skip This menu is used to lock the function for rear You can see the previous or next page. You can see the E-Manual. seat. Push the controller to the left or right. 1. Press [HOME] > [Settings] > [E-Manual]. Press [HOME] >... -
Page 66: Search
Settings Search System Info Jukebox Info 1. Press [MENU] > [Search] on the E-Manual This menu is used to display the capacity of Version screen. the stored information on the Jukebox. This menu option allows you to view the 1. Press [HOME] > [Settings] > [System Info] > system information. -
Page 67: Update
Settings • Turning off the power or ejecting the USB Update Reset All during the update process may result in For system’s software security, new function This menu is used to reset all settings specifi ed data loss. Make sure to keep the ignition on addition, and map update, you need an by the user. -
Page 68: Using Rear Camera - Option
Using rear camera - Option Using rear camera - Option Note About Rear Camera Rear camera has an optical lens to secure • Rear camera is an option for the customers wide view, so there is a little diff erence in the who selected the option. -
Page 69: Using Pgs (Parking Guide System) - Option
Using PGS (Parking Guide System) - Option Using PGS (Parking Guide System) - Option It is the screen looking down the rear About PGS (Parking Guide Normal View direction of the vehicle from above, and System) 1. In top view screen, if you press [Normal the screen composition is as follows. -
Page 70: Avm (Around View Monitor)
AVM (Around View Monitor) - Option AVM (Around View Monitor) - Option b Front camera screen: screen of the front of About AVM (Around View Monitor) Operating rear AVM the vehicle is displayed through camera • AVM (Around View Monitor) is an option that After starting the vehicle, if you put gear at R c AVM side camera screen: According to the is provided to the customers who selected... -
Page 71: Avm Setting
AVM (Around View Monitor) - Option • [General]: It sets/resets guide line steering Front passenger's door open indicator (Rear + left side display): It displays the interface and approaching obstacle warning vehicle’s rear screen and left rear screen at When the front passenger’s door is open, “ ” display function. -
Page 72: Climate Mode
Climate Mode Climate Mode F A/C: It is displayed when A/C button • Rear Climate Control: Turns Climate Operating Climate Mode is selected, and air conditioner is Control for the rear seats on or off . 1. Press the CLIMATE key to display the operated for vehicle cooling. -
Page 73: Before Thinking There Is A Product Defect
Before thinking there is a product defect Before thinking there is a product defect • When driving in heavy traffi c with frequent The current position as shown on the Correct route guidance may not occur starts and stops navigation may differ from the actual due to search conditions or driving position under the following conditions. - Page 74 Before thinking there is a product defect These situations may occur after conducting route calculation. The following occurrences are not malfunctions: • Guidance may be given to a position diff ering from the current position when turning at an intersection •...
- Page 75 Before thinking the product has malfunctioned 1. Errors which occur during the operation or installation of the device may be mistaken as a malfunction of the actual device. 2. If you are having problems with the device, try the suggestions listed below. 3.
-
Page 76: Troubleshooting
Troubleshooting Troubleshooting Problem Possible Cause Countermeasure The power does not The fuse is disconnected. • Replace with a suitable fuse. turn on. • If the fuse is disconnected again, please contact your point of purchase or service center. Device is not properly connected. Check to see that the device has been properly connected. - Page 77 Troubleshooting Problem Possible Cause Countermeasure The sound or image The disc is dirty or scratched. Wipe off water or dirt from the disc. Do not use a disc which has been quality is low. scratched. Vibration is occurring from where the The sound may be short circuited and the image distorted if the device conversion switch has been installed.
-
Page 78: Trademarks And Licenses
Trademarks and Licenses Trademarks and Licenses DivX® Bluetooth® Wireless Technology • ABOUT DIVX VIDEO: DivX® is a digital video The Bluetooth Wireless Technology word mark format created by DivX, LLC, a subsidiary and logos are registered trademarks owned by of Rovi Corporation. This is an offi cial DivX Bluetooth Wireless Technology SIG, Inc. - Page 79 Specification Specification Power Supply DC 14.4 V Operating Power DC 9 V ~ DC 16 V Tuning range 522 kHz ~ 1620 kHz Current Consumption Maximum 5 A Sensitivity 35 dBuV Dark Current Maximum1 mA Frequency response 30 Hz ~ 10000 Hz Operating Signal-to-noise ratio Minimum 45 dB...
- Page 80 P/N: MFL67720954...
Need help?
Do you have a question about the LNN2010IWUM and is the answer not in the manual?
Questions and answers