Table of Contents
Advertisement
Advertisement
Table of Contents

Related Manuals for VTech 17450


Summary of Contents for VTech 17450
- Page 1 User Guide For product support Model: please call: 1 300 369 193 VTech 17450...
- Page 2 INTRODUCTION To your VTech 17450 Cordless Phone with Answering Machine • Phonebook - Up to 70 phonebook entries are shared between the the base and handsets. • Calling Number Display* - Lets you see who’s calling. Your phone stores details of the last 30 callers in the Call List.
- Page 3 NEED HELP? PLEASE LOOK IN THE HELP SECTION AT THE END OF THE USER GUIDE IF YOU EXPERIENCE ANY OPERATIONAL DIFFICULTIES WITH YOUR VTECH PRODUCT, OR PLEASE CONTACT THE TECHELP INFORMATION LINE 1300 369 193 OR CONTACT US BY EMAIL AT: tcpsupport_au@vtech.com...
-
Page 4: Table Of Contents
TABLE OF CONTENT Important safety instructions Getting started Location Handset Overview Base Overview Display Icons Overview Main Menu Structure Connect Install the Handset Battery Charge the Batteries Keystroke Table Navigating the Handset Menu Telephone operation Make a Call Call from the Phonebook Speakerphone Volume Boost Search Alphabetically for Phonebook Entries... - Page 5 Answer a Call Adjust Earpiece and Speakerphone Volume Temporary Ringer Silencing End a Call Call Timer Redial Chain Dialing Find the Handset (Paging) Internal Calls Power Fail Back-up Telephone settings Date and Time Settings Handset Settings Base Settings Call log View the Call Log Store a Call Log Number into the Phonebook Delete an Entry in the Call Log...
- Page 6 Phonebook Store a Number Entry in the Phonebook Entering Names Writing Tips Review an Entry Dial an Entry Search a Phonebook Entry Alphabetically Edit a Phonebook Entry Delete a Phonebook Entry Delete All Phonebook Entries Check phonebook capacity Direct Memory Keys Base photo Speed Dial Keys Speed dial Assign a Speed Dial Number from the Directory...
- Page 7 Review Block List Entries Edit a Block List Entry Delete a Block List Entry Delete all Block List Entries Answering system Answer On/Off Message Playback Delete All Messages Record, Play, or Delete Memos Announcement Number of Rings Recording Time Remote Access Setting Change Remote Access PIN Code Voice Guide Call Screening...
- Page 8 Device setup Add a New Device Test Device Signal Strength Doorbell Remote Ringer Device Monitoring General product care Frequently asked questions General information Replacing the handset batteries Safety Cleaning Environmental How many telephones can you have? Customer service & Product warranty...
-
Page 9: Important Safety Instructions
IMPORTANT SAFETY INSTRUCTIONS When using your telephone equipment, basic safety precautions should always be followed to reduce the risk of fire, electric shock and injury, including the following: 1. Read and understand all instructions. 2. Follow all warnings and instructions marked on the product. - Page 10 8. This product should be operated only from the type of power source indicated on the marking label. If you are not sure of the type of power supply in your home or office, consult your dealer or local power company.
- Page 11 instructions. Improper adjustment of other controls may result in damage and often requires extensive work by an authorized technician to restore the product to normal operation. • If the product has been dropped and the telephone base and/or handset has been damaged. •...
-
Page 12: Save These Instructions
Base unit adapter: Input 100-240V AC 50/60Hz; Output: 6V DC 450mA; Handset charger adapter: Input 100-240V AC 50/60Hz; Output: 6V DC 450mA 18. The power adapter is intended to be correctly oriented in a vertical or floor mount position. The prongs are not designed to hold the plug in place if it is plugged into a ceiling, under-the-table or cabinet outlet. -
Page 13: Getting Started
GETTING STARTED LOCATION Place your VTech 17450 within 2 metres of the mains power socket and telephone socket so that the cables will reach. Make sure it is at least 1 metre away from other electrical appliances to avoid interference. Your VTech 17450 works by sending radio signals between the base and handset. -
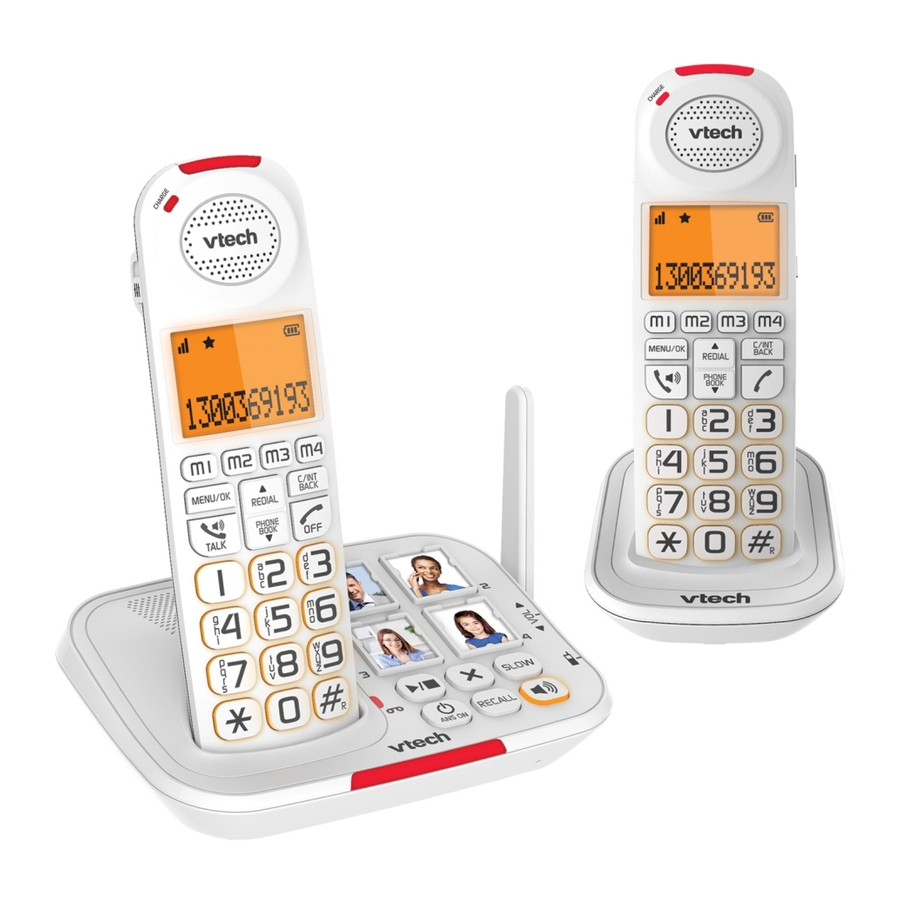
Page 14: Handset Overview
HANDSET OVERVIEW 1 – CHARGE light • On when the handset is charging. 2 – Handset earpiece 3 – LCD display 4 – Direct memory keys (M1/M2/M3/M4) • When idle, press to dial a preset memory number stored on the respective key. - Page 15 5 – MENU/OK • Show the menu. • While in a menu, press to select an item, or save an entry or setting. 6 – TALK / SPEAKER • Make or answer a call. • During a call, press to switch between earpiece and speakerphone mode.
- Page 16 10 – / SOS • Press to enhance the clarity and loudness of the caller’s voice during a call. • When idle, press and hold to start calling the SOS numbers according to Emergency calling sequence set. • When in SOS calling mode press to cancel the SOS call.
-
Page 17: Base Overview
BASE OVERVIEW 1 – ANS ON/OFF LIGHT • On when the answering system is turned on. 2 – CHARGING CRADLE 3 – PHOTO SPEED DIAL KEYS • When idle, press to dial a preset memory number stored on the respective key. 4 –... - Page 18 6 – /PLAY/STOP • Press to play messages. • Press to stop message playback. • Press to delete the playing message. • When the phone is not in use, press twice to delete all old messages. SLOW • Press to slow down the answering system mes- sage.
- Page 19 7 – VISUAL RINGER INDICATOR • Steadily on: During a call or when an extension phone (a parallel set) or the built-in TAM is off hook. • During an incoming call: Flashing according to the incoming ring pattern. • Flash at a rate of 0.5s on and 0.5s off for 2 min- utes: During paging.
-
Page 20: Display Icons Overview
DISPLAY ICONS OVERVIEW Handset display icons displays when there the signal strength is strong. displays when there the signal strength is moderate. displays when there the signal strength is weak. There are new Call log entries. On when the home line is in use or there is an incoming home call. - Page 21 The battery icon flashes when the battery is low and needs charging. The battery icon animates when the battery is charging. The battery icon becomes solid when the battery is fully charged. The answering system is turned on. There are new voicemail received from your telephone service provider.
-
Page 22: Main Menu Structure
MAIN MENU STRUCTURE When the handset is switched on and in idle mode: 1. Press MENU/OK when the handset is not in use. 2. Press until the screen displays the desired feature menu. 3. Press MENU/OK to enter that menu. •... - Page 23 CALL BLOCK INTERCOM (for BS SETTINGS multi-handset packs only) BLACK LIST [Handset list] BS RINGER SETTINGS RING VOL CALL GUARD DELETE HS BLOCK MODE DIAL MODE W/O NUM FLASH TIME FIRST RING HS SETTINGS ANS. SYS DIRECT MEM RING SETUP PLAYBACK TONE SETUP DEL OLD...
-
Page 24: Connect
CONNECT NOTES • Use only the adaptors provided. • Make sure the electrical outlets are not controlled by wall switches. • The adaptors are intended to be correctly oriented in a vertical or floor mount position. The prongs are not designed to hold the plug in place if it is plugged into a ceiling, under-the-table or cabinet outlet. - Page 25 Connect the handset charger (for 17450 multi- handset packs only)
-
Page 26: Install The Handset Battery
INSTALL THE HANDSET BATTERY 1. Slide open the battery compartment cover. 2. One by one, insert 3 AAA batteries into the battery compartment, according to the polarity. 3. Slide the battery compartment cover back into place, until you hear a click sound. NOTES •... -
Page 27: Charge The Batteries
CHARGE THE BATTERIES Place the handset in the telephone base to charge. KEYSTROKE TABLE NAVIGATING THE HANDSET MENU You can use the telephone base or a cordless handset to change your telephone settings. 1. Press MENU/OK when the phone is not in use. 2. -
Page 28: Telephone Operation
TELEPHONE OPERATION MAKE A CALL Preparatory dialing 1. Enter the phone number. If you make a mistake, press C/INT/BACK to delete the last digit. 2. Press to dial the number. Direct dialing 1. Press to take the line. 2. Enter the phone number to dial. CALL FROM THE PHONEBOOK 1. -
Page 29: Volume Boost
VOLUME BOOST Use the volume boost feature to enhance the loudness of the voice on handset earpiece. To turn on volume boost on the handset: • While you are on a call using the handset earpiece, press on the handset. •... -
Page 30: Call Log Entry
CALL LOG ENTRY Press to dial out to the selected Call Log entry. Alternatively, press MENU/OK to access the Call Log from the main menu. CALL FROM THE REDIAL LIST 1. Press to access the redial list and press select the desired redial number. 2. -
Page 31: Temporary Ringer Silencing
TEMPORARY RINGER SILENCING When the telephone is ringing, you can temporarily silence the ringer of the handset or the telephone base without disconnecting the call. The next call rings normally at the preset volume. To silence the ringer temporary on a handset: Press To silence the ringer temporary at the base: Press VOL - repeatedly until the ringer is silent. -
Page 32: Redial
REDIAL You can redial up to 10 of the last numbers called. If you have stored a name in the phonebook to go with the number, the name will be displayed instead. The most recent last number will display at the top of the redial list. -
Page 33: Delete A Redial Number
Delete a Redial Number 1. Follow Steps 1 and 2 in the section of Redial a Number from the Redial List. 2. Press MENU/OK and to select DELETE. 3. Press MENU/OK to confirm and MENU/OK to confirm again. Delete the Entire Redial List 1. -
Page 34: Find The Handset (Paging)
To access a number in the call log: 1. Press MENU/OK while on a call. to select CALL LOG. 2. Press 3. Press MENU/OK and to scroll to desired entry. 4. Press MENU/OK to dial the displayed number. To access a number on the redial list: 1. -
Page 35: Internal Calls
INTERNAL CALLS This feature is only applicable when there are at least two registered handsets. It allows you to make internal calls, transfer external calls from one handset to another handset and make conference calls. If the called handset is not answered within 60 seconds, the called handset will stop ringing and the calling handset will return to standby mode. - Page 36 Transfer an External Call to Another Handset During an external call: 1. Press MENU/OK and to select INTERCOM. 2. Press MENU/OK and to select the desired handset to intercom with. 3. The external call is put on hold automatically and the called handset rings.
-
Page 37: Power Fail Back-Up
POWER FAIL BACK-UP The Power Fail back-up system lets you make calls during a mains power interruption with your cordless phone. During a mains power interruption, you can supply the power stored in your handset battery to the base unit, so you can make calls even when the power is out. - Page 38 NOTES • If there is more than one handset registered to the base, the handset on the main base unit should be left as a power supply of the base and you can use the other handset(s) to make calls like normal. •...
-
Page 39: Telephone Settings
TELEPHONE SETTINGS Your phone comes with a selection of settings that you can change to personalize your phone the way you like it to work. DATE AND TIME SETTINGS You will need to set the correct time and date so that you know when you received answering machine (applicable to model with answering machine) or call log entries. -
Page 40: Handset Settings
Set the Date 1. Press MENU/OK and to select HS SETTINGS. 2. Press MENU/OK and to select CLOCK. 3. Press MENU/OK and to select SET DATE. 4. Press MENU/OK then enter the date according to DD-MM-YY or MM-DD-YY format. The date will be in the format you set. - Page 41 4. Press MENU/OK and to select the desired ringer melody. NOTE • The respective ringer melody will be played while you are scrolling through the melody list. 5. Press MENU/OK to confirm. Set the Ringer Melody for Internal Calls You can set the melody to personalize your external ringer.
-
Page 42: Base Settings
4. Press MENU/OK and to select the ringer volume. NOTE • The respective ringer volume will be played during your selection. 5. Press MENU/OK to confirm. Set Alert Tones A single beep is emitted when you press a key. You can turn on or off the key tone. - Page 43 Ringer Volume 1. Press MENU/OK then to select BS SETTINGS. 2. Press MENU/OK then to select RING VOL. 3. Press MENU/OK then to sample each ringer volume level (a total of 6 levels for your selection, including VOLUME OFF). 4. Press MENU/OK to confirm. Set the Dial Mode The dial mode settings is country dependent.
- Page 44 Turn the First Ring On or Off Your telephone rings once for blocked calls. You can choose to mute the first ring for all incoming calls, so that there will be no ring for blocked calls. By default, the first ring is set to On.
- Page 45 Register a Handset Your handset is pre-registered to the base station. If for some reason, the handset is not registered to the base station, REGISTER will display on the handset screen. Register your handset following the process below. 1. Press and hold on the base station for about five seconds, the base station is entered into registration mode.
- Page 46 Deregister a Handset You may need to deregister your handsets if you wish to change the designated handset number of your registered handsets. You are requested to enter the 4-digit PIN in order to deregister a handset from the base station. NOTE •...
-
Page 47: Call Log
CALL LOG This feature is available if you have subscribed to the Calling Number Display service from your telephone company. Your phone can store up to 30 received calls with date/time information in the Call Log. The number will be shown on the LCD when the phone is ringing. If the number matches exactly with one of the entries in your phonebook, the caller’s name stored in the phonebook will be displayed with the number. -
Page 48: Delete An Entry In The Call Log
4. Press MENU/OK and the selected call log number is displayed. 5. Edit the number if necessary. 6. Press MENU/OK and to select the melody, and MENU/OK to confirm. NOTE • If the phonebook is full, “PB FULL” will be displayed. You need to delete some entries from the phonebook in order to save new ones. -
Page 49: Network Voicemail
NETWORK VOICEMAIL You can get messages from your fixed home phone when you are away from the phone, busy on another call or using the Internet. Callers will hear a standard greeting inviting them to leave a message. To call Network Voicemail While the handset or telephone base is in idle mode, press and hold 1. -
Page 50: 3-Way Chat
3-WAY CHAT This service is available on most lines ready for you to use. If you are already on a call, you can add another person and then have a 3-Way Chat. To put existing call on hold and make a new call then to 3-Way Chat 1. -
Page 51: Phonebook
You can also select different melodies for your phonebook entries. The entries are store alphabetically. The entries are shared across all handsets when more than one handset is registered to your 17450 base. STORE A NUMBER ENTRY IN THE PHONEBOOK 1. When idle, press to access the phonebook. -
Page 52: Entering Names
ENTERING NAMES Use the keypad letters to enter names, e.g. to store Tom: Press 8 once to enter T. Press 6 three times to enter o . Press 6 once to enter m . WRITING TIPS Press C/INT/BACK to delete the last character or digit. Press and hold C/INT/BACK to delete all characters or digits. -
Page 53: Dial An Entry
DIAL AN ENTRY While in the phonebook list, press to select the entry you want, or search alphabetically using the alphanumeric keypad. 1. Press to dial the selected entry. SEARCH A PHONEBOOK ENTRY ALPHABETICALLY 1. When idle, press to access the phonebook. 2. -
Page 54: Delete A Phonebook Entry
DELETE A PHONEBOOK ENTRY 1. When idle, press to access the phonebook. 2. Press to select the desired phonebook entry. 3. Press MENU/OK and to select DELETE. 4. Press MENU/OK to confirm. DELETE ALL PHONEBOOK ENTRIES 1. When idle, press to access the phonebook. -
Page 55: Direct Memory Keys
DIRECT MEMORY KEYS There are four direct memory keys on both the handset and the base - M1, M2, M3, and M4 on the handset and their corresponding photo speed dial keys 1, 2, 3, and 4 on the base. You can store a number into each of these keys and dial them directly from idle mode. -
Page 56: Base Photo Speed Dial Keys
BASE PHOTO SPEED DIAL KEYS There are four photo speed dial memory keys 1, 2, 3, and 4 on the right side of the telephone base. After a number is stored in any of these memory keys, you can simply press once on one of these memory keys to dial out to the number stored in it directly. -
Page 57: Speed Dial
SPEED DIAL You can store six directory entries to the speed dial locations (4-9). The speed dial numbers can be shared by all handsets. For keys 1-3, the speed dial number are pre-defined. Refer to the end of CALL LOG section for details. -
Page 58: Vip List
VIP LIST You can add 50 numbers to the VIP list, so that you can choose to allow incoming calls of the numbers in the VIP list to be exempted from being blocked in the call block settings. Add a Number in the VIP List 1. -
Page 59: Call Guard
CALL GUARD If you have subscribed to a Calling Number Display service, you can use the call guard feature to reject certain calls automatically. This is achieved by adding up to 50 numbers into the block list, and/or programming the phone to reject all calls without number. When there is a call from a number saved in the block list, the call will be disconnected. -
Page 60: Set Block Mode
SET BLOCK MODE You can set the block mode to determine whether all types of calls are to be blocked. 1. Press MENU/OK when the telephone is not in use. to scroll to CALL BLOCK. 2. Press 3. Press MENU/OK and to scroll to SETTINGS. -
Page 61: Add A Block List Entry
ADD A BLOCK LIST ENTRY 1. Press MENU/OK when the telephone is not in use. to select CALL BLOCK. 2. Press 3. Press MENU/OK to select BLACK LIST. 4. Press OK twice to select ADD. The screen displays NAME. 5. Use the dialing keys to enter a name (up to 15 characters). -
Page 62: Review Block List Entries
REVIEW BLOCK LIST ENTRIES Block list entries appear alphabetically. 1. Press MENU/OK when the telephone is not in use. to scroll to CALL BLOCK. 2. Press 3. Press MENU/OK to select BLACK LIST. 4. Press to scroll to the desired entry. 5. -
Page 63: Delete A Block List Entry
Press OK. The screen displays NUMBER. 8. Use the dialing keys to enter a telephone number. • Press to move the cursor to the left or right. • Press C/INT/BACK on a handset, or X on the telephone base, to erase a digit. •... -
Page 64: Delete All Block List Entries
DELETE ALL BLOCK LIST ENTRIES 1. Press MENU/OK when the telephone is not in use. to scroll to CALL BLOCK. 2. Press 3. Press MENU/OK to select BLACK LIST. 4. Press to scroll to the desired entry. 5. Press MENU/OK and to scroll to DELETE ALL. -
Page 65: Answering System
ANSWERING SYSTEM The total storage time for outgoing message, messages and memos is 30 minutes. Use the answering system menu of a cordless handset to turn on or off the answering system or call screening, set up the announcement message, or change the, number of rings, message recording time, remote access code, or system PIN. -
Page 66: Message Playback
MESSAGE PLAYBACK If you have new messages, the telephone plays the new messages, and then the old messages. If there are no new messages, the telephone plays back all messages (oldest first). To play messages at the telephone base: Press when the telephone is not in use. -
Page 67: Delete All Messages
• Press 4 to repeat the playing message. Press 4 twice to listen to the previous message. • Press 2 to delete the current message. • Press 5 to stop the playback, or to exit message playback and return to idle. DELETE ALL MESSAGES You can only delete old (reviewed) messages. -
Page 68: Announcement
To record a memo: 1. Press MENU/OK when the phone is not in use. Then, to scroll to ANS. SYS. press 2. Press MENU/OK and to scroll to MEMO. 3. Press MENU/OK and the handset displays RECORDING. Now speak into handset to record your message. -
Page 69: Number Of Rings
To play the announcement: 1. Press MENU/OK when the phone is not in use. Then, to scroll to ANS. SYS. press 2. Press MENU/OK and to scroll to SET TAM. 3. Press MENU/OK and to scroll to TAM MSG. 4. Press MENU/OK twice. The handset displays PLAYING ANNC. -
Page 70: Recording Time
RECORDING TIME You can set the recording time limit for each incoming message. 1. Press MENU/OK when the phone is not in use. Then, to scroll to ANS. SYS. press 2. Press MENU/OK and to scroll to SET TAM. 3. Press MENU/OK and to scroll to REC. -
Page 71: Change Remote Access Pin Code
CHANGE REMOTE ACCESS PIN CODE 1. Press MENU/OK when the phone is not in use. Then, to scroll to ANS. SYS. press 2. Press MENU/OK and to scroll to SET TAM. 3. Press MENU/OK and to scroll to CHANGE PIN. 4. -
Page 72: Call Screening
CALL SCREENING To screen a call at a handset: If the answering system is on and your answering system is recording a message, the handset displays SCREENING ?. Press OK to screen the call on your handset. Options while a message is being recorded: •... - Page 73 Command Description Main menu. Play all messages. Repeat the current message or press twice for the previous message. Delete the message currently being played. Skip to the next message. Turn on the answering machine. Turn off the answering machine. NOTES •...
-
Page 74: Sos Emergency Calls
SOS EMERGENCY CALLS You need to program the SOS numbers before you can make SOS Emergency Calls. To program the SOS numbers: 1. Press MENU/OK when the phone is not in use, and to scroll to SET SOS. then press 2. - Page 75 Make sure your SOS message recorded includes your name, the SOS message, and a request to far end on pressing any number key to start the conversation. You can also playback and listen to your SOS message or delete it. To record an SOS Messages: 1.
- Page 76 To make the SOS Emergency Calls: 1. Press and hold SOS button on handset (or press SOS button on SOS pendant if one paired) 2. All registered handsets, base (and extension ringer if one paired) ring. SOS call can be cancelled internally by pressing: Handset –...
-
Page 77: Talking Digits
TALKING DIGITS You can choose whether the digits are to be announced whenever you press the number keys. To turn the Talking Digits on or off: 1. Press MENU/OK when the phone is not in use, and to scroll to DIGIT ANNC. then press 2. -
Page 78: Device Setup
Ringer (VS014), and SOS pendant (VS015) to your 17450 telephone system (all purchased separately). Once there is at least one of these devices registered to the 17450 telephone base, the SET DEVICE menu option will appear in the handset menu. -
Page 79: Test Device Signal Strength
TEST DEVICE SIGNAL STRENGTH Before you mount any of your devices, follow the instructions below to check the signal strength between the device and the telephone base. Make sure you mount the device in a location where the signal strength is good. 1. -
Page 80: Doorbell
DOORBELL After you have registered an Audio Doorbell (VS013) to your 17450 telephone base, you can follow the instructions below to configure your doorbell. The doorbell helps you get notified at your telephone system upon visitors’ arrival. When the doorbell is chimed, it sends an alert to your telephone. - Page 81 Call Divert You can divert a doorbell call to a preset external number. The telephone base will call directly to the destination number during doorbell ringing. To set the preset divert number: 1. Press MENU/OK when the phone is not in use, and to scroll to SET DEVICE.
- Page 82 You can also set up an auto call divert to a preset divert number, only when you pressed REJECT at your handset to reject the doorbell call. To turn on or off the auto call divert when the doorbell call is rejected at your handset: 1.
-
Page 83: Remote Ringer
REMOTE RINGER After you have registered an Extension Ringer (VS014) to your 17450 telephone base, you can follow the instructions below to set the alert schedule your of extension ringer. Set Alert Schedule 1. Press MENU/OK when the phone is not in use, and to scroll to SET DEVICE. -
Page 84: Device Monitoring
You can add new Audio Doorbell (VS013), Extension Ringer (VS014), and SOS pendant (VS015) to your 17450 telephone system (all purchased separately). Once there is at least one of these devices registered to the 17450 telephone base, the DEVICE menu option will appear in the handset menu. - Page 85 Rename Device You can customize the name for each registered doorbell. 1. Press MENU/OK when the phone is not in use, and to scroll to SET DEVICE. then press 2. Press MENU/OK to select the desired device. 3. Press MENU/OK to select RENAME. 4.
-
Page 86: General Product Care
GENERAL PRODUCT CARE Taking care of your telephone Your cordless telephone contains sophisticated electronic parts, so it must be treated with care. Avoid rough treatment Place the handset down gently. Save the original packing materials to protect your telephone if you ever need to ship it. Avoid water Your telephone can be damaged if it gets wet. -
Page 87: Frequently Asked Questions
FREQUENTLY ASKED QUESTIONS Below are the questions most frequently asked about the cordless telephone. Problem Solutions • Make sure the batteries are installed and charged telephone correctly. For optimum daily performance, return the does not handset to the telephone base after use. work at all. -
Page 88: General Information
GENERAL INFORMATION REPLACING THE HANDSET BATTERIES After a time, you may find that the handset batteries are running out of charge more quickly. This is a standard sign of wear and the batteries will need replacing. Replacement rechargeable Nickel Metal Hydride (NiMH) batteries can be purchased from TecHelp line on 1300 369 193 your local electrical retailer. -
Page 89: Cleaning
Please note VTech accepts no responsibility for damage caused to your VTech 17450 handset by using any other type of batteries. • Never dispose of batteries in a fire. There is a serious risk of explosion and/or the release of highly toxic chemicals. -
Page 90: Environmental
Equivalence Number (REN), which is used to calculate the number of items which may be connected to any other telephone line. Your VTech 17450 has a REN of 0.1. A total REN of 3 is allowed, if the total REN of 3 is exceeded, the telephone may not ring. -
Page 91: Customer Service & Product Warranty
Customer Service If you require assistance in operating this product please call the TecHelp Information Line on 1300 369 193 or contact VTech by e-mail at: tcpsupport_au@vtech.com. If you are trying to access a Telephone Network Service and require assistance specifically related to the network service or would like to subscribe to the service, contact your service provider. - Page 92 VTech do not warrant that the product will be free from defects if defects are caused by an accident, misuse, abuse, improper installation or operation, vermin infestations, lack of reasonable care, unauthorised modification, loss of parts, tampering or attempted repair by a person not authorised by VTech; or where the product has been damaged by lightning or a mains power surge.
- Page 93 Warranty in no way limit your rights which arise as a result of your Statutory Rights. This Voluntary Product Warranty is given by: VTech Telecommunications (Australia) Pty Ltd ABN 70 136 672 627 Address: 24 Gilby Road, Mount Waverley 3149...
- Page 94 IMPORTANT NOTE: THIS IS NOT A PRODUCT RETURN OR SERVICE ADDRESS – PLEASE CONTACT TECHELP BY PHONE OR EMAIL FOR PRODUCT AND WARRANTY SUPPORT. NO LIABILITY WILL BE ACCEPTED BY VTECH FOR PRODUCTS RETURNED TO THIS ADDRESS UNDER THIS VOLUNTARY PRODUCT WARRANTY.
- Page 95 VTech is the registered trademark of VTech Holdings Limited. Copyright © 2017 for VTech Telecommunications (Australia). All rights reserved. Printed in China. Version 1 FOR MORE INFORMATION CALL: TECHELP ON 1300 369 193 OR EMAIL: TCPSUPPORT_AU@VTECH.COM...
Need help?
Do you have a question about the 17450 and is the answer not in the manual?
Questions and answers