Table of Contents
Advertisement
Advertisement
Table of Contents

Related Manuals for Ametek Surtronic Duo


Summary of Contents for Ametek Surtronic Duo
- Page 1 Surtronic ® User Guide...
- Page 2 Surtronic User Guide This is Taylor Hobson’s User Guide for the Surtronic Duo. All the specifications in this document are correct at time of production and are subject to change. Please contact Taylor Hobson for further information. K505-444...
-
Page 3: Table Of Contents
Contents Surtronic Duo overview ............4 Surtronic Duo accessories ............8 System information ..............10 Surtronic Duo dimensions ............12 Quick start guide ..............14 Using the instrument ..............16 Overview ......................16 Function buttons .....................17 Device icons.......................18 Menu ........................19 Calibration......................24 Factory reset ......................26 Test mode ......................27... -
Page 4: Surtronic Duo Overview
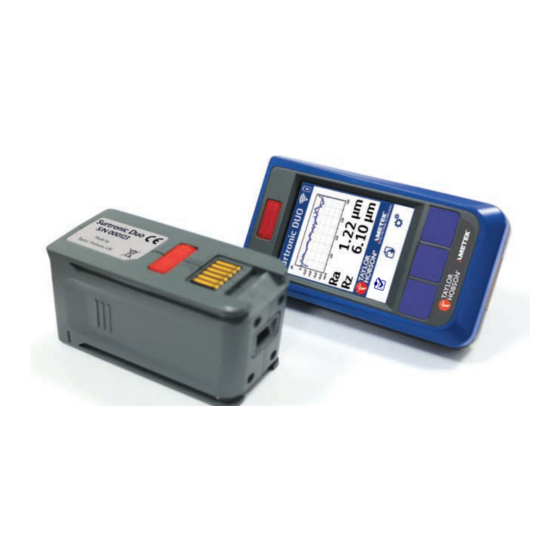
Surtronic Duo overview What it does The Surtronic Duo is a superior portable surface roughness tester that measures multiple roughness parameters with a 1-button click. Roughness measurement parameters Ra, Rz, Rp, Rv, Rz1max, Rsk, Rq & Rku are displayed on a brightly lit intuitive 2.4” LCD colour display. - Page 5 Keeping it simple The Surtronic philosophy keeps the process simple. It is the perfect tool for any inspector to check surface roughness even in the most demanding applications. • Incoming inspections • Final inspection before shipment • Process control on the production line • Checking large components or structures Standards and traceability The reference standard supplied can be used both to calibrate the...
- Page 6 Bluetooth technology Profile graph Quick, reliable communication Clear detailed graph showing measurement between traverse and display/unit. area – excellent for visually identifying defects. Simple 3-button Measure navigation Tactile measurement Instant access to menu button great for challenging options and settings. orientations.
- Page 7 User-friendly, not user-hostile! The Surtronic Duo are as simple and easy-to-use as any SmartPhone. Users have the advantage of the intuitive quick access 3-button menu and its crisp 2.4” daylight readable industrial colour LCD screen.
-
Page 8: Surtronic Duo Accessories
Portable hybrid solar rechargeable power bank* - Code SC-15 • Portable power bank for charging the Surtronic Duo on the go. Can be charged by USB, mains AC or sunlight. Compact portable carry bag - Code SA-51 • Helps secure the Surtronic Duo and prevent accidental drops especially for applications involving measuring at heights. - Page 9 Hard transport case* - Code SA-55 • Air and water tight case that provides the Surtronic Duo with extra protection for safe storage and/or transportation. calibration standard - Code CS-20 • For calibrating and checking the Surtronic Duo instrument.. Ra 5.81 µm (229 µin)
-
Page 10: System Information
System information Instrument performance Gauge Resolution 0.01 µm (0.4 µin) Range (Ra) Up to 40 µm (1600 µin) Range Up to 199 µm (7800 µin) (Rz, Rv, Rp, Rt) Measurement Repeatability 2 % of value + noise Accuracy 5 % of reading + 0.1 µm (4 µin) Noise 0.1 µm (4 µin) Process... - Page 11 Instrument capability Pick-up type Piezoelectric Pick-up assembly Stylus type Diamond, Radius 5 µm (200 µin) Gauge force 200 mg Gauge Measurement Skidded type Filter type Gaussian Filter Filter cut-off 0.8 mm Traverse 5 mm (0.2 in) length Traverse Traverse 2 mm/sec (0.08 in/sec) Speed Display Units...
-
Page 12: Surtronic Duo Dimensions
92 mm 45 mm What is a skid? Surtronic Duo is a skidded device. The skid guides the pick-up along the workpiece, with the workpiece itself forming the datum for measurement. This method usually eases set-up by reducing the need for leveling. - Page 13 How much difference does the stylus tip size make? These instruments use a 5 µm (200 µin) stylus tip radius. This suits their purpose as a portable tool for checking roughness in three ways: • Durability – It is less likely to be damaged even when subjected to mishandling.
-
Page 14: Quick Start Guide
Quick start guide x 8 h x 8 h 5 mm 5 mm... - Page 15 300 s 300 s Ra = 5.81 µm 229 µin code: SC-15 Ra = 5.81 µm 229 µin code: SC-15 code: SA-55 code: SA-55...
-
Page 16: Using The Instrument
Using the instrument Overview Display unit power / Measure button Colour Status Traverse unit Screen power button Pick up & USB Charging 3 Menu port buttons Stylus Surtronic Duo Operation mode Slides apart ‘Connected’ mode ‘Separated’ mode... -
Page 17: Function Buttons
Surtronic Duo Storage mode Slides apart ‘Connected’ mode ‘Storage’ mode Function buttons Unit power / Measure button - Seperated mode Power • Both the display unit and the traverse unit will need to be powered On/Off individually. There is no specific order of preference. -
Page 18: Device Icons
Unit power / Measure button - Connected mode Power • Both the display unit and the traverse unit can be switched on in Connected mode configuration when the only the display unit power button is pressed. However, to power OFF, both traverse and display unit will need to be powered off individually. -
Page 19: Menu
Menu Font size (Large/Small) Press the settings button to enter the settings menu Select the size of font to use in displaying the measurement results. There are two size options available to choose from – Large and Small. Press the to toggle between the 2 options. - Page 20 Units (µm / µin) Press the settings button to enter the settings menu Press the down arrow button to scroll down to the units selection line. Press the to toggle between the 2 options – µm (Metric) or µin (English). Press the tick button to accept the setting and exit the settings menu.
- Page 21 Parameters (R Press the settings button to enter the settings menu Press the down arrow button to scroll down to the Parameter setting line. Press the to toggle between the two ISO 4287 parameter options available to display – Roughness (R) or Primary (P). Press the tick button to accept the setting and exit the settings menu.
- Page 22 Profile graph (On / Off) Press the settings button to enter the settings menu Press the down arrow button to scroll down to the Graph option line. Press the to toggle between the option of displaying or not displaying the graph on the results screen. Press the tick button to accept the setting and exit the settings menu.
- Page 23 No graph with Small Font No graph with Big Font...
-
Page 24: Calibration
Calibration Press the calibration button to enter the calibration menu In the calibration screen, the default or last saved calibration Ra value will be displayed. To change this calibration value, press the settings icon. Then use the up (+) and down (-) buttons to adjust the calibration Ra value to the desired number. - Page 25 Place the Duo on the calibration standard provided with the unit (or any other certified standard). Press the measure button to take a measurement on the calibration standard. The measured Ra value will be displayed at the end of the measurement.
-
Page 26: Factory Reset
Factory reset To reset the Duo to factory settings, hold the settings button for about 3 seconds. Press the delete settings button. In the reset screen, press the tick button to do a factory reset or the cross(x) button to exit and return to the main results screen. Press the back arrow at any time to exit and return to the results screen. -
Page 27: Test Mode
Test mode Test Mode is initiated when the settings button is held for 3 seconds and the test mode icon is pressed. This is for internal service and diagnostic purposes and should NOT be used by the customer. If at any time the test mode is inadvertently activated, switch off the unit completely and switch back on to return the unit to normal operation. -
Page 28: Error Codes
Error codes The following are the error codes associated with the Duo and their meanings: • E1 => Motor sensor failure • E2 => Motor sensor misaligned • E3 => Motor speed failure • E4 => Traverse unit settings lost, returned to default • E5 =>... - Page 29 This Page is Intentionally Blank...
- Page 30 Fax: +886 3 575 0799 taylor-hobson.korea@ametek.com taylor-hobson.taiwan@ametek.com Taylor Hobson Singapore Taylor Hobson USA AMETEK singapore, 10 Ang Mo Kio Street 1725 Western Drive West Chicago, 65, No. 05-12 Techpoint, Singapore 569059 Illinois 60185, USA Tel: +65 6484 2388 Ext 120...
Need help?
Do you have a question about the Surtronic Duo and is the answer not in the manual?
Questions and answers