
Subscribe to Our Youtube Channel
Related Manuals for Faro Focus 3D X 130


Summary of Contents for Faro Focus 3D X 130
- Page 1 Focus X 130 and X 330 Laser Scanners SCENE 5.3 Training Manual • September 2014...
- Page 3 In no event shall FARO Technologies, Inc. be liable to anyone for special, collateral, incidental, or consequential damages in connection with or arising from the purchase or use of the Focus or its materials.
-
Page 5: Table Of Contents
CCnCCnCs Contents Training Overview ........1 Structure . - Page 6 SD Card ........29 Clearing Scan Data .
- Page 7 CCnCCnCs Conceptual File Structure ....44 Scanner File Structure ..... . 45 Activity 1.5: Creating the Project Folder Structure .
- Page 8 Artificial Common Reference Objects (Targets) . . . 85 Natural Common Reference Objects ... 88 Correspondence ......89 Sensor Data .
- Page 9 CCnCCnCs Mounting Targets ......112 Activity 2.1: Arranging and Mounting Targets ......113 Site Sketches .
- Page 10 Project Locations ......144 Project Selection Window ..... . . 144 Editing Project Details .
- Page 11 CCnCCnCs Importing Scan Data ......179 Opening a Scan Project ......180 Activity 4.1: Importing and Opening a Scan Project.
- Page 12 Activity 5.4: Automatic Registration – Targetless ..... . 234 Lesson 3: Manual Registration Workflow . . . . . . . . . . . . . . . . . . . . . 237 Common Reference Objects .
- Page 13 CCnCCnCs Cropping ........267 General Cropping ......268 Scan State .
- Page 14 Notes . . . . . . . . . . . . . . . . . . . . . . . . . . . . . . . . . . . . . . . . . . 289 Module 7: Detail Scans .
- Page 15 CCnCCnCs Activity 5.1 Using the Scan Area Screen ......313 Appendix 2: Accuracy Verification . . . . . . . . . . . . . . . . . . . . . . . . . . . . 315 Scale Objects .
-
Page 17: Training Overview
Training Overview Welcome to the FARO training for the FARO Focus laser scanner and FARO SCENE software. This manual is designed for FARO’s three- day training. You will learn how to use the Focus laser scanner to Slides 1-2 scan three-dimensional objects, use FARO SCENE software to register and refine captured data, and, if needed, prepare the data for third-party software applications. -
Page 18: Notes
TTTTTTTT TTTTTTTT StTuctuTT The training is presented as Modules, which are made up of Lessons. There are also several Activities, which are practice exercises designed to provide opportunities to practice the tasks and apply the concepts Slides 3-4 necessary to use the scanner and SCENE successfully. FoTmTt Words that appear on the equipment and in the software (such as commands and the names of tools, buttons, dialogue boxes, and... -
Page 19: Format
IcoTs Icons are used to indicate the following types of information: Activities designed to enhance your efficiency Information relevant to specific tasks Tips to make tasks easier Warnings regarding potential harm to the device or the user Presentation slide numbers Focus X 130 and X 330 •... -
Page 20: Targets
Activity. ITtToductToT VTdTo FARO GB (Great Britain) has posted an 11-minute introductory video to YouTube.com. The name of the video is Introducing the FARO Focus , and the video... - Page 21 ITstTuctoT GuTdT CoTTTctTTT to thT ScTTTTT RTmotTly As you discuss the scanner software, you can connect to the scanner using a Wireless Local Area Network (WLAN) so you can demonstrate features and commands, as well as Activities. These sidebars To connect remotely to the scanner: provide additional instructor guidance.
-
Page 23: Module
MMMMMM MM MMMMM MMM MMMMMMM Module 1: Using the Scanner Slides 7-9 This module introduces you to the scanner hardware and components, and to the scanner software. It also explains the steps involved in setting up the scanner, setting up the scanner software, and other important concepts. -
Page 25: Scanner Hardware
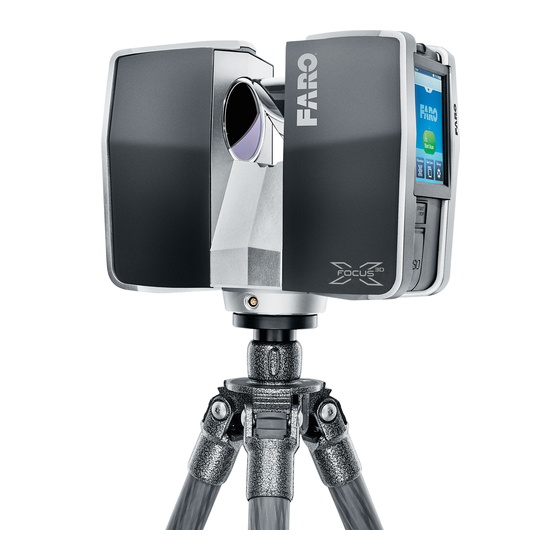
LMMMMM MM MMMMMMM LMMMLMMM LMMMMM MM Scanner Hardware This lesson introduces you to the scanner hardware, scanner components, Slide 10 and scanner setup and maintenance. To proficiently work with the scanner hardware, you need be familiar with: • Transport case contents •... - Page 26 MMMMMM MM MMMMM MMM MMMMMMM FMMMM X 330 The Focus X 330 is shipped inside a black transport case, which has wheels and an extendable handle. FMMMM X 330 TMMMMpMMM CMMM CMMMMMMM Focus X 130 and X 330 • SCENE 5.3 September 2014...
-
Page 27: Scanner Components
LMMMMM MM MMMMMMM LMMMLMMM The Focus X 330 is shipped with the following: Transport case Transport cover Calibration certificate PowerBlock battery Power cable SCENE software disc and Quick Start Guide Mirror cleaning kit PowerDock battery charger Tribrach adapter 10. USB flash drive 11. - Page 28 MMMMMM MM MMMMM MMM MMMMMMM FMMMM The front of the scanner is the side with the power inlet. Slide 12 FMMMM X 330 FMMMM The following components are located on the front of the scanner: Serial number Mirror Scanner logo Light-emitting diode (LED) Power inlet Focus...
- Page 29 LMMMMM MM MMMMMMM LMMMLMMM BMMk The back of the scanner is the side without the power inlet. Slide 13 FMMMM X 330 BMMk The following components are located on the back of the scanner: Mirror Scanner logo Focus X 130 and X 330 • SCENE 5.3 September 2014...
- Page 30 MMMMMM MM MMMMM MMM MMMMMMM TMMMM-MMMMMM MMMM The touch-screen side of the scanner is the side with the touch screen, the Start/Stop button, and the SD card slot. Slide 14 FMMMM X 330 TMMMM-MMMMMM MMMM The following components are located on the touch-screen side of the scanner: SD memory card slot cover Touch screen...
- Page 31 LMMMMM MM MMMMMMM LMMMLMMM MD CMMM MMMM CMvMM There are two inlets under the SD card slot cover. Slide 15 FMMMM X 330 MD CMMM MMMM The following are located under the SD card slot cover: SD card slot Micro USB port (for service only) Focus X 130 and X 330 •...
- Page 32 MMMMMM MM MMMMM MMM MMMMMMM BMMMMMy MMMM The battery side of the scanner is the side with the battery compartment. Slide 16 FMMMM X 330 BMMMMMy MMMM The following components are located on the battery side of the scanner: Battery compartment cover Battery fastener Focus X 130 and X 330 •...
- Page 33 LMMMMM MM MMMMMMM LMMMLMMM The power button is located on the top of the scanner. Slide 17 FMMMM X 330 TMp The following components are located on the top of the scanner: LEDs Power button Mirror Focus X 130 and X 330 • SCENE 5.3 September 2014...
- Page 34 MMMMMM MM MMMMM MMM MMMMMMM BMMMMm The bottom of the scanner is used for mounting and service. Slide 18 FMMMM X 330 BMMMMm The following components are located on the bottom of the scanner: SD card slot cover Cooling vents Automation interface cover LEDs Battery cover...
-
Page 35: Setting Up
LMMMMM MM MMMMMMM LMMMLMMM LEDM The LEDs use the following colors to show the status of the scanner: • Blinking blue – The scanner is booting up or shutting down, pictures are being taken, or the battery is charging when the scanner Slide 19 is off. -
Page 36: Tripod
MMMMMM MM MMMMM MMM MMMMMMM TMMpMM Extend the legs of the tripod and lock the leg angle clips. Ensure that the tripod is stable and the tripod feet are secured. Slide 21 In windy conditions, use a heavy weight or sandbags to stabilize and secure the tripod. - Page 37 LMMMMM MM MMMMMMM LMMMLMMM IMMMMMMMMM MMM TMMbMMMM AMMpMMM When first installing the tribrach adapter: Remove the scanner from the transport case and lay the scanner on its side on a flat surface. If you have a scanner transport cover, you can install the tribrach adapter with the scanner inside the cover –...
-
Page 38: Power Supply
MMMMMM MM MMMMM MMM MMMMMMM Make sure that the numbers on the tripod mounting ring are right-side up. TMMpMM MMMMMMMM RMMM Once the tripod mounting ring is secure, place the scanner on the tripod. Tighten the set screw to secure the scanner mounting ring to the tripod mounting ring. -
Page 39: September
LMMMMM MM MMMMMMM LMMMLMMM ExMMMMMM PMLMM MMppMy MMMM When installing the external power supply unit, be sure to secure the unit to relieve pressure on the unit’s cord. You can use the tripod hook, Velcro, or another system. ExMMMMMM PMLMM MMppMy MMMM When inserting the power plug, line up the red dot on the plug with the red dot next to the power inlet. - Page 40 MMMMMM MM MMMMM MMM MMMMMMM PMLMM PMMM MMM IMMMM BMMMMMy The battery can be charged in the scanner or in the PowerDock battery charger, which is an optional accessory. The scanner needs to be plugged in, but does not need to be on, to charge the battery. If the scanner is off, the LEDs will illuminate blinking blue while the battery is charging.
- Page 41 LMMMMM MM MMMMMMM LMMMLMMM BMMMMMy MMMMMMMM Mp To turn the scanner on, press the power button on the top. It will take a few minutes to start up. As the scanner starts up, the LEDs illuminate blinking blue. When the scanner is ready to scan, the LEDs illuminate steady blue.
- Page 42 MMMMMM MM MMMMM MMM MMMMMMM TMMMbMMMMMMMMMM If the scanner stops responding, press and hold the power button for four to five seconds. PMLMM BMMMMM Focus X 130 and X 330 • SCENE 5.3 September 2014...
- Page 43 LMMMMM MM MMMMMMM LMMMLMMM AMMMvMMy M.MM MMMMMMM Mp MMM MMMMMMM In this activity, you will set up the scanner. Slide 25 Follow these steps: Set up the tripod. Extend the legs of the tripod. Lock the leg angle clips. Ensure that the tripod is stable. Remove the scanner from the transport case.
- Page 44 MMMMMM MM MMMMM MMM MMMMMMM III. Insert the 5/8-inch screw and tighten with the hex wrench. Mount the scanner on the tripod. Align the two sections of the tribrach adapter by positioning the scanner over the tripod, then tighten the set screw. If using the scanner transport cover, remove the cover.
-
Page 45: Sd Card
Snapshot. The SD card is also used to install scanner software Slide 26 updates. You can find information about software updates on FARO’s website (www.faro.com). CMMMMMMM MMMM DMMM Before beginning a scan project you may want to remove all data from the SD card and the scanner. - Page 46 MMMMMM MM MMMMM MMM MMMMMMM AMMMvMMy M.2M CMMMMMMM MMMM DMMM In this activity, you will format an SD card and remove all Slide 27 scan data from the scanner. Follow these steps: Insert the SD card. Open the SD card slot cover. Hold the SD card with the chamfer side down and toward the scanner.
-
Page 47: Safety
• Never insert objects into the openings in the housing, as they may cause short circuits, electrical shock, or fire. • Use only the FARO-recommended power supply and battery. Ensure that the specifications of the power converter are appropriate for the available electrical voltage. If you do not know the electrical voltage, consult your local power company. - Page 48 MMMMMM MM MMMMM MMM MMMMMMM CMMMMMMM MMM MMMMMM Turn the scanner off before cleaning. When cleaning the scanner mirror, wear non-powdered gloves. Only clean the mirror when necessary. Do not touch the mirror’s surface. Use oil-free compressed air, alcohol-free Slide 31 and acetone-free cleaning fluids, tweezers, and lens tissues.
-
Page 49: Scanner Software
LMMMMM 2M MMMMMMM MMfMLMMM LMMMMM 2M Scanner Software This lesson introduces you to the scanner software, which is accessed Slides 32-34 using the touch screen. At the end of this lesson, you will capture your first set of scans. Commonly used features include the: •... - Page 50 MMMMMM MM MMMMM MMM MMMMMMM Where can you access the inclinometer? What screen allows you to update the scanner software? Where is customer support information found? What information can be entered for an operator? What information can be entered for projects? Focus X 130 and X 330 •...
-
Page 51: Navigation Bar
LMMMMM 2M MMMMMMM MMfMLMMM LMmM MMMMMM When you turn the scanner on, the Home screen appears. LMmM MMMMMM The Home screen contains the following: Navigation bar Status bar Information drop-down box Start Scan button Menu Focus X 130 and X 330 • SCENE 5.3 September 2014... - Page 52 MMMMMM MM MMMMM MMM MMMMMMM NMvMMMMMMM BMM The navigation bar contains a button that takes you to the previous screen, the Help button, and the Home button. The navigation bar also displays errors if they occur. NMvMMMMMMM BMM MMMMMM BMM The status bar shows the name of the currently displayed screen or the scan progress, whether the scanner is broadcasting, battery status, and time.
- Page 53 LMMMMM 2M MMMMMMM MMfMLMMM IMfMMmMMMMM DMMp-DMLM BMx Tapping the arrow under the navigation bar opens the information drop- down box, which displays details about scanner settings and parameters. IMfMMmMMMMM DMMp-DMLM BMx The information drop-down box displays: Operator – Displays the most recent operator name. Project –...
-
Page 54: Start Scan Button
MMMMMM MM MMMMM MMM MMMMMMM MMMMM MMMM BMMMMM The Start Scan button starts a scan. When a scan is in progress, the Stop Scan button appears. MMMMM MMMM MMM MMMp MMMM BMMMMMM MMMM All features of the scanner interface are accessed from the menu. The menu contains the following buttons: •... -
Page 55: General Interface Elements
LMMMMM 2M MMMMMMM MMfMLMMM GMMMMMM IMMMMfMMM EMMmMMMM As you use the scanner interface, you will use several different general interface elements. IMMMM MMM BMMMMMM IMMM/BMMMMM FMMMMMMM LMmM LMMp MMMMMM Mp MMMMMM DMLM MMMMMMMM DMMMMM DMpMMMMMM IMMMMMMM DMMMMMMM MMMMMM Focus X 130 and X 330 • SCENE 5.3 September 2014... - Page 56 MMMMMM MM MMMMM MMM MMMMMMM IMMM/BMMMMM FMMMMMMM BMMkMpMMM ZMMm IM ZMMm OMM RMMMM MMzM – This only appears when you are zoomed in on a scan preview. OpMM PMMvMMMM MMMM NMxM MMMM MMvM Mp MM DMLM MMvM LMfM MM RMMMM WMMMMMM EMMMM PMMMMM PMMjMMM...
-
Page 57: On-Screen Keyboard
LMMMMM 2M MMMMMMM MMfMLMMM OM-MMMMMM KMybMMMM When you tap a field to enter information, an on-screen keyboard appears that allows you to enter information. The on-screen keyboard contains the following: Numbers and special characters Shift Move cursor Space (or underscore when spaces are not allowed) OM-MMMMMM KMybMMMM When you touch a letter on the on-screen keyboard, that letter and the letters on either side will appear enlarged. - Page 58 MMMMMM MM MMMMM MMM MMMMMMM AMMMvMMy M.4M MMMMMMM IMMMMMM MMMMMMM MMMMMMMM In this activity, you will set some of the initial scanner settings. Slide 43 Follow these steps: Set the sound options. From the LMmM screen, tap MMMMMM > GMMMMMM MMMMMMMM.
- Page 59 LMMMMM 2M MMMMMMM MMfMLMMM Tap NMmM. Tap DMMMMM. Enter a new operator name. G. Tap OK. Enter other operator information as needed. Tap LMmM at the top of the screen. Set the date and time and select a date format. Tap MMMMMM.
- Page 60 MMMMMM MM MMMMM MMM MMMMMMM PMMjMMM FMMM MMMMMMMMM Scan projects are often composed of several subprojects. For example, a scan of the interior of a multi-floor building can be organized into subprojects – one subproject for each level of the building. Each of these Slide 44 subprojects can be organized into subprojects representing each room on each floor of the building.
- Page 61 LMMMMM 2M MMMMMMM MMfMLMMM MMMMMMM FMMM MMMMMMMMM The easiest way to create this file structure on the scanner is to add subprojects and let the scanner automatically name each subproject and each scan. The scanner’s automatic naming uses consecutive numbers, Slides 45-49 periods, and underscores.
- Page 62 MMMMMM MM MMMMM MMM MMMMMMM To view subprojects on the scanner, select the project that contains the subprojects. MMMMMM > PMMjMMMM When you view the scans (by tapping View Scans), you can see that each scan is also numbered consecutively, beginning with 0. When the scanner automatically numbers scans, it uses three digits.
- Page 63 LMMMMM 2M MMMMMMM MMfMLMMM The View Scans screen sorts scans with the most recently captured scans at the top. VMML MMMMM For each project and subproject, you can enter and customize the following project information: • Project Name – Project names cannot contain spaces and must be no longer than 40 characters.
- Page 64 MMMMMM MM MMMMM MMM MMMMMMM • Additional Info – Record notes and additional information. • Latitude – Enter the approximate latitude (±10 degrees) of the scan. Enter the latitude using decimal degrees. To open a project and edit project information: •...
- Page 65 LMMMMM 2M MMMMMMM MMfMLMMM IV. Tap OK. Change the file base name. Tap FMMM BMMM NMmM. Tap DMMMMM. III. Using the on-screen keyboard, enter Training_ [Your Initials]. IV. Tap OK. Tap PMMjMMMM. Create a new subproject. Make sure Training_[Your Initials] is selected. Tap AMM.
- Page 66 MMMMMM MM MMMMM MMM MMMMMMM Create the second new subproject. Make sure Training_[Your Initials] is selected. Tap AMM. Change the FMMM BMMM NMmM to [Your Initials].2_ MMMM_. Tap OK. Tap PMMjMMMM. Create the third new subproject by repeating Step 3. You should now have the three subprojects listed below the Training_[Your Initials] project: ◦...
-
Page 67: Scan Parameters
LMMMMM 2M MMMMMMM MMfMLMMM MMMM PMMMmMMMMM Scan parameters are settings that affect the captured data and the scan duration. Slide 51 To understand how scan parameters will affect the captured data, it is important to understand how the scanner works. LML MMM MMMMMMM WMMkM Laser scanners emit laser light, which is reflected off of surfaces in the scan area, and then reflected back to the scanner. - Page 68 MMMMMM MM MMMMM MMM MMMMMMM TMmM-Mf-FMMMMM MMMMMMMmMMM Time-of-flight scanners measure the amount of time it takes for the emitted laser light to return to the scanner, and use that time to calculate distance. Slide 53 TMmM Mf FMMMMM MMMMMMMmMMM PMMMM-BMMMM MMMMMMMmMMM The Focus uses phase-based measurement.
- Page 69 LMMMMM 2M MMMMMMM MMfMLMMM PMMMM-BMMMM MMMMMMMmMMM Phase Shift RMmMvMMM AmbMMMMMy When the phase difference of laser light is measured, there is some ambiguity, because the location of the phase can vary periodically. This means that the phases of the emitted light and the returning light may align perfectly, so the phase shift distance measurement is zero.
- Page 70 MMMMMM MM MMMMM MMM MMMMMMM MMMMM/MMMp PMMMM When scanning, a laser light is sent from the scanner onto the mirror, which reflects the laser outward. Slide 56 Reflected Laser The mirror rotates around a horizontal axis, and the scanner rotates around a vertical axis.
- Page 71 LMMMMM 2M MMMMMMM MMfMLMMM The start/stop point is where the scan starts and stops on the horizontal axis. The start/stop point of the scanner is located at the center of the scanner, in line with the power inlet and perpendicular to the front of scanner.
- Page 72 MMMMMM MM MMMMM MMM MMMMMMM PMMMM DMMMMMMM Because the laser light is sent from a single point (the center of the mirror), the distance between the captured scan points increases with distance from the scanner. This distance, called point distance, is also referred to as point density.
- Page 73 LMMMMM 2M MMMMMMM MMfMLMMM CMmmMM MMMM PMMMmMMMMM Scan Parameters are used by the scanner when recording scan data. You can set these parameters to ensure you have enough scan data to meet project requirements, are working within any time constraints, and are Slide 61 able to successfully register scans together.
- Page 74 MMMMMM MM MMMMM MMM MMMMMMM RMMMMMMMMM The Resolution setting determines the point distance, which, in turn, determines the level of detail. Slide 63 TMbMMMMp (LML RMMMMMMMMM) TMbMMMMp (LMMM RMMMMMMMMM) Focus X 130 and X 330 • SCENE 5.3 September 2014...
- Page 75 LMMMMM 2M MMMMMMM MMfMLMMM Increasing the Resolution setting increases the number of points captured and decreases the point distance. Decreasing the Resolution setting decreases the number of points captured and increases the point distance. You can adjust the Resolution setting to capture more points on distant objects.
- Page 76 MMMMMM MM MMMMM MMM MMMMMMM QMMMMMy With a higher Quality setting, the scanner captures points that are more concentrated on objects in the scan area. The Quality setting affects the rate of measurement, the level of noise reduction, and the range of the Slide 65 scanner.
- Page 77 LMMMMM 2M MMMMMMM MMfMLMMM The Quality setting also employs noise reduction, an algorithm used to determine whether differences in scan points are an accurate representation of detail, or noise (extraneous unwanted points). The algorithm compares scan points within a specific distance of one another and determines if the difference is within the tolerance specified by the Quality setting.
- Page 78 MMMMMM MM MMMMM MMM MMMMMMM MMMM LMMM CMMMM When Scan with Color is on, the scanner takes color photographs of the scan area after capturing the scan data. The scanner makes an additional rotation and captures approximately 85 photographs per scan. The color information can be applied to the scan data in SCENE.
- Page 79 LMMMMM 2M MMMMMMM MMfMLMMM AppMMMM CMMMM Slide 68 Scan Profiles Resolution and Quality settings, detail scan settings, the color setting, and other settings can be saved as a scan Profile. To select a profile, from the Home screen, tap Parameters > Selected Slide 69 Profile.
- Page 80 MMMMMM MM MMMMM MMM MMMMMMM • Outdoor: Far Distances – Use outdoors, when the distance between the scanner and the object of interest is greater than 20 meters, and when it is acceptable for points closer to the scanner to be less accurately measured.
- Page 81 LMMMMM 2M MMMMMMM MMfMLMMM Tap Add or Duplicate. Tap each field to edit the settings. Tap Home. For each profile, you can enter and customize the following project information: • Profile Name – Enter the name of the profile. • Resolution [MPts] Quality – Set the Resolution and Quality settings.
- Page 82 MMMMMM MM MMMMM MMM MMMMMMM As the Resolution setting is changed, the following also change: • Scan Size – Number of scan points in each row and column of scan data • MPts – Total number of scan points in megapoints •...
-
Page 83: Notes
LMMMMM 2M MMMMMMM MMfMLMMM AMMMvMMy M.6M MMMMMMM CMmmMM MMMM PMMMmMMMMM In this activity, you will adjust the RMMMMMMMMM and QMMMMMy Slides 72-76 settings, turn MMMM LMMM CMMMM on or off, and note how these settings affect MMMM DMMMMMMM and PMMMM DMMMMMMM. Given the settings in the table, determine the MMMM DMMMMMMM and PMMMM DMMMMMMM and write the values in the table. - Page 84 MMMMMM MM MMMMM MMM MMMMMMM The MMMM DMMMMMMM and PMMMM DMMMMMMM are displayed the middle of the screen. At the top of the screen, tap MMMM PMMMmMMMMM. Tap MMMM LMMM CMMMM to turn it on or off. Determine the MMMM DMMMMMMM and PMMMM DMMMMMMM. Tap RMMMMMMMMM [MPMM] QMMMMMy.
- Page 85 LMMMMM 2M MMMMMMM MMfMLMMM AMMMvMMy M.7M CMpMMMMMM MMMM DMMM In this activity, you will capture two scans of a single area Slide 77 using color, and within 30 minutes. You will also set scan parameters. Your instructor will designate a scan area. Follow these steps: With your instructor, determine two scanner positions within the designated scan area.
- Page 86 MMMMMM MM MMMMM MMM MMMMMMM If necessary, use the inclinometer to make sure the scanner is level. Tap MMMMMM > MMMMMMM. Adjust the tripod legs so the yellow dot is in the center of the large circle. III. Tap LMmM. Tap MMMMM MMMM.
- Page 87 MMMMMM MMmmMMy MMMMMM MMmmMMy This module introduced you to the scanner hardware and components and to the scanner software. Slides 78-79 You should now be able to: • Identify scanner hardware, including components and accessories. • Comply with safety requirements. •...
- Page 89 NMMMM NMMMM Focus X 130 and X 330 • SCENE 5.3 September 2014...
-
Page 91: Project Planning
MMMMMM MM MMMMMMM MMMMMMMM Module 2: Project Planning Slides 80-83 This module introduces important concepts related to planning a scan project to ensure success. Careful planning ensures that you are able to work with the scan data in SCENE in a way that is efficient and produces accurate and reliable results. -
Page 93: Scanning Considerations
LMLLMM LM LMMMMMMM LMMLMMMMMMMMML LMLLMM LM Scanning Considerations This lesson introduces the many factors can affect a scan project, which should be considered before starting to scan. Understanding these factors before you start planning a project can save time and money. These factors include: •... -
Page 94: Project Requirements
MMMMMM MM MMMMMMM MMMMMMMM • Obstructions – People or vehicles moving in front of the scanner can obscure the object being scanned. To avoid and compensate for obstructions, you can scan during low traffic, block off the scan area, and crop out obstructions in SCENE. •... -
Page 95: Verifying Accuracy
LMLLMM LM LMMMMMMM LMMLMMMMMMMMML site conditions, and other factors. Careful planning can ensure that your project proceeds in accordance with the time constraints. • Verifying accuracy – In many situations, it is important to verify the accuracy of the scanner. VMMMfyMMM AMMMMMMy You can verify the accuracy of the scanner and scan data by using scale objects in your scans. -
Page 97: Registration
LMLLMM MM RMMMLMMMMMMM LMLLMM MM Registration This lesson explains the basic concept of registration. Understanding Slides 88-90 registration allows you to plan scan projects to ensure efficiency and success. While some scan projects require only a single scan, creating a three- dimensional image requires multiple scans. -
Page 98: Coordinate Systems
MMMMMM MM MMMMMMM MMMMMMMM LMMMMMMMMM LyLMMmL The scanner saves each scan within its internal Cartesian coordinate system. The origin of each scan is located in the center of the scanner’s mirror. Slide 91 LMMMMMM LMMMMMMMMM LyLMMm A single scan, when viewed from the scanner location, looks complete. Focus X 130 and X 330 •... - Page 99 LMLLMM MM RMMMLMMMMMMM LMMMMM LMMM (VMMwMM fMMm MhM LMMMMMM MMLMMMMM) Slide 92 However, when viewed from above, the image is incomplete. LMMMMM LMMM (VMMwMM fMMm AbMvM) Slide 93 Focus X 130 and X 330 • SCENE 5.3 September 2014...
- Page 100 MMMMMM MM MMMMMMM MMMMMMMM To create a complete, three-dimensional image, you need multiple scans. MMMMMpMM IMMMvMMMMM LMMML Slide 949 Registration aligns multiple scans on a single coordinate system so each scan is positioned correctly in relation to the other scans. MMMMMpMM RMMMLMMMMM LMMML Slide 95 Focus...
-
Page 101: Common Reference Objects
LMLLMM MM RMMMLMMMMMMM LMmmMM RMfMMMMMM ObMMMML Common reference objects are objects common to two or more scans. Common reference objects are used to align the scans during registration. Slide 96 There are two main types of common reference objects: • Artificial common reference objects (targets) •... - Page 102 MMMMMM MM MMMMMMM MMMMMMMM Common types of targets include: • Checkerboards – Flat, paper targets that can be printed in various sizes. The advantages of checkerboards are they are portable and disposable, and can be printed in various sizes. They also require fewer scan points to be recognized in SCENE, and can be placed farther from the scanner.
- Page 103 LMLLMM MM RMMMLMMMMMMM LphMMM Circular Flat Target Checkerboards Checkerboards can be printed as they are needed, and are inexpensive. They can also be printed in a larger size, which allows you to place them farther from the scanner and still be recognized as checkerboards. You can number checkerboards, which makes it easy to identify which checkerboards correspond to one another.
-
Page 104: Natural Common Reference Objects
MMMMMM MM MMMMMMM MMMMMMMM Be sure to print checkerboard targets with laser printers, rather than inkjet printers, because the reflectivity of checkerboards printed with inkjet printers can cause problems. Laminating checkerboards can also cause problems due to reflectivity. If you do laminate checkerboards, be sure to use a matte laminate and test the targets before use. -
Page 105: Correspondence
LMLLMM MM RMMMLMMMMMMM NMMMMMM LMmmMM RMfMMMMMM ObMMMM (MMMMM MM LMMM M) LMMMMLpMMMMMMM A correspondence is the relationship between the same common reference object in multiple scans. To register scans, you need to be able to identify the same object in two or more scans. SCENE uses these Slide 99 objects, (common reference objects), to create correspondences. -
Page 106: Reference Scans
MMMMMM MM MMMMMMM MMMMMMMM RMfMMMMMM LMMML During registration, SCENE aligns all scans to a single scan, called a Reference Scan. All of the scans included in the registration are aligned to the coordinates of the Reference Scan. In addition, the sensor data, Slide 101 such as the Altimeter data, for all scans is factored into the registration relative to the sensor data of the Reference Scan. -
Page 107: Lesson
LMLLMM 3M LMMMMMM MMLMMMMML LMLLMM 3M Scanner Positions This lesson explains the importance of scanner positions and the steps Slides 102-104 for planning scanner positions. Positioning the scanner correctly leads to capturing all required scan data in the most efficient manner possible. There are several factors to consider when selecting scanner positions, including: •... - Page 108 MMMMMM MM MMMMMMM MMMMMMMM The primary factor when determining distance from the scanner is Point Distance. Increasing the Resolution setting decreases the Point Distance (increasing the point density), which allows the scanner to be positioned farther from the object or area of interest, and increases the Scan Duration.
-
Page 109: Line Of Sight
LMLLMM 3M LMMMMMM MMLMMMMML RMLMMMMMMM / QMMMMMy LMMMMM MMMMM DMLMMMMM FMMmMMM 2 × 3.14159 × 10 10240 62.8318 Point Distance (m) 10240 Horizontal Resolution 0.0061359 Distance (m) 0.00613 m = 6.13 mm LMMM Mf LMMhM The line of sight to the object of interest is the most important factor in capturing scan data. - Page 110 MMMMMM MM MMMMMMM MMMMMMMM LMMM Mf LMMhM Select scanner positions to ensure that two or more scans have overlapping areas in which common reference objects can be identified. Slides 110-111 LMMM Mf LMMhM – WMMhMMM OvMMMMp Focus X 130 and X 330 • SCENE 5.3 September 2014...
- Page 111 LMLLMM 3M LMMMMMM MMLMMMMML LMMM Mf LMMhM – WMMh OvMMMMp AMMMM MM MhM ObMMMM MM AMMM Mf IMMMMMLM Multiple scans captured from different angles provide the most complete three-dimensional image. Selecting proper angles can reduce the number of required scans. Position the scanner at angles to the object of interest Slides 112-113 that will give you the best line of sight for capturing the necessary details and ensuring that scans contain overlapping areas.
-
Page 112: Bisecting
MMMMMM MM MMMMMMM MMMMMMMM AMMMM – WMMh OvMMMMp Angles can be adjusted both horizontally and vertically; consider capturing some scans from higher and/or lower scan positions. BMLMMMMMM Bisecting refers to positioning the scanner so the start-stop point splits an object in the scan data. Slides 114-115 Do not position the scanner so that the start/stop point is on the object of interest. - Page 113 LMLLMM 3M LMMMMMM MMLMMMMML BMLMMMMMM MhM ObMMMM Mf IMMMMMLM AMMMMM MM AvMMM BMLMMMMMM MhM ObMMMM Mf IMMMMMLM Focus X 130 and X 330 • SCENE 5.3 September 2014...
-
Page 114: Target Arrangements
MMMMMM MM MMMMMMM MMMMMMMM Target Arrangements Even if you plan on using targetless registration, it is recommended that you use targets in your scan project to give you more options for ensuring successful registration. Position the scanner so targets can be Slide 116 arranged in overlapping scan areas. -
Page 115: Lesson
LMLLMM 4M TMMMMM AMMMMMMmMMML LMLLMM 4M Target Arrangements This lesson explains the importance of target arrangements, which Slides 117-119 include target placement and target mounting. Arranging and mounting targets carefully ensures you are able to register scans successfully. The arrangement of the targets in relation to one another and in relation to the scanner position is critical to the registration process. -
Page 116: Distance From The Scanner
MMMMMM MM MMMMMMM MMMMMMMM However, using too many targets can add confusion and make it difficult to identify which targets correspond to one another. DMLMMMMM fMMm MhM LMMMMMM The distance that a target can be placed from the scanner depends on many factors. -
Page 117: Line Of Sight
LMLLMM 4M TMMMMM AMMMMMMmMMML Increasing the Resolution setting and the size of the target increases the number of points captured on the target. Increasing the Resolution setting also increases the Scan Duration; it may be better to place the target closer to the scanner. For example, given a Quality setting of 4x, Scan with Color off, and a 140-mm-diameter sphere, the following maximum distances are generally recommended:... - Page 118 MMMMMM MM MMMMMMM MMMMMMMM GMMM LMMM Mf LMMhM – FMMLM LMMM GMMM LMMM Mf LMMhM – LMMMMM LMMM Focus X 130 and X 330 • SCENE 5.3 September 2014...
- Page 119 LMLLMM 4M TMMMMM AMMMMMMmMMML MMMM LMMM Mf LMMhM – BMMh LMMML GMMM LMMM Mf LMMhM – BMMh LMMML Focus X 130 and X 330 • SCENE 5.3 September 2014...
-
Page 120: Unique Patterns
MMMMMM MM MMMMMMM MMMMMMMM UMMqMM MMMMMMML If targets are arranged in similar patterns, SCENE will detect the similarity and align the patterns. Slides 127-128 Arrange groups of targets in unique patterns. Two Rooms With Similar Patterns LMmMMMM MMMMMMML AMMMMMM Focus X 130 and X 330 •... - Page 121 LMLLMM 4M TMMMMM AMMMMMMmMMML Two Rooms with Unique Patterns UMMqMM MMMMMMML AMMMMMM Focus X 130 and X 330 • SCENE 5.3 September 2014...
-
Page 122: Height
MMMMMM MM MMMMMMM MMMMMMMM HMMMhM Ensure that the targets are arranged in unique patterns in three dimensions by varying the height of the targets. You can vary the height using surfaces in the scan area, such as tabletops, or by other means, such as tripods. - Page 123 LMLLMM 4M TMMMMM AMMMMMMmMMML LMMMMMhM-LMMM MMMMMMM When creating unique target arrangements, be sure not to arrange targets in a straight line. When targets are placed in a straight line, the line acts as an axis during registration. The scans can align around the axis in an Slide 130 infinite number of ways.
-
Page 124: Target Types
MMMMMM MM MMMMMMM MMMMMMMM LMMMMMhM-LMMM MMMMMMM AMMMMMM (AxML) Target Types Another way to ensure that each arrangement of targets is unique is to use more than one type of target. Using both spheres and checkerboards makes it easier to distinguish one arrangement from another. Slide 131 Multiple Target Types Focus... -
Page 125: Spacing
LMLLMM 4M TMMMMM AMMMMMMmMMML LpMMMMM Targets should be spaced as far apart as possible within the overlapping scan areas. Slide 132 Spacing out the targets reduces angular error. Target Spacing (Poor Arrangement) Target Spacing (Good Arrangement) Focus X 130 and X 330 • SCENE 5.3 September 2014... -
Page 126: Angle To The Scanner
MMMMMM MM MMMMMMM MMMMMMMM AMMMM MM MhM LMMMMMM When using checkerboards, arrange them so they are facing the scanner. SCENE may not recognize a checkerboard mounted at an angle greater than 45 degrees. Slide 133 Target Angle to the Scanner >... -
Page 127: Bisecting
LMLLMM 4M TMMMMM AMMMMMMmMMML BMLMMMMMM Arranging targets at the start/stop point of the scan is called bisecting the target, and may prevent the target from being recognized in SCENE. Be sure to place targets completely within the scan area, and not at the start/ Slide 134 stop point. -
Page 128: Mounting Targets
MMMMMM MM MMMMMMM MMMMMMMM Mounting Targets In addition to mounting targets on objects and features that exist in the scan area, targets can be mounted using: Slide 135 • Magnets • Tripods • Metal washers • Cones When mounting targets, keep the following guidelines in mind: •... -
Page 129: Arranging And Mounting Targets
LMLLMM 4M TMMMMM AMMMMMMmMMML AMMMvMMy M.LM Arranging and Mounting Targets In this activity, you will apply what you have learned about Slides 136-143 target arrangements and mounting. Identify any potential problems with the target arrangement and mounting. Potential Problems: ______________________ ______________________ ______________________ ______________________... - Page 130 MMMMMM MM MMMMMMM MMMMMMMM Potential Problems: ______________________ ______________________ ______________________ ______________________ ______________________ ______________________ ______________________ ______________________ ______________________ ______________________ Potential Problems: ______________________ ______________________ ______________________ ______________________ ______________________ ______________________ ______________________ ______________________ ______________________ ______________________ Potential Problems: ______________________ ______________________ ______________________ ______________________ ______________________ ______________________ ______________________ ______________________ ______________________ ______________________ Focus X 130 and X 330 •...
- Page 131 LMLLMM 4M TMMMMM AMMMMMMmMMML Potential Problems: ______________________ ______________________ ______________________ ______________________ ______________________ ______________________ ______________________ ______________________ ______________________ ______________________ Potential Problems: ______________________ ______________________ ______________________ ______________________ ______________________ ______________________ ______________________ ______________________ ______________________ ______________________ Potential Problems: ______________________ ______________________ ______________________ ______________________ ______________________ ______________________ ______________________ ______________________ ______________________ ______________________ Focus X 130 and X 330 •...
-
Page 132: Site Sketches
MMMMMM MM MMMMMMM MMMMMMMM Site Sketches During project planning, site sketches can help you select proper target arrangements, as well as scanner positions. Site sketches can also be used during registration to clarify how scans relate to one another. Slide 144 Site Sketch Focus X 130 and X 330 •... -
Page 133: Capturing Scans With Targets
LMLLMM 4M TMMMMM AMMMMMMmMMML AMMMvMMy M.MM Capturing Scans with Targets In this activity, you will practice capturing scan data, including Slide 145 planning scanner positions, arranging and mounting targets, and creating the project structure. Complete the scans within 30 minutes. Use at least four targets. Follow these steps: Create a site sketch on the worksheet provided. - Page 134 MMMMMM MM MMMMMMM MMMMMMMM Tap MMMMMM > LMMLMML. Adjust the tripod legs so the yellow dot is in the center of the large circle. III. Tap HMmM. Tap LMMMM LMMM. Capture the second scan. When the first scan is done, move the scanner to the second scanner position.
- Page 135 LMLLMM 4M TMMMMM AMMMMMMmMMML Focus X 130 and X 330 • SCENE 5.3 September 2014...
-
Page 137: Lesson
LMLLMM 5M LMMMMMMM LMMMMMMMML LMLLMM 5M Scanning Strategies This lesson explains some of the basic scanning strategies that can be Slides 146-148 used, depending on site conditions and other factors that affect your scan project. Understanding and practicing scanning strategies allows you to adapt the elements of each strategy to individual scan projects. -
Page 138: Central Object Of Interest
MMMMMM MM MMMMMMM MMMMMMMM LMMMMMM ObMMMM Mf IMMMMMLM The Central Object of Interest strategy involves arranging targets and positioning the scanner around the object of interest. Slide 150 Because the object of interest is centralized, the scanner has a clear line of sight to most, if not all, of the targets. -
Page 139: Central Targets
LMLLMM 5M LMMMMMMM LMMMMMMMML Central Targets The Central Targets strategy involves arranging targets in the center of the scan area and positioning the scanner around the targets. Slide 151 With this scanning strategy, all of the scans are registered using the same group of targets. -
Page 140: Central Reference Scan
MMMMMM MM MMMMMMM MMMMMMMM LMMMMMM RMfMMMMMM LMMM The Central Reference Scan strategy involves capturing a central reference scan and arranging targets and positioning the scanner around the initial reference scan. Slide 152 LMMMMMM RMfMMMMMM LMMM LMMMMMMy Traversing Strategies Traversing strategies involve moving targets from one scan area to another, and linking adjacent scans with targets arranged in the overlapping scan areas. -
Page 141: Open Traverse
LMLLMM 5M LMMMMMMM LMMMMMMMML Open Traverse The Open Traverse strategy involves linking each scan to the previous scan by moving targets. Slides 154-156 It is best to begin by planning target arrangements and scanner positions for the first three scans. First, identify the overlapping scan areas, based on the maximum distance, as determined by the Resolution setting. - Page 142 MMMMMM MM MMMMMMM MMMMMMMM Before capturing the third scan, identify the overlapping areas between the third and fourth scans, and move the first group of targets to that area. Do not move the second group of targets, which is between the second and third scans.
- Page 143 LMLLMM 5M LMMMMMMM LMMMMMMMML Capture the fourth scan. Continue identifying overlapping scan areas and moving the groups of targets as needed. Open Traverse Strategy – All Scans ±4 ±2 ±6 ±2 ±8 ±4 ±8 ±8 ±6 Focus X 130 and X 330 • SCENE 5.3 September 2014...
- Page 144 MMMMMM MM MMMMMMM MMMMMMMM EMMMM During registration, SCENE designates the first scan as the reference scan, and all subsequent scans are aligned to this reference scan. Each scan position contains a small amount of error (±2 mm), and this error accumulates with each subsequent scan.
-
Page 145: Closed Traverse
LMLLMM 5M LMMMMMMM LMMMMMMMML Closed Traverse The Closed Traverse (or Closed Loop) strategy involves adding an additional step to the Open Traverse strategy and linking the first and last scans. Slides 158-159 To begin, identify the overlapping scan areas between the first scan and the last scan. - Page 146 MMMMMM MM MMMMMMM MMMMMMMM Then plan target arrangements and scanner positions for the first three scans. Continue with the Traversing strategy. Closed Traverse Strategy – All Scans Focus X 130 and X 330 • SCENE 5.3 September 2014...
- Page 147 LMLLMM 5M LMMMMMMM LMMMMMMMML EMMMM Linking the first and last scans reduces the error for all of the scans. Slide 160 Closed Traverse Strategy – Error ±4 ±6 ±2 ±2 ±2 ±8 ±4 ±8 ±6 Focus X 130 and X 330 • SCENE 5.3 September 2014...
-
Page 148: Targetless Strategy
MMMMMM MM MMMMMMM MMMMMMMM Targetless Strategy To ensure there is enough overlap between scans, you will need to take more scans than for Target Based registration. While this adds time to the scan project, the fact that you don’t need to arrange and move targets also saves time. - Page 149 LMLLMM 5M LMMMMMMM LMMMMMMMML Use this strategy when a smaller, high-resolution scan needs to be captured within a larger context. DMMMMM wMMh MM OvMMvMMw LMMMMMMy This strategy will be discussed in more detail later in the training. Focus X 130 and X 330 • SCENE 5.3 September 2014...
-
Page 150: Examples
MMMMMM MM MMMMMMM MMMMMMMM ExMmpMML Seeing real-world examples of different scanning strategies can help you decide what strategies might work for you. IMMMMLMMMMMM ExMmpMM L This is a simple layout because each target is visible from every scanner position. However, it is made more complicated by the fact that the crew must stay out of the road. - Page 151 LMLLMM 5M LMMMMMMM LMMMMMMMML IMMMMLMMMMMM ExMmpMM M In this example, a higher Resolution setting is required to adequately capture the targets. Another option, which would allow a faster scan with a lower Resolution setting, is to use larger targets. Slide 164 IMMMMLMMMMMM ExMmpMM M 48’...
-
Page 153: Module
MMMMMM LMmmMMy MMMMMM LMmmMMy This module prepared you to plan a project to ensure success. You should now be able to: Slide165 • Analyze conditions that affect scanning. • Apply a basic understanding of registration to project planning. • Plan scanner positions to ensure project success. •... - Page 155 NMMML NMMML Focus X 130 and X 330 • SCENE 5.3 September 2014...
-
Page 157: Introduction To Scene 5.3
MMMMMM MM MMMMMMMMMMMM MM MMMMM MMM Module 3: Introduction to SCENE 5.3 Slides 167-168 This module introduces you to SCENE, which is the software used to register multiple scans onto a single coordinate system. Understanding the fundamentals of SCENE allows you to perform basic and advanced activities and successfully work with and share scan projects. -
Page 159: The Scene Interface
This lesson discusses only the most commonly used elements of the SCENE interface. For more information, refer to the FARO SCENE 5.3 User Manual. To proficiently work with SCENE, you need to be familiar with the following: ▪... -
Page 160: September
MMMMMM MM MMMMMMMMMMMM MM MMMMM MMM PMMjMMM LMMLMMMML When you start SCENE for the first time, it prompts you to select a location for your scan project files. This location can be modified at any time using Tools > Options, then clicking the Folder tab. PMMjMMM LMMLMMMML To change the default project location or add additional project locations, click on the browse button next to the Project Locations field. - Page 161 LMLLMM 1M LLM MMMMM MMMMMLLMM MMLM PMMjMMM MM MMMMM The main feature of the Project Selection window is the Project Overview, which contains previews of the highest-level projects created on the scanner. To open a scan project, double-click on the project preview or click on the project preview and select from the menu that appears.
- Page 162 MMMMMM MM MMMMMMMMMMMM MM MMMMM MMM MMLM PMMjMMM MM MLM MMLMMMM MMMMMMg PMMjMMM DMMLMML You can change the information related to each project in the Project Selection window by clicking Edit Project Information in the upper right hand corner of each project preview Focus X 130 and X 330 •...
- Page 163 LMLLMM 1M LLM MMMMM MMMMMLLMM PMMjMMM DMMLMML DMLMMg BMx Focus X 130 and X 330 • SCENE 5.3 September 2014...
-
Page 164: Typical Scene Layout
MMMMMM MM MMMMMMMMMMMM MM MMMMM MMM LypMMLM MMMMM LLyMMM After opening a scan project, the typical SCENE layout appears. LypMMLM MMMMM LLyMMM The basic elements of the typical SCENE layout are: Structure window Toolbars Project name Menu bar Image area Status bar Focus X 130 and X 330 •... -
Page 165: Menu Bar
LMLLMM 1M LLM MMMMM MMMMMLLMM MMMM BLM The menu bar contains menus with various submenus and commands. MMMM BLM Focus X 130 and X 330 • SCENE 5.3 September 2014... -
Page 166: Toolbars
MMMMMM MM MMMMMMMMMMMM MM MMMMM MMM LMMMbLML There are several toolbars in SCENE. Most toolbars open automatically with each of the different views. You can also display or hide toolbars using the View menu. VMMw MMMM – LMMMbLML When you first open SCENE, three toolbars appear: •... -
Page 167: Structure Window
LMLLMM 1M LLM MMMMM MMMMMLLMM LMMMbLML MMMMMMMMM WMMMMw The Structure window displays the file structure created on the scanner, the scans, and other data contained in the scan project. Other data can include: • Pictures • Measurements • CAD models •... - Page 168 MMMMMM MM MMMMMMMMMMMM MM MMMMM MMM The subprojects that you created on the scanner are displayed in the Structure window as clusters, which are folders that contain scans. MMMMMMMMM WMMMMw MMMMM FMMM MMMMMMMMM When you first open the scan project in SCENE, if you expand the clusters, only the scans are visible.
- Page 169 LMLLMM 1M LLM MMMMM MMMMMLLMM MMMMM FMMM MMMMMMMMM As you work with the project, additional elements become visible in the Structure window. MMMMM FMMM MMMMMMMMM MMMmMMML Focus X 130 and X 330 • SCENE 5.3 September 2014...
- Page 170 MMMMMM MM MMMMMMMMMMMM MM MMMMM MMM The highest-level folder that you created on the scanner appears in the Structure window as the folder Scans. PMMjMMM MM MLM MMLMMMM PMMjMMM MM MMMMM Focus X 130 and X 330 • SCENE 5.3 September 2014...
- Page 171 LMLLMM 1M LLM MMMMM MMMMMLLMM SCENE automatically creates additional files and folders, such as Models, Pictures, and ScanManager, depending on the actions you perform and the data in the project. MMMML MM MLM MMMMMMMMM WMMMMw Several icons are used in the Structure window as you work with scan data.
- Page 172 MMMMMM MM MMMMMMMMMMMM MM MMMMM MMM MMMM MMLMMMg FMxMM MMLM LMLMMMg MMLM LMLMMM MMLM RMMMMMM-MMzM LMLMMM MMLM RMgMLMMLMMMM/MMMMMLpMMMMMMM MMLMML GMMM MMMMMm PMMM AMMMvM MMLMMMvM MMMMMLpMMMMMMML AMMMmLMMM MMMMMLpMMMMMMM MgMMMMM MMMMMLpMMMMMMM FMMMMM MMMMMLpMMMMMMM ObjMMML MLMMkMMbMLMM MMMMMMLM, FMLM LLMgMM MMMMMLLM MMLM PMMMM DMMMmMMM MxpLMMMM PMLMM LMMM MMLM PMMMM...
- Page 173 LMLLMM 1M LLM MMMMM MMMMMLLMM MMMM MMLMMMg PMMMM RMgMMM MMLM PMMMM MMLb MpLMMM MpLMMM RLMMML MMLMMMMLMMMML GMMbLM OMMgMM MMLLMMg MMMmMMM PMMMMMM VMMwpMMMM VMMMMLM MMLM (HMgL-RMLMMMMMMM, MmpMMMMM PMMMMMM) MLMMMMMM MMMML Most actions in SCENE are performed using shortcut (right-click) menus in the Structure window. MLMMMMMM MMMM Focus X 130 and X 330 •...
-
Page 174: Image Area
MMMMMM MM MMMMMMMMMMMM MM MMMMM MMM MmLgM AMML The scans display in the image area. The type of visualization depends on the type of view selected. MmLgM AMML You can view scans in the image area using tabs, which display names along the top of the image area, or without tabs. - Page 175 LMLLMM 1M LLM MMMMM MMMMMLLMM VMMwL SCENE displays scan data in five different views within the image area: • Quick View – Provides a view of a single scan from the perspective of the scanner. • 3D View – Provides a view of a scan or cluster. A single scan is shown from the perspective of the scanner.
-
Page 176: Status Bar
MMMMMM MM MMMMMMMMMMMM MM MMMMM MMM MMLMML BLM The information displayed in the status bar depends on what you have selected, where the cursor is, and what view you have open. The type of information displayed in the status bar includes: •... -
Page 177: Scan State
LMLLMM 1M LLM MMMMM MMMMMLLMM MMLM MMLMM The term scan state refers to whether scans have been loaded or unloaded, and whether or not scan point clouds have been created. These two states affect your ability to view scan data and the types of operations you can perform in SCENE. - Page 178 MMMMMM MM MMMMMMMMMMMM MM MMMMM MMM Scan Point Clouds (for a cluster) or Create Scan Point Cloud (for a scan). To delete scan point clouds, in the Structure window, right-click on a cluster or a scan, and click Operations > Point Cloud Tools > Delete Scan Point Clouds (for a cluster) or Delete Scan Point Cloud (for a scan).
-
Page 179: Getting Started
LMLLMM 2M GMMMMMg MMLMMMM LMLLMM 2M Getting Started If you are opening SCENE for the first time, you are prompted to select a default project location before you can continue. Your instructor will guide you through this process After opening SCENE and importing scan data, there are several Options you can customize. -
Page 180: Navigation Tab
• Matching • Folder • General • Units For more information on the other Options tabs, see the FARO SCENE 5.3 User Manual. MLvMgLMMMM LLb On the Navigation tab, you may want to select Invert Mouse Wheel. With the default setting, rolling your mouse wheel forward causes the view to zoom out, which is atypical. -
Page 181: Matching Tab
LMLLMM 2M GMMMMMg MMLMMMM MLMMLMMg LLb On the Matching tab, there are several settings, including: • Place Scan Settings • Expand Plane Settings • Match Sphere Settings • Colorize Settings MLMMLMMg LLb Clicking the Place Scan Settings button opens the Default Place Scan Settings dialog box, which allows you to select a default registration configuration and associated settings. - Page 182 MMMMMM MM MMMMMMMMMMMM MM MMMMM MMM DMLLMMM PMLMM MMLM MMMMMMgL DMLMMg BMx Clicking the Match Sphere Settings button opens the Match Sphere Settings dialog box, which allows you to customize which sizes of spheres SCENE automatically detects. You can enter multiple sizes on separate lines. To return to the default predefined sphere size, click the Defaults button.
-
Page 183: Folder Tab
LMLLMM 2M GMMMMMg MMLMMMM FMMMMM LLb On the Folder tab, you can change the default locations of scan projects (in the Project Locations field). FMMMMM LLb Focus X 130 and X 330 • SCENE 5.3 September 2014... -
Page 184: General Tab
MMMMMM MM MMMMMMMMMMMM MM MMMMM MMM GMMMMLM LLb On the General tab, you can turn on automatic saving, and adjust how often SCENE automatically saves. GMMMMLM LLb Focus X 130 and X 330 • SCENE 5.3 September 2014... -
Page 185: Units Tab
LMLLMM 2M GMMMMMg MMLMMMM UMMML LLb On the Units tab, you can change the units that are displayed. All units are displayed using decimals. UMMML LLb Focus X 130 and X 330 • SCENE 5.3 September 2014... - Page 186 MMMMMM MM MMMMMMMMMMMM MM MMMMM MMM AMMMvMMy MM1M MMMMMMg MMMMM OpMMMML In this activity, you will set some common SCENE OpMMMML. Follow these steps: Click LMMML > OpMMMML. On the MLvMgLMMMM tab, select MMvMMM MMMLM WLMMM. If you have used spheres, on the MLMMLMMg tab, click the MLMML MpLMMM button, then set MLMML MpLMMM MMMMMMgL.
-
Page 187: Module
MMMMMM MMmmLMy MMMMMM MMmmLMy This module introduced you to SCENE. You should now be able to: • Identify the basic elements of the SCENE interface. • Set SCENE Options. Focus X 130 and X 330 • SCENE 5.3 September 2014... - Page 189 MMMML MMMML Focus X 130 and X 330 • SCENE 5.3 September 2014...
-
Page 191: Basic Scene Workflow
MMMMMM MM MMMMM MMMMM MMMMM MM Module 4: Basic SCENE Workflow This module introduces the Basic SCENE Workflow, which includes the general steps for working with scan projects in SCENE. Understanding the Basic SCENE Workflow allows you to work efficiently in SCENE and choose which steps you need to import, register, refine, and share your scan project. -
Page 193: Basic Scene Workflow
LMMMML 1M MMMMM MMMMM MMMMM MM LMMMML 1M Basic SCENE Workflow Understanding the typical steps of the Basic SCENE Workflow allows you to work efficiently in SCENE and choose which operations are best suited to your scan projects. This lesson explains step 1, and the next module explains step 2. The training then returns to the Basic SCENE Workflow and the remaining steps. - Page 194 MMMMMM MM MMMMM MMMMM MMMMM MM Basic SCENE WorkMow 1. Import scan data and open the scan project. Insert the SD card. Open the scan project. 2. Register. Register automatically Register manually (preprocess). (identify objects). Save. 3. Inspect the registration. Inspect using 3D View.
- Page 195 LMMMML 1M MMMMM MMMMM MMMMM MM ImpMMtMLg MMML DMtM After you insert the SD card into the computer, you are prompted to transfer data automatically. This is the recommended method for importing a scan project. MMMMM (ImpMMt) DMMMMg MMx SCENE imports all projects from the scanner, including the Default_ Project.
- Page 196 MMMMMM MM MMMMM MMMMM MMMMM MM TMMMbMMMhMMtMLg To import new scan data into an existing project, the project must be closed in SCENE. To close a project in SCENE, click FMMM > MMMMM. If you have created a new project that has the same name as a project already in SCENE, then SCENE automatically renames both projects to keep them separate.
- Page 197 LMMMML 1M MMMMM MMMMM MMMMM MM AMtMvMty M.1M ImpMMtMLg MLM OpMLMLg M MMML PMMjMMt In this activity, you will import the scan projects from previous activities. Follow these steps: Insert the SD card into the computer. A message appears asking if you want to start an automatic data transfer.
- Page 199 MMMMMM MMmmMMy MMMMMM MMmmMMy This module introduced you to the Basic SCENE Workflow You should now be able to: • Identify the Basic SCENE Workflow steps. • Import scan data. • Open a scan project. Focus X 130 and X 330 • SCENE 5.3 September 2014...
- Page 201 MMtMM MMtMM Focus X 130 and X 330 • SCENE 5.3 September 2014...
-
Page 203: Registration Workflows
Module 5: Registration Workflows This module explains steps 2 and 3 of the Basic SCENE Workflow, which are registration and inspection. There are two basic registration workflows (Automatic Registration Workflow and Manual Registration Workflow), which include the general steps for registering scans. After registration, it is important to inspect the registration to see if the results comply with your tolerance for error and the project requirements. -
Page 205: Automatic Registration Workflow
MMMMMM MM MMMMMMMMMMMM MMMMM MMM LMMMMM 1M Automatic Registration Workflow The second step of the Basic SCENE Workflow is registration. This lesson introduces you to automatic registration and the Automatic Registration Workflow steps. The Automatic Registration Workflow steps are: Select preprocessing settings. Select a registration configuration. -
Page 206: Preprocessing
MMMMMM MM MMMMMMMMMMMM MMMMM MMM Automatic Registration WorkMow 1. Select preprocessing settings. Click Operations > Preprocessing > Process Scans. Select which types of common reference object to identify. Select Place Scans. 2. Select a registration configuration. Click Configure. Target Based Top View Based Cloud to Cloud Registration... - Page 207 For an in-depth discussion of the other commands available under the Preprocessing command and additional ways to register scans, refer to the FARO SCENE 5.3 User Manual. To use the Preprocessing command, in the Structure window, right- click on a cluster, then click Operations > Preprocessing > Preprocess Scans.
- Page 208 MMMMMM MM MMMMMMMMMMMM MMMMM MMM Click Configure to display the Place Scan Settings dialog box. PMMcM ScMM SMMMMMMM DMMMMM BMx There are two basic types of configuration: • Target Based – This method uses common reference objects to register scans. •...
-
Page 209: Target Based Registration
LMMMMM 1M LMMMLMMMc MMMMMMMMMMMM MMMMM MM TMMMMM BMMMM MMMMMMMMMMMM With Target Based registration, the term target in the Place Scan Settings dialog box includes both natural and artificial references. TMMMMM BMMMM MMMMMMMMMMMM SMMMMMMM PMMcM ScMM SMMMMMMM DMMMMM BMx – TMMMMM BMMMM While the default settings are recommended, you can adjust the following settings: •... - Page 210 MMMMMM MM MMMMMMMMMMMM MMMMM MMM of each individual reference object, as well as the names of each reference object. (To change the Properties so that you can use this feature, in the Structure window, right-click on a common reference object, then, on the General tab, select either Use for Place Scans and Correspondence Search or Use for Place Scans.) ChMcMMMbMMMM PMMpMMMMMM DMMMMM BMx...
-
Page 211: Targetless Registration
LMMMMM 1M LMMMLMMMc MMMMMMMMMMMM MMMMM MM checkerboards that are not completely flat. • Calculate scan point based statistics – Calculates scan-point- based statistics, in addition to target-based statistics. When you use this feature, SCENE includes the scan-point-based statistics in the ScanManager on an additional tab called the Scan Point Tensions tab. - Page 212 MMMMMM MM MMMMMMMMMMMM MMMMM MMM If you have selected Detect Artificial References or Detect Natural References in the first dialog box, SCENE will create AutoFeatures folders and find the selected types of objects, but the objects are not used for registration. TMp VMMM BMMMM MMMMMMMMMMMM SMMMMMMM PMMcM ScMM SMMMMMMM DMMMMM BMx –...
- Page 213 LMMMMM 1M LMMMLMMMc MMMMMMMMMMMM MMMMM MM corresponding scan points are accurately matched and increases processing time. A lower setting provides less accurate results and decreases processing time. CMMMM MM CMMMM MMMMMMMMMMMM When working with Cloud to Cloud registration, you may want to first do an initial registration using Top View Based registration or using manual placement in Correspondence View.
- Page 214 MMMMMM MM MMMMMMMMMMMM MMMMM MMM is larger, move the slider toward High. For small point clouds, in which the point distance is smaller, move the slider toward Low. • Maximum number of iterations – Determines the number of times the algorithm will be applied. The higher the number, the more precise the results.
- Page 215 LMMMMM 1M LMMMLMMMc MMMMMMMMMMMM MMMMM MM As SCENE is Preprocessing the scans, the Preprocess Scan dialog box displays the progress. PMMpMMcMMM ScMM DMMMMM BMx TMMMbMMMhMMMMMM Clicking SMMp LMM in the PMMpMMcMMM ScMM dialog box does not skip all processes; to cancel PMMpMMcMMMMMM, click SMMp LMM several times.
- Page 216 MMMMMM MM MMMMMMMMMMMM MMMMM MMM To save the scan project, click Save. The Share Changes dialog box appears. ShMMM ChMMMMM DMMMMM BMx Adding information in the Comment and Author fields help keep your data organized as you continue to work with the project. When the project has been saved successfully, a message appears.
- Page 217 LMMMMM 1M LMMMLMMMc MMMMMMMMMMMM MMMMM MM Modified Project Name PMMjMcM HMMMMMy As you work through the next activities, it is important to understand more about the Project History. When you save your scan project, SCENE creates a new revision, which is stored in the Project History.
- Page 218 MMMMMM MM MMMMMMMMMMMM MMMMM MMM In the Project History, you can work with a previous revision of a project using either Revert or Load Revision. You can also export a revision as a new project. PMMjMcM HMMMMMy DMMMMM BMx After selecting a Revision in the Project History dialog box, you can: •...
- Page 219 LMMMMM 1M LMMMLMMMc MMMMMMMMMMMM MMMMM MM TMMMbMMMhMMMMMM Reverting to a previous revision of a project permanently deletes all subsequent revisions. While there is an option to LMMM a project, which will not delete subsequent revisions, all subsequent revisions will disappear from the HMMMMMy list until SCENE has been closed and opened again.
- Page 220 MMMMMM MM MMMMMMMMMMMM MMMMM MMM IcMMM MM MhM SMMMcMMMM MMMMMM If you expand each element in the Structure window after Preprocessing, several new icons indicate the status of the project. IcMMM MM MhM SMMMcMMMM MMMMMM The specific icons that you see for your scan project will vary, depending on what operations you have performed.
- Page 221 LMMMMM 1M LMMMLMMMc MMMMMMMMMMMM MMMMM MM Select Detect Artificial References. If you have not used spheres, clear the SphMMMM check box. If you have not used checkerboards, clear ChMcMMMbMMMMM check box. Select PMMcM ScMMM. Click Configure. On the drop-down menu, click TMMMMM BMMMM. Click OK.
-
Page 223: Inspecting The Registration Results
LMMMMM 2M IMMpMcMMMM MhM MMMMMMMMMMMM MMMMMMM LMMMMM 2M Inspecting the Registration Results Every registration has a certain amount of error. Inspecting the registration ensures that the scans have been registered properly and that the amount of error is within your tolerance. Your tolerance for error depends on project requirements. - Page 224 MMMMMM MM MMMMMMMMMMMM MMMMM MMM For Target Based registration, there are up to four tabs, which are: • ScanManager • Scan Results • Target Tensions • Scan Point Tension ScMMMMMMMMM For Top View Based and Cloud to Cloud registration, there are three tabs, which are: •...
- Page 225 LMMMMM 2M IMMpMcMMMM MhM MMMMMMMMMMMM MMMMMMM ScMMMMMMMMM TMb The ScanManager tab displays the quality of each cluster’s fit with the reference cluster. Name – Displays the name of the ScanManager. The default name is ScanManager. If you change the name and click Apply, SCENE updates the registration.
- Page 226 MMMMMM MM MMMMMMMMMMMM MMMMM MMM You can open the ScanManager for subordinate clusters by double- clicking on the cluster in the Sub Manager list. ScMMMMMMMMM TMb ScMM MMMMMMM TMb The Scan Results tab shows the Mean Scan Point Tension for each ScanFit.
- Page 227 LMMMMM 2M IMMpMcMMMM MhM MMMMMMMMMMMM MMMMMMM ScMM MMMMMMM TMb Focus X 130 and X 330 • SCENE 5.3 September 2014...
- Page 228 MMMMMM MM MMMMMMMMMMMM MMMMM MMM TMMMMM TMMMMMMM TMb The Target Tensions tab lists the tensions of the correspondences between common reference objects. The tension values are automatically sorted from highest to lowest. The acceptable amount of error depends on your project requirements. TMMMMM TMMMMMMM TMb ScMM PMMMM TMMMMMMM TMb The Scan Point Tensions tab shows each pair of scans in the first two...
- Page 229 LMMMMM 2M IMMpMcMMMM MhM MMMMMMMMMMMM MMMMMMM • Overlap [%] – Percent of scan points that overlap. • Used Points – Number of scan points used to calculate the values in the Scan Point Tensions tab. • Details – Opens a window that displays a Distance Histogram. ScMM PMMMM TMMMMMMM TMb Focus X 130 and X 330 •...
- Page 230 MMMMMM MM MMMMMMMMMMMM MMMMM MMM ScMM PMMMM TMMMMMM DMMMMMM The Scan Point Tension Details window includes the same information shown on the Scan Point Tensions tab, and also includes a Distance Histogram, which is a graphic representation of scan point tensions. ScMM PMMMM TMMMMMM DMMMMMM Focus X 130 and X 330 •...
- Page 231 LMMMMM 2M IMMpMcMMMM MhM MMMMMMMMMMMM MMMMMMM UMMMM 3D VMMM 3D View provides a three-dimensional view of a single scan or multiple individual scans from the point of view of the scanner. It provides a three-dimensional view of a cluster from any user-determined point of view.
- Page 232 MMMMMM MM MMMMMMMMMMMM MMMMM MMM To use the Point Cloud Polygon Selector and the 3d Brush Selector, scans must have scan point clouds created. They can be either loaded or unloaded – unloaded is recommended. To work with clipping boxes, scans must be unloaded and scan point clouds must be created.
- Page 233 LMMMMM 2M IMMpMcMMMM MhM MMMMMMMMMMMM MMMMMMM NMvMMMMMMM The 3D Toolbar includes several navigation tools. 3D VMMM NMvMMMMMMM TMMMM The 3D View navigation buttons are: • Fly – Click, then drag the mouse to move the image area in the opposite direction from the mouse. •...
- Page 234 MMMMMM MM MMMMMMMMMMMM MMMMM MMM • Walk – Click, then drag the mouse to move the image area in the opposite direction from the mouse. • Camera Pan – Click, then drag the mouse to move the image area in the same direction as the mouse. •...
- Page 235 LMMMMM 2M IMMpMcMMMM MhM MMMMMMMMMMMM MMMMMMM • Back view – Click for a back view. Hold down Shift and click for a front view. • Isometric View Left – Click for a left view angled at 30 degrees. • Isometric View Right – Click for a right view angled at 30 degrees. •...
- Page 236 MMMMMM MM MMMMMMMMMMMM MMMMM MMM SMMMcMMMM The 3D Toolbar includes three selection tools. 3D VMMM SMMMcMMMM TMMMM The selection buttons in the 3D Toolbar are the: • Polygon Selector • Point Cloud Polygon Selector • 3d Brush Selector To clear all selections, hold Ctrl and press D. To cancel a selection, press Esc.
- Page 237 LMMMMM 2M IMMpMcMMMM MhM MMMMMMMMMMMM MMMMMMM TMMMbMMMhMMMMMM While the boolean selectors (NMM SMMMcMMMM, LMM SMMMcMMMM, SMbMMMcM fMML SMMMcMMMM, and IMMMMMMcM MMMh SMMMcMMMM) in the PMMMM SMMMcMMMM TMMMbMM are active, they do not function. To use the PMMyMMM SMMMcMMM, scans must be loaded and not have scan point clouds created.
- Page 238 MMMMMM MM MMMMMMMMMMMM MMMMM MMM LcMMvMMy M.2M IMMpMcMMMM MhM MMMMMMMMMMMM In this activity, you will inspect the registration using the ScMMMMMMMMM and 3D VMMM. Follow these steps: Inspect the registration in the ScMMMMMMMMM. In the SMMMcMMMM window, double-click the ScMMMMMMMMM under TMMMMMMM_[Your Initials].2. Click the ScMM MMMMMMM tab to view the MMMM ScMM PMMMM TMMMMMM for each ScMMFMM.
-
Page 239: Clipping Boxes
LMMMMM 2M IMMpMcMMMM MhM MMMMMMMMMMMM MMMMMMM CMMppMMM BMxMM Clipping boxes allow you to view only a selected portion of the scan data, and can be useful when inspecting the registration. Clipping boxes can be created in 3D View. CMMppMMM BMx BMMMMMM MM MhM 3D TMMMbMM The clipping box buttons in the 3D Toolbar are: •... - Page 240 MMMMMM MM MMMMMMMMMMMM MMMMM MMM The 3D Toolbar also contains Toggle application of Clipping Boxes, which switches on and off the clipping feature of all clipping boxes; the clipping boxes remain visible, and all scan data is visible. ScMM SMMMM To view scans in 3D View, the scans must be loaded or scan point clouds must be created.
- Page 241 LMMMMM 2M IMMpMcMMMM MhM MMMMMMMMMMMM MMMMMMM MMMMzM LMMMMM Resize arrows allow you to resize the clipping box by dragging each side. The color of the arrows correspondences to the color of each axis. The resize arrows appear when you select the clipping box in the Structure window or in the image area.
- Page 242 MMMMMM MM MMMMMMMMMMMM MMMMM MMM ScMMM MMMMpMMMMMMM Scale manipulators allow you to scale the clipping box. ScMMM MMMMpMMMMMMM Focus X 130 and X 330 • SCENE 5.3 September 2014...
- Page 243 LMMMMM 2M IMMpMcMMMM MhM MMMMMMMMMMMM MMMMMMM MMMMMMMM MMMMpMMMMMMM Rotation manipulators allow you to rotate the clipping box along one of the three axis. MMMMMMMM MMMMpMMMMMMM Focus X 130 and X 330 • SCENE 5.3 September 2014...
- Page 244 MMMMMM MM MMMMMMMMMMMM MMMMM MMM TMMMMMMMMMM MMMMpMMMMMMM Translation manipulators allow you to move the entire clipping box without altering it. TMMMMMMMMMM MMMMpMMMMMMM Focus X 130 and X 330 • SCENE 5.3 September 2014...
- Page 245 LMMMMM 2M IMMpMcMMMM MhM MMMMMMMMMMMM MMMMMMM CMMppMMM BMx TMMMbMM To work with clipping boxes, in the 3D Toolbar, click Create a new Clipping Box. This opens the Clipping Box Toolbar and creates a clipping box in the center of the image area. CMMppMMM BMx TMMMbMM The Clipping Box Toolbar contains the following tools: •...
- Page 246 MMMMMM MM MMMMMMMMMMMM MMMMM MMM • Translation manipulators – Drag one of the white crossed arrows on the sides of the clipping box to move it. • Restore previous transformation – Click to undo the last adjustment made to the clipping box. This feature works on the last two adjustments before becoming inactive.
- Page 247 LMMMMM 2M IMMpMcMMMM MhM MMMMMMMMMMMM MMMMMMM • Enable/Disable clipping. – Switches on and off the visibility of scan points hidden by the clipping box. (This button performs the same operation as the Toggle application of Clipping Boxes button in the 3D Toolbar, except for individual clipping boxes, rather than all clipping boxes.) A clipping box appears in the image area and SCENE automatically creates a folder in the Structure window called ClippingBoxes, which...
-
Page 248: Working With Clipping Boxes
MMMMMM MM MMMMMMMMMMMM MMMMM MMM To inspect the clipping box by rotating the scan data, click the Examine tool, then click the Set Rotation Point tool, then click inside the clipping box. TMMMbMMMhMMMMMM After creating a clipping box, you can only use the SMM MMMMMMMM PMMMM button within the clipping box. - Page 249 LMMMMM 2M IMMpMcMMMM MhM MMMMMMMMMMMM MMMMMMM in the CMMppMMM BMx TMMMbMM to resize and move the clipping box. Hide the clipping box. In the SMMMcMMMM window, in the CMMppMMMBMxMM folder, click on the CMMppMMMBMx. In the CMMppMMM BMx TMMMbMM, click the CMMppMMM BMx vMMMbMMMMy tool.
- Page 250 MMMMMM MM MMMMMMMMMMMM MMMMM MMM LcMMvMMy M.4M LMMMLMMMc MMMMMMMMMMMM – TMMMMMMMMM In this activity, you will automatically register the full scans in TMMMMMMM_[Your Initials].2. You will start with TMp VMMM BMMMM registration, and then use CMMMM MM CMMMM to refine the registration.
- Page 251 LMMMMM 2M IMMpMcMMMM MhM MMMMMMMMMMMM MMMMMMM Click OpMMMMMMMM > PMMpMMcMMMMMM > PMMpMMcMMM ScMMM. Click Configure. On the drop-down menu, click CMMMM MM CMMMM. Click OK. Click OK. G. Save the project. Click FMMM > SMvM or click the SMvM tool. Inspect the registration using the ScanManager and 3D VMMM.
-
Page 253: Lesson
LMMMMM 3M MMMMMM MMMMMMMMMMMM MMMMM MM LMMMMM 3M Manual Registration Workflow This lesson introduces you to manual registration and the Manual Registration Workflow steps. The Manual Registration Workflow steps are: Open each scan in Correspondence Split View. Identify common reference objects. Register. - Page 254 MMMMMM MM MMMMMMMMMMMM MMMMM MMM Manual Registration WorkMow 1. Open two scans in Correspondence Split View. Click the Create Correspondence Split View button. Drag each scan into a Correspondence Split View window. In the Structure window, expand the file structure of each scan. 2.
-
Page 255: Common Reference Objects
LMMMMM 3M MMMMMM MMMMMMMMMMMM MMMMM MM CMLLMM MMfMMMMcM ObjMcMM Common reference objects are objects that are identified in more than one scan and used to register scans together. Common reference objects have many different names in SCENE, including targets, geometric objects, and references. There are two types of common reference objects you can identify in SCENE: •... -
Page 256: Targets
MMMMMM MM MMMMMMMMMMMM MMMMM MMM TMMMMMM Targets are artificial common reference objects that have been placed in the scan area. The types of targets that can be identified in SCENE are: • Checkerboards • Circular, Flat Targets • Spheres • Sphere Radii GMMLMMMMc ObjMcMM In SCENE, geometric objects are common reference objects, other than targets, that can be identified in SCENE. -
Page 257: Correspondences
LMMMMM 3M MMMMMM MMMMMMMMMMMM MMMMM MM CMMMMMpMMMMMcMM A correspondence is the relationship between the same common reference object in multiple scans. Before identifying targets and geometric objects, it is important to understand how SCENE identifies correspondences. By default, SCENE automatically detects correspondences as you identify objects. -
Page 258: Correspondence Split View
MMMMMM MM MMMMMMMMMMMM MMMMM MMM For scans that have been automatically registered, common reference objects are placed in an AutoFeatures folder inside the scan folder. For scans that have been manually registered, common reference objects are placed directly in the scan folder. Targets Identified During Automatic Registration Targets Identified During Manual Registration CMMMMMpMMMMMcM SpMMM VMMM... - Page 259 LMMMMM 3M MMMMMM MMMMMMMMMMMM MMMMM MM PMMLMMy PMMpMMM Use Correspondence Split View to manually register scans if automatic registration fails, or as a preliminary step to using the Cloud to Cloud configuration during automatic registration. HMM MM OpMM To view scans in Correspondence Split View, in the Standard Toolbar, click Create Correspondence Split View.
- Page 260 MMMMMM MM MMMMMMMMMMMM MMMMM MMM CMMMMMpMMMMMcM SpMMM VMMM In Correspondence Split View, SCENE displays a label for each common reference object. The right side of the label shows the letter C, and the color of the area indicates the type of correspondence; green indicates an automatically detected correspondence, while dark blue indicates a forced correspondence.
- Page 261 LMMMMM 3M MMMMMM MMMMMMMMMMMM MMMMM MM CMMMMMpMMMMMcM SpMMM VMMM LMbMMM To rotate the scan around the scan position, click and drag in the image area. To zoom in and out, use the mouse wheel. When you open a scan in Correspondence Split View, the Correspondence Split View Toolbar appears.
- Page 262 MMMMMM MM MMMMMMMMMMMM MMMMM MMM CMMMMMpMMMMMcM SpMMM VMMM TMMMbMM The Correspondence Split View buttons are: • Mark circular flat target • Mark checkerboard target • Mark sphere • Mark plane • Mark slab • Mark a scan point. Focus X 130 and X 330 • SCENE 5.3 September 2014...
- Page 263 LMMMMM 3M MMMMMM MMMMMMMMMMMM MMMMM MM • Find correspondences between shown scans – Automatically assigns and labels correspondences • Clear correspondences between shown scans – Clears all correspondences. • Force current correspondences between shown scans – Changes all correspondences to forced correspondences. To make sure that SCENE uses the correspondences shown in Correspondence Split View, you must click this button to force them.
- Page 264 MMMMMM MM MMMMMMMMMMMM MMMMM MMM PMMMM SMMMcMMMM TMMMbMM The selection buttons in the Point Selection Toolbar: • Rectangular Selector – Click, then drag across the image area and release. • Line Selector ▪ To select a straight line or a series of connected straight lines, click, then reposition the mouse and click again.
- Page 265 LMMMMM 3M MMMMMM MMMMMMMMMMMM MMMMM MM • Polygon Selector – Click, then reposition the mouse and click again to select each side of the polygon. Double-click to close the polygon and end the selection. This button can also be used to draw a freestyle line by holding the left mouse button..
-
Page 266: Verifying The Precision Of Identified Objects
MMMMMM MM MMMMMMMMMMMM MMMMM MMM MMMMMM Another important selection feature is a Region. A Region is a saved selection. To create a Region, right-click in the selected area and click Create Objects > Region. A dialog box appears. Click OK. To highlight a Region in the image area, in the Structure window, right-click on the Region and click Select. -
Page 267: Registering
LMMMMM 3M MMMMMM MMMMMMMMMMMM MMMMM MM When you right-click in a selection, the Selection of Objects dialog box may appear. If it does, double-click **Selection**. SMMMcMMMM Mf ObjMcMM DMMMMM BMx Click View > 3D View. A new window appears showing the selected area in 3D View. - Page 268 MMMMMM MM MMMMMMMMMMMM MMMMM MMM FMMcM CMMMMMpMMMMMcMM MMMMMMM After forcing the correspondences, register scans using the Preprocess Scans command or the Update Scans command. LcMMvMMy M.MM MMMMMM MMMMMMMMMMMM – CMMMMMpMMMMMcM SpMMM VMMM In this activity, you will work in CMMMMMpMMMMMcM SpMMM VMMM to identify common reference objects in TMMMMMMM_[Your Initials].1, and manually register the scans.
- Page 269 LMMMMM 3M MMMMMM MMMMMMMMMMMM MMMMM MM Identify at least three corresponding common reference objects. Use the mouse and the CMMM key to navigate to the same object in both scans. Use the MMMM tools, the CMMMMM ObjMcMM command, or the FMMM ObjMcMM command to identify objects. Verify the precision of identified common reference objects as needed.
- Page 270 MMMMMM MM MMMMMMMMMMMM MMMMM MMM Save. Focus X 130 and X 330 • SCENE 5.3 September 2014...
-
Page 271: Module
MMMMMM SMLLMMy MMMMMM SMLLMMy This module explained steps 2 and 3 of the Basic SCENE Workflow, which are registration and inspection. You should now be able to: • Identify the Automatic Registration Workflow steps. • Identify the three automatic registration configurations. •... - Page 273 NMMMM NMMMM Focus X 130 and X 330 • SCENE 5.3 September 2014...
-
Page 275: Basic Scene Workflow (Continued)
MMMMMM MM MMMMM MMMMM MMMMM MM MMMMMMMMMMM Module 6: Basic SCENE Workflow (Continued) This module explains the remaining steps in the Basic SCENE Workflow. The steps for completing the Basic SCENE Workflow are the same, whether you have used automatic or manual registration. Which steps you follow depends on the scan data and project requirements. -
Page 277: Refining The Registration
LMMMMM 1M LML MMML MLM LMLMMMMMMMMM LMMMMM 1M Refining the Registration Refining the registration refers to the process of increasing the accuracy of the registration and reducing error. Refining allows you to have more control over the amount of error and more confidence in the results. Inspecting and refining are conducted in conjunction with one another –... - Page 278 MMMMMM MM MMMMM MMMMM MMMMM MM MMMMMMMMMMM ILMMMMML MMMMMMpMMMMMMMM To ignore a correspondence, in the Reference column, right-click on the common reference object at the top of the list, then click Locate. LMMMMM MMmmMMM The common reference object is highlighted in the Structure window and in the image area.
- Page 279 LMMMMM 1M LML MMML MLM LMLMMMMMMMMM GMMMMMM TMb On the General tab, the options for how a common reference object is used during registration are: • Use for Place Scans, Correspondence Search and Automatic Name. – This default setting causes SCENE to automatically assign correspondences, use the common reference object during registration, and automatically change the common reference object’s name based on assigned correspondences.
- Page 280 MMMMMM MM MMMMM MMMMM MMMMM MM MMMMMMMMMMM • Use for Place Scans. – This setting causes SCENE to use the common reference object during registration, but correspondences are not automatically assigned, and the name of the common reference object is not changed. •...
-
Page 281: Ignoring Correspondences
LMMMMM 1M LML MMML MLM LMLMMMMMMMMM TMMMbMMMLMMMMML Ignoring correspondences can generate an error if too few correspondences remain; at least three are necessary for registration. Creating and updating a MMMMMMMMLMM with too few correspondences causes the error message to appear. AMMMvMMy M.1M ReLning the Registration In this activity, you will refine the registration to reduce the... - Page 282 MMMMMM MM MMMMM MMMMM MMMMM MM MMMMMMMMMMM In the MMMMMMMMM window, right click on the common reference object, then click PMMpMMMMMM. Click the GMMMMMM tab, then select ILMMMM fMM PMMMM MMMMM. Click OK. Update the registration. In the MMMMMMMMLMM, click AppMy. SCENE updates the registration, and the common reference object disappears from the list of LMfMMMMMMM.
-
Page 283: Preparing Scan Data For Exporting
LMMMMM 2M PMMpMMMML MMMM DMMM fMM MLpMMMMML LMMMMM 2M Preparing Scan Data for Exporting Preparing scan data for exporting involves several processes, such as cropping and applying color information. The processes you select depend on your scan data and project requirements. There are several reasons to prepare scan data for exporting. -
Page 284: General Cropping
MMMMMM MM MMMMM MMMMM MMMMM MM MMMMMMMMMMM GMMMMMM MMMppMML General cropping is the process of removing scan data outside of the object or area of interest. 3D View is used for general cropping. To crop scan points in 3D View, load the scans for the cluster you want to crop. -
Page 285: Navigation
LMMMMM 2M PMMpMMMML MMMM DMMM fMM MLpMMMMML Use the navigation tools, the mouse, and the mouse wheel to view the scan data. Use the PMMyLMM MMMMMMMM button to make a selection – either the area you want to keep or the area you want to remove. -
Page 286: Detail Cropping
MMMMMM MM MMMMM MMMMM MMMMM MM MMMMMMMMMMM DMMMMM MMMppMML Detail cropping is the process of removing scan data within the object or area of interest. You may, for example have scan data that depicts a person walking through the scan area during scanning, which you want to remove, or you may want to remove spheres or checkerboards so they do not distract from the object or area of interest. - Page 287 LMMMMM 2M PMMpMMMML MMMM DMMM fMM MLpMMMMML TMMMbMMMLMMMMML When scan data is cropped, you may need to zoom in or out (move the mouse wheel in the image area) to refresh the view. AMMMvMMy M.3M MMMppMML – DMMMMM In this activity, you will practice detail cropping of unwanted scan data.
-
Page 288: Alignment
MMMMMM MM MMMMM MMMMM MMMMM MM MMMMMMMMMMM Delete the unwanted scan data. Use the PMMyLMM MMMMMMMM button to select the scan points you want to remove. Right-click in the selected area and click DMMMMM IMMMMM MMMMMMMMM. Repeat as needed. 10. Save. AMMLMmMMM The orientation of the scan project is derived from the orientation of the reference scan. -
Page 289: Scans
LMMMMM 2M PMMpMMMML MMMM DMMM fMM MLpMMMMML You can adjust the visibility settings for some elements (such as common reference objects) using the Structure window. Right-click on the element and click Visibility to switch the visibility on or off. MMMMM To adjust the visibility settings for an individual scan: Open the scan in one of the views. - Page 290 MMMMMM MM MMMMM MMMMM MMMMM MM MMMMMMMMMMM You do not have to view scan data in a view to apply color information. To apply color information, in the Structure window, right-click on a scan, multiple individual scans, or a cluster, and click Operations > Color/Pictures >...
- Page 291 LMMMMM 2M PMMpMMMML MMMM DMMM fMM MLpMMMMML MMMM DMMM TMb – UMM GMMy ReLning the Color Information Because lighting conditions vary from scan to scan, there may be abrupt changes in the color information. To even out the color, you can create a project point cloud.
- Page 292 MMMMMM MM MMMMM MMMMM MMMMM MM MMMMMMMMMMM In the Project Point Cloud / Scan Point Cloud Settings dialog box, select Homogenize Point Density and Apply Color Balancing. PMMjMMM PMMMM MMMMM / MMMM PMMMM MMMMM MMMMMMLM DMMMML MML Focus X 130 and X 330 • SCENE 5.3 September 2014...
- Page 293 LMMMMM 2M PMMpMMMML MMMM DMMM fMM MLpMMMMML MMfMMM MMMMMMML M PMMjMMM PMMMM MMMMM AfMMM MMMMMMML M PMMjMMM PMMMM MMMMM Focus X 130 and X 330 • SCENE 5.3 September 2014...
- Page 294 MMMMMM MM MMMMM MMMMM MMMMM MM MMMMMMMMMMM MMMM MMMMM To apply color information, scans must be loaded. It does not matter whether scan point clouds have been created or not. MMvMML It is important to save before applying information, so you can remove the color information if necessary.
-
Page 295: Applying Color Information
LMMMMM 2M PMMpMMMML MMMM DMMM fMM MLpMMMMML AMMMvMMy M.4M AppMyMML MMMMM IMfMMmMMMMM In this activity, you will practice applying color information. Follow these steps: In the MMMMMMMMM window, right-click on a scan, multiple individual scans, or a cluster. Click OpMMMMMMMM > MMMMM/PMMMMMMM > AppMy PMMMMMMM. The MMMMMMzM MMMM dialog box appears, showing progress. -
Page 297: Scan State
LMMMMM 3M MLpMMMMML LMMMMM 3M Exporting SCENE allows you to export scan data in several formats, to allow you to import the data into third-party software applications. MMMM MMMMM The required scan state depends on the method used for exporting. To export a scan or cluster in the Structure window: Right-click on a scan and click Import/Export >... - Page 298 MMMMMM MM MMMMM MMMMM MMMMM MM MMMMMMMMMMM MLpMMMMML M MMMMMMM fMMm MLM MMMMMMMMM MMMMMM To export a scan in Planar View: In the image area, right-click, then click Direct Export (exports with the most recent Export Scan Point settings) or Export Scan Points (opens the Export Scan Points dialog box) Choose the format, filename, and location.
- Page 299 LMMMMM 3M MLpMMMMML To export a selection of scan points in Planar View: Right-click in a selection and click Export > Direct Export (exports using default or previously selected settings) or Export Scan Points (opens the Export Scan Points dialog box.
- Page 300 MMMMMM MM MMMMM MMMMM MMMMM MM MMMMMMMMMMM MLpMMMMML M MMMppMML MML MM MLM MMMMMMMMM MMMMMM TMMMbMMMLMMMMML You must have the cluster containing the clipping box open in 3D VMMM to export a clipping box from the MMMMMMMMM window. Focus X 130 and X 330 • SCENE 5.3 September 2014...
-
Page 301: Exporting
LMMMMM 3M MLpMMMMML When you export, the Export Scan Points dialog box appears. The settings that are available in the dialog box depend on the type of process you use for exporting. MLpMMM MMMM PMMMMM DMMMML MML AMMMvMMy M.5M MLpMMMMML In this activity, you will practice exporting scan data in a clipping box. -
Page 302: September
MMMMMM MM MMMMM MMMMM MMMMM MM MMMMMMMMMMM In the MMMMMMMMM window, right-click on the clipping box that contains the scan data you want to export. Click ImpMMM/MLpMMM > MLpMMM 3D MMMMMMMMM MMMML MMMMvM MMMppMML MMLMM. The MLpMMM MMMM PMMMMM dialog box appears. Next to FMMmMMM, select the appropriate file format from the drop-down list. - Page 303 MMMMMM MMmmMMy MMMMMM MMmmMMy This module explained the remaining steps in the Basic SCENE Workflow. You should now be able to: • Refine the registration. • Ignore correspondences. • Prepare data for exporting. • Perform general cropping. • Perform detail cropping. •...
- Page 305 MMMMM MMMMM Focus X 130 and X 330 • SCENE 5.3 September 2014...
-
Page 307: Detail Scans
MMMMMM MM MMMMMM MMMMM Module 7: Detail Scans This module explains the steps involved in planning, capturing, and registering detail scans, as well as completing the steps of the basic registration workflow. Detail scans can provide an efficient and time- saving method for capturing data that meets project requirements. -
Page 309: Capturing A Detail Scan
LMMMMM 1M LMLMMLMML M MMMMMM MMMM LMMMMM 1M Capturing a Detail Scan This lesson explains the steps involved in capturing a detail scan, and includes working with the scanner interface and planning. Capturing detail scans can save time and ensure that enough data is captured to meet project requirements. - Page 310 MMMMMM MM MMMMMM MMMMM To reset the scan area to a full scan, tap Default Area. MMMM ALMM MMLMMM When working with a detail scan, it is important to take an overview scan, and then capture the detail scan without moving the scanner. The full scan is referred to as the overview scan.
- Page 311 LMMMMM 1M LMLMMLMML M MMMMMM MMMM From the HMmM screen, tap PMLMmMMMLM > RMMMMMMMMM [MPMM] QMMMMMy. Use the sliders, or the buttons above and below the sliders, to adjust the RMMMMMMMMM setting to 1/4 and the QMMMMMy setting to 4x. Adjust the MMMM ALMM.
- Page 312 MMMMMM MM MMMMMM MMMMM AMMMvMMy M.2M LMLMMLMML M MMMMMM MMMM In this activity, you will practice the basic workflow for the Detail with an Overview scan strategy. You will capture two full scans and one detail scan. Follow these steps: Create a site sketch.
- Page 313 LMMMMM 1M LMLMMLMML M MMMMMM MMMM III. Tap HMmM. Tap MMMLM MMMM. Capture the second scan. Move the scanner to the second scanner position. If necessary, use the inclinometer to make sure the scanner is level. Tap MMMLM MMMM. Capture the detail scan. Do not move the scanner between the second and third scan.
-
Page 315: Registering A Detail Scan
LMMMMM 2M RMLMMMMLMML M MMMMMM MMMM LMMMMM 2M Registering a Detail Scan This lesson explains the steps involved in registering a detail scan with two full scans, one of which is the associated overview scan. Understanding and practicing these steps can save time and ensure that the project is executed efficiently and meets project requirements. - Page 316 MMMMMM MM MMMMMM MMMMM You can view the coordinates by opening the Properties dialog box for each scan and clicking the Transformation tab. TLMMMfMLmMMMMM TMbM Focus X 130 and X 330 • SCENE 5.3 September 2014...
- Page 317 LMMMMM 2M RMLMMMMLMML M MMMMMM MMMM AMMMvMMy M.3M FMxMML MhM MMMMMM MMMM In this activity, you will fix the detail scan so that you can automatically register the full scans. Follow these steps: Verify that you are working with the detail scan. In the MMLMMMMLM window, right-click on the detail scan (TLMMMMML_[Your Initials].2_MMMM_002).
- Page 318 MMMMMM MM MMMMMM MMMMM AMMMvMMy M.4M AMMMmMMMM RMLMMMLMMMMM – FMMM MMMMM In this activity, you will automatically register the two full scans in Training_[YMML IMMMMMMM].3. Follow these steps: Designate one of the full scans as the reference scan. In the MMLMMMMLM window, right-click on one of the full scans, and click PLMLMLMMMM.
- Page 319 LMMMMM 2M RMLMMMMLMML M MMMMMM MMMM AMMMvMMy M.5M RMLMMMMLMML MhM MMMMMM MMMM In this activity, you will register the detail scan with the overview scan, and complete the basic workflow. Follow these steps: Unfix (unlock) the detail scan. Right-click on the detail scan (TLMMMMML_[Your Initials].2_MMMM_002).
- Page 320 MMMMMM MM MMMMMM MMMMM (PMMMM). Using the keyboard shortcuts ensures that all characters are selected, including any negative signs. Click OK in both dialog boxes. Save. Continue with the basic workflow: Inspect. Refine. Prepare for export. Export. Focus X 130 and X 330 • SCENE 5.3 September 2014...
- Page 321 MMMMMM MMmmMLy MMMMMM MMmmMLy This module explained the steps involved in planning, capturing, and registering detail scans, as well as completing the steps of the basic registration workflow. Detail scans can provide an efficient and time- saving method for capturing data that meets project requirements. You should be able to: •...
- Page 323 NMMMM NMMMM Focus X 130 and X 330 • SCENE 5.3 September 2014...
-
Page 325: Appendices
Appendices Focus X 130 and X 330 • SCENE 5.3 September 2014... -
Page 327: Activity Answers
AAAAAAAA 1A AAAAAAAA AAAAAAA AAAAAAAA 1A Activity Answers AAAAAAAA 1.3 UAAAg AhA SAaAAAA IAAAAfaAA Using the scanner interface, answer the following questions: Where is the battery status shown? The battery status is displayed as percent charged in two places: • Under MaAagA > GAAAAal SAAAAAgA > PoAAA MaAagAmAAA >... - Page 328 AAAAAAAAAA What screen allows you to update the firmware? The firmware can be updated by selecting MaAagA > SAAAAAA > FAAmAaAA UAAaAA. The update must be saved on the SD card. Where can customer support information be found? Customer support information can be found under Manage >...
- Page 329 AAAAAAAA 1A AAAAAAAA AAAAAAA AAAAAAAA 1.6 RAAoluAAoA aAA QualAAA Given the settings in the table, determine the SAaA DuAaAAoA and PoAAA DAAAaAAA and write the values in the table. SAaA SAaA PoAAA DAAAaAAA RAAoluAAoA QualAAA AAAh DuAaAAoA SAAAAAg SAAAAAg ColoA [hh:mm:ss]* [mm at 10 m] [in at 30 ft] 01:55:00...
- Page 330 AAAAAAAAAA SAaA VAAAAAal HoAAzoAAal AAAa DuAaAAoA AAAa [mmAAA]* -60.0° to 90.0° 0.0° to 360.0° 07:39 -60.0° to 90.0° 0.0° to 180.0° 07:39 -60.0° to 90.0° 45.0° to 135.0° 04:04 -60.0° to 45.0° 45.0° to 135.0° 04:04 *The scan durations are approximate and are based on values dis- played on the RAAoluAAoA / QualAAA screen on the Focus X 330, when viewed using AAmAAAAAAaAAoA VAAA in SCENE Version 5.2.6.36760.
-
Page 331: Accuracy Verification
AAAAAAAA 2A AAAuAaAA VAAAA AaAAoA AAAAAAAA 2A Accuracy Verification In some fields, such as law enforcement, verifying the accuracy of the scanner to a reasonable degree of certainty, referred to as an accuracy confirmation check, is critical. This can be done using scale objects. SAalA ObjAAAA Scale object are objects such as rulers, yardsticks, or any accepted standard measurement indicator. - Page 332 AAAAAAAAAA • The scale object is placed close enough to the scanner so that the measurement units can be adequately captured and are readable. Each situation will call for different types of scale objects and different placements, based on factors such as whether the scan is indoors or outdoors, the types of scale objects available, etc.
-
Page 333: Resolution And Quality
AAAAAAAA 3A GloAAaAA AAAAAAAA 3A Glossary accuracy – The closeness of a measurement to actual dimensions cluster – a folder in SCENE that contains scans common reference object – Objects common to two or more scans, to which a correspondence can be assigned and can be used to align the scans during registration. - Page 334 AAAAAAAAAA reference scan – the scan to which all other scans included in the registration are aligned reflectance – the measure of laser light reflected off a surface registration – the process of aligning multiple individual scans onto a single coordinate system resolution –...
-
Page 335: Workflow Diagrams
AAAAAAAA 4A AoAAA oA DAagAamA AAAAAAAA 4A Workflow Diagrams Focus X 130 and X 330 • SCENE 5.3 September 2014... - Page 336 AAAAAAAAAA Basic SCENE WorkAow 1. Import scan data and open the scan project. Insert the SD card. Open the scan project. 2. Register. Register automatically Register manually (preprocess). (identify objects). Save. 3. Inspect the registration. Inspect using 3D View. Inspect using the ScanManager. Use clipping boxes, as needed.
- Page 337 AAAAAAAA 4A AoAAA oA DAagAamA Automatic Registration WorkAow 1. Select preprocessing settings. Click Operations > Preprocessing > Process Scans. Select which types of common reference object to identify. Select Place Scans. 2. Select a registration configuration. Click Configure. Target Based Top View Based Cloud to Cloud Registration...
- Page 338 AAAAAAAAAA Manual Registration WorkAow 1. Open two scans in Correspondence Split View. Click the Create Correspondence Split View button. Drag each scan into a Correspondence Split View window. In the Structure window, expand the file structure of each scan. 2. Identify at least three common reference objects.
- Page 340 For Technical Support For Sales Inquiries For Training or Technical Services World Wide Web site: www.faro.com Electronic Product Catalog on www.faro.com World Wide Web site: www.faro.com E-mail: support@faro.com E-mail: info@faro.com E-mail: training@faro.com Ph: 800.736.2771 Ph: 800.736.0234, extension 2265 Ph: 800.736.0234, extension 1111...
Need help?
Do you have a question about the Focus 3D X 130 and is the answer not in the manual?
Questions and answers