Advertisement
Setup Instructions for the Freestyle2
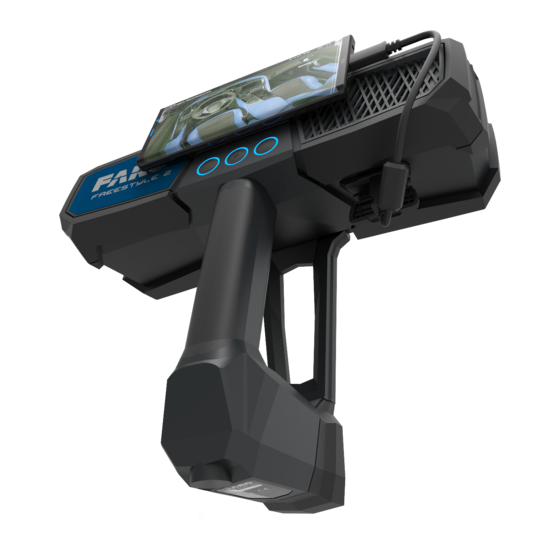
1. Insert the battery into the Mobile PC.
2. With the white dot toward the battery, plug the Freestyle 2 handset cable into the mobile PC.
3. Press the power button until the light surrounding the button flashes blue.
4. Power on the cellular phone.
To connect via USB:
1. Ensure that the phone WiFi is turned off.
2. Mount the cellular phone, via magnet, to the front of the handset.
3. Connect the phone to the handset using the short USB cable.
4. Open the FARO Freestyle 2 App.
5. Select USB Tethering.
6. Toggle on USB tethering and use the back arrow to return to the app home screen.
To connect via WiFi:
1. Open the camera on your phone.
2. Use the camera to scan the WiFi QR code on the back of the Mobile PC.
3. Allow the phone to connect to the Mobile PC network.
Note: If you connect your mobile PC to a monitor, via HDMI, the QR code will appear on the Windows
screen.
4. From the Home screen, tap Settings.
5. Select Recording Settings.
a. Choose your data range (best results under 5m), plane detection, color scan and whether you want to use
flash.
NOTE: Flash can be toggled on and off mid-scan using the button to the left of center on the device.
6. Select Scan Project Settings.
a. Insert a Project Base Name and Scan Base Name.
7. Select Scan Info Settings.
8. Choose the settings you want visible on the left side of the phone while scanning. Suggested to turn on the
acoustic/vibration feedback to assist with tracking feedback.
9. Select the < icon in the top left corner of the screen.
https://knowledge.faro.com/Hardware/3D_Scanners/Freestyle_2/Setup_Instructions_for_the_Freestyle2
Updated: Sat, 11 Dec 2021 07:26:33 GMT
1
Advertisement
Table of Contents

Related Manuals for Faro Freestyle2


Summary of Contents for Faro Freestyle2
- Page 1 2. Mount the cellular phone, via magnet, to the front of the handset. 3. Connect the phone to the handset using the short USB cable. 4. Open the FARO Freestyle 2 App. 5. Select USB Tethering. 6. Toggle on USB tethering and use the back arrow to return to the app home screen.
- Page 2 • If you have a defined X,Y,Z in your scene (2-walls meet ceiling/floor), you can add an anchor point by pointing the device in that area and using the button to the right of center on the device. When you see a green point on your https://knowledge.faro.com/Hardware/3D_Scanners/Freestyle_2/Setup_Instructions_for_the_Freestyle2 Updated: Sat, 11 Dec 2021 07:26:33 GMT...
- Page 3 • If combining data with scans from the FARO Focus scanner, allow for data overlap. • While using markers (especially for long trajectories) make sure targets have different orientation (horizontal- vertical) - It will greatly improve the constraint.
Need help?
Do you have a question about the Freestyle2 and is the answer not in the manual?
Questions and answers