Table of Contents
Advertisement
Advertisement
Table of Contents

Related Manuals for EDAN SD5


Summary of Contents for EDAN SD5
-
Page 2: About This Manual
This manual will help you understand the operation and maintenance of the product better. It is reminded that the product shall be used strictly complying with this manual. User’s operation failing to comply with this manual may result in malfunction or accident for which EDAN INSTRUMENTS, INC. (hereinafter called EDAN) can not be held liable. - Page 3 injury or death. CAUTION A CAUTION label advises against actions or situations that could damage equipment, produce inaccurate data, or invalidate a procedure. NOTE A NOTE provides useful information regarding a function or a procedure.
-
Page 4: Table Of Contents
Table of Contents Chapter 1 Safety Guide ......................... 1 1.1 Intended Use/Indications for Use ..................1 1.2 Safety Precautions ....................... 1 1.3 Symbols ..........................4 Chapter 2 Introduction ........................6 2.1 Main Unit ..........................6 2.2 Probes ..........................8 2.3 Control Keys ........................9 2.4 Indicators ........................... - Page 5 A3.6 Probe Acoustic Output Parameters List ................. 41 Appendix 4 Overall Sensitivity ....................43 A4.1 Overall Sensitivity of SD5 (2MHz Wired Probe) ............43 A4.2 Overall Sensitivity of SD5 (3MHz Wired Probe) ............44 A4.3 Overall Sensitivity of SD6 (2MHz Wireless Probe) ............45...
-
Page 6: Chapter 1 Safety Guide
Follow the operation and maintenance instructions to ensure proper use of it. 1.1 Intended Use/Indications for Use The SD5 Ultrasonic TableTop Doppler (hereinafter called “SD5”) and SD6 Ultrasonic TableTop Doppler (hereinafter called “SD6”) are intended to be used by health care professionals including registered nurses, practical nurses, midwives, ultrasound technicians, and physician assistants, by prescription from licensed physicians in hospitals, clinics and private offices. - Page 7 SD5/SD6 Ultrasonic TableTop Doppler User Manual Safety Guide WARNING Do not touch the signal input/output connector and the patient simultaneously. Do not apply this device and other ultrasonic equipment simultaneously on the same patient, in case of possible hazard caused by leakage current superposition.
- Page 8 SD5/SD6 Ultrasonic TableTop Doppler User Manual Safety Guide WARNING 28 Using accessories other than those specified by the manufacturer may result in increased electromagnetic emissions or decreased electromagnetic immunity of the device. 29 The appliance coupler or mains plug is used as isolation means from supply mains.
-
Page 9: Symbols
SD5/SD6 Ultrasonic TableTop Doppler User Manual Safety Guide 1.3 Symbols Definition Symbol Headphones Equipotential grounding Alternating Current Fuse ON/OFF switch Menu Recording and play-back Print control Move the cursor downwards Move the cursor upwards Speaker Decrease Increase Charge battery Push right... - Page 10 SD5/SD6 Ultrasonic TableTop Doppler User Manual Safety Guide TYPE BF APPLIED PART CE marking Disposal method The device is protected against splashing water. Water splashed IPX4 against the enclosure from any direction shall have no harmful effects. Part Number SERIAL NUMBER...
-
Page 11: Chapter 2 Introduction
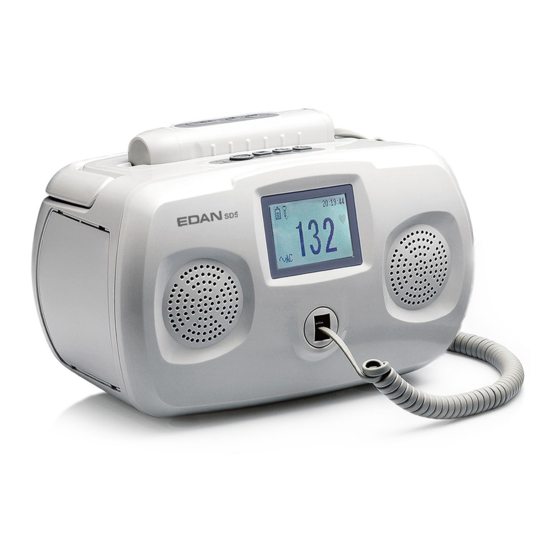
SD5/SD6 Ultrasonic TableTop Doppler User Manual Introduction Chapter 2 Introduction NOTE: The pictures and interfaces in this manual are for reference only. 2.1 Main Unit SD5: 1 Probe 2 Probe Cable 3 Main Unit SD6: 4 LCD 5 Speakers 6 Probe Socket... - Page 12 SD5/SD6 Ultrasonic TableTop Doppler User Manual Introduction WARNING Please do not touch the probe sensor socket and the patient simultaneously. 11 Main Unit Indicator 12 On/OFF Key 13 Setup Key / Confirm Key 14 Up Key / Record/Play Control Key...
-
Page 13: Probes
SD5/SD6 Ultrasonic TableTop Doppler User Manual Introduction 2.2 Probes WARNING Do not touch the charge sockets of the Doppler probe and the patient simultaneously. CAUTION 1. Do not immerse the probe (and the probe cable) in any liquid. 2. Do not stretch the probe cable for more than three meters. -
Page 14: Control Keys
The Doppler supports 2 MHz and 3 MHz probes supplied by the manufacturer. The probe nominal frequency is disclosed on the probe type label. Probes of SD5 are wired, while probes of SD6 are wireless. WARNING SD6 complies with Part 15 of the FCC Rules. Operation is subject to the following two... -
Page 15: Indicators
SD5/SD6 Ultrasonic TableTop Doppler User Manual Introduction Function: Switch on/off the main unit or switch on the probe. Note that if the probe fails to connect the main unit in two minutes, it will power off automatically. (2) Up Key / Record/Play Control Key Function: Move the cursor upwards to the previous item (in the setting mode). -
Page 16: Lcd
SD5/SD6 Ultrasonic TableTop Doppler User Manual Introduction 2.5 LCD The Doppler has four modes: examining mode, recording mode, playing mode and setting mode. In the former three modes, the LCD displays as follows: Item Description The battery is installed and the battery energy is full. - Page 17 SD5/SD6 Ultrasonic TableTop Doppler User Manual Introduction In the setting mode, the LCD displays as the right figure shows. The rectangular mark that moves up and down is called the “cursor”. Press the Up key or the Down key to move it back or forth.
-
Page 18: Chapter 3 Basic Operation
SD5/SD6 Ultrasonic TableTop Doppler User Manual Basic Operation Chapter 3 Basic Operation 3.1 Opening Package and Checking Open the package; take out the Doppler and accessories carefully. Place them on a flat, clean surface. Keep the package for possible future transportation or storage. Check the components according to the packing list. - Page 19 SD5/SD6 Ultrasonic TableTop Doppler User Manual Basic Operation Battery Connecting Metal Insert Cable & Connector 2 Tilt the battery sideways and put its bottom left corner into the battery compartment from the left end of the compartment to the right. Make sure connector ① stays out of the compartment.
-
Page 20: Fitting Wireless Probe Battery
SD5/SD6 Ultrasonic TableTop Doppler User Manual Basic Operation 4 Connect the two connectors (①&②) and then put them into the compartment. 5 Close the battery compartment cover. 3.2.2 Fitting Wireless Probe Battery The wireless probe is powered by a lithium battery. -
Page 21: Charging Main Unit Battery
SD5/SD6 Ultrasonic TableTop Doppler User Manual Basic Operation 2 Fit the battery. Make sure the polarities correspond with the battery compartment diagram. 3 Close the battery compartment cover and fix it with the screw. 3.2.3 Charging Main Unit Battery Observe the battery indicator on the LCD, the panes in it indicate the main unit battery electric energy. -
Page 22: Care Of Batteries
If the protective grounding (protective earth) system is doubtful, the Doppler must be supplied only by inner power. 3.4 Using Wired Probe 3.4.1 Probe Socket SD5 adopts wired probes. The probe cable is a telephone cable with a standard RJ11 plug on each terminal. - 17 -... -
Page 23: Connecting And Disconnecting A Wired Probe
SD5/SD6 Ultrasonic TableTop Doppler User Manual Basic Operation RJ11 Interface: Power Signal Wire Signal Wire 3.4.2 Connecting and Disconnecting a Wired Probe To connect the wired probe to the main unit: 1 Take out the probe cable from package. Insert one modular plug of the cable into the probe socket of the main unit. -
Page 24: Switching Off
If you take up the probe within 3 hours, it will power on automatically and be ready for use. For SD5, the wired probe is ready to use when the main unit is switched on. 3.6 Switching Off When the examination is finished, switch off the main unit, wipe the remaining gel off the probe with a clean soft cloth and then place the probe back into the holder. -
Page 25: Using Earphone
SD5/SD6 Ultrasonic TableTop Doppler User Manual Basic Operation To switch off the wireless probe: NOTE: If the probe is not to be used over a relatively long period of time, It is recommended to switch off the main unit first, and then put the probe into the probe holder. -
Page 26: Setting Auto-Shut-Off Time
SD5/SD6 Ultrasonic TableTop Doppler User Manual Basic Operation 4 Press the Setup key. 3.8.3 Setting Auto-Shut-Off Time The Auto-Shut-Off feature facilitates the economical use of the Doppler. The main unit will switch off automatically after no signal is received and no operation is performed for 1 minute,... -
Page 27: Replacing Fuses
SD5/SD6 Ultrasonic TableTop Doppler User Manual Basic Operation setting changes will not be effective. 3.9 Replacing Fuses WARNING Switch off the main unit and unplug it before replacing the fuses. Two fuses are located on the rear panel of the device, their specifications are: Size: Ф5 mm*20 mm;... -
Page 28: Chapter 4 Fhr Examining
SD5/SD6 Ultrasonic TableTop Doppler User Manual FHR Examining Chapter 4 FHR Examining WARNING Always check if the main unit and the probe are in good condition prior to use. To avoid inaccurate diagnosis: (a) relocate the probe for the best FHR signal as the fetal position changes;... - Page 29 SD5/SD6 Ultrasonic TableTop Doppler User Manual FHR Examining When applied to the patient, the ultrasound transducer may warm slightly (less than 8°C (14.4°F) above ambient temperature). When NOT applied, the ultrasound transducer may reach the highest temperature of 8°C (14.4ºF).
-
Page 30: Chapter 5 Recording And Playing
SD5/SD6 Ultrasonic TableTop Doppler User Manual Recording and Playing Chapter 5 Recording and Playing The built-in recorder of the Doppler allows recording and playing fetal heart sound of 240 seconds (at most). To record fetal heart sound: Press and hold the Record/Play control key for two seconds. -
Page 31: Chapter 6 Maintenance And Cleaning
SD5/SD6 Ultrasonic TableTop Doppler User Manual Maintenance and Cleaning Chapter 6 Maintenance and Cleaning 6.1 Inspection (1) Visual Inspection Prior to using the device every time, do the following inspections: Check the device and accessories to see if there is any visible evidence of damage that may affect patient safety. -
Page 32: Cleaning
SD5/SD6 Ultrasonic TableTop Doppler User Manual Maintenance and Cleaning Handle the probe with care to avoid damaging the cover, piezoelectric crystals and mechanical movement. Do not contact the probe with hard or sharp objects. Do not excessively flex the probe cable. -
Page 33: Sterilization
SD5/SD6 Ultrasonic TableTop Doppler User Manual Maintenance and Cleaning 6.5 Sterilization Do not sterilize the Doppler, unless this is necessary according to your hospital regulation. NOTE: After cleaning or disinfection, check if the Doppler function well. If any problem is detected, please contact the manufacturer for service before reusing them. -
Page 34: Chapter 7 Warranty And Service
EDAN will, at its discretion, repair or replace the defective part(s) free of charge. EDAN will not provide a substitute product for use when the defective product is being repaired. -
Page 35: Chapter 8 Product Specifications
SD5/SD6 Ultrasonic TableTop Doppler User Manual Product Specifications Chapter 8 Product Specifications 8.1 Environmental Specifications Temperature: 0ºC ~ + 40ºC ( +32ºF ~ +104ºF) Working Relative Humidity: 15% RH ~ 95% RH (non-condensing) Atmospheric Pressure: 86 kPa ~ 106 kPa Temperature: -20ºC ~ +55ºC (-4ºF ~ +131ºF) -
Page 36: Performance Specifications
SD5/SD6 Ultrasonic TableTop Doppler User Manual Product Specifications Main Unit: Ordinary equipment (Sealed equipment Degree Protection against without liquid proof) Harmful Ingress of Water Probe: IPX4 Equipment not suitable for use in presence of Degree of Safety in Presence of... -
Page 37: Battery Specifications
SD5/SD6 Ultrasonic TableTop Doppler User Manual Product Specifications Audio Output Power: 1-minute/3-minute no signal and no operation Auto Shut off: Photopic vision: >5 m (the indoor distance depends on Bluetooth Transmission Distance: the building structure and material) Ultrasound: 2 MHz Wired /Wireless Probes: 2 MHz... -
Page 38: Low Output Summary Table
SD5/SD6 Ultrasonic TableTop Doppler User Manual Product Specifications ≥300 times Circle Life: (after 300 circles, only 90% of the capacity can be restored.) -20°C ∼ +60°C (-4 ºF ~ +140 ºF) (1 month) or Storage Temperature: -20°C ∼ +40°C (-4 ºF ~ +104 ºF) (3 months) 8.5 Low Output Summary Table... -
Page 39: Appendix 1 Ordering Information
SD5/SD6 Ultrasonic TableTop Doppler User Manual Ordering Information Appendix 1 Ordering Information CAUTION Only the parts supplied by the manufacturer should be used with the Doppler. Parts Part Number Probe 2 MHz Wired Probe 02.01.212045 3 MHz Wired Probe 02.01.212046 Probe Cable 01.13.036108... -
Page 40: Appendix 2 Emc Information
A2.1 Electromagnetic Emissions Guidance and manufacture’s declaration- electromagnetic emission The SD5/SD6 is intended for use in the electromagnetic environment specified below. The customer or the user of the SD5/SD6 should assure that it is used in such an environment. Emission test Compliance... -
Page 41: A2.2 Electromagnetic Immunity
A2.2 Electromagnetic Immunity Guidance and manufacture’s declaration – electromagnetic immunity The SD5/SD6 is intended for use in the electromagnetic environment specified below. The customer or the user of SD5/SD6 should assure that it is used in such an environment. Electromagnetic... -
Page 42: A2.3 Electromagnetic Immunity
A2.3 Electromagnetic Immunity Guidance and manufacture’s declaration – electromagnetic immunity The SD5/SD6 is intended for use in the electromagnetic environment specified below. The customer or the user of SD5/SD6 should assure that it is used in such an environment. Immunity... -
Page 43: A2.4 Recommended Separation Distances
RF transmitters, an electromagnetic site survey should be considered. If the measured field strength in the location in which the SD5/SD6 is used exceeds the applicable RF compliance level above, the SD5/SD6 should be observed to verify normal operation. If abnormal performance is observed, additional measures may be necessary, such as reorienting or relocating the SD5/SD6 Over the frequency range 150 kHz to 80 MHz, field strengths should be less than 3 V/m. -
Page 44: Appendix 3 Ultrasound Intensity And Safety
SD5/SD6 Ultrasonic TableTop Doppler User Manual Ultrasound Intensity and Safety Appendix 3 Ultrasound Intensity and Safety A3.1 Ultrasound in Medicine The use of diagnostic ultrasound has proved to be a valuable tool in medical practice. Given its known benefits for non-invasive investigations and medical diagnosis, including investigation of the human fetus, the question of clinical safety with regards to ultrasound intensity arises. -
Page 45: A3.3.2 Ti (Thermal Index)
SD5/SD6 Ultrasonic TableTop Doppler User Manual Ultrasound Intensity and Safety MI = r, α × C = 1 (MPa / MHz ) A3.3.2 TI (Thermal Index) Heating of tissues is caused by absorption of ultrasound when the ultrasound energy is applied. -
Page 46: A3.5 References For Acoustic Output And Safety
SD5/SD6 Ultrasonic TableTop Doppler User Manual Ultrasound Intensity and Safety ultrasound equipment have ever been reported, the potential exists that such bioeffects may be identified in the future. Therefore, the ultrasound should be used prudently. High levels of acoustic output and long exposure time should be avoided while acquiring necessary clinical information. - Page 47 SD5/SD6 Ultrasonic TableTop Doppler User Manual Ultrasound Intensity and Safety Acoustic Output Reporting Table for Track 1 Non-autoscanning Mode Operating Mode: CW mode Transducer: CD3.0 Working Frequency: 3.0MHz SPTA.3 SPPA.3 Acoustic Output (mW/cm^2) (W/cm^2) Global Maximum Value 0.01342 17.45 0.01745 (MPa) 0.02325...
-
Page 48: Appendix 4 Overall Sensitivity
SD5/SD6 Ultrasonic TableTop Doppler User Manual Overall Sensitivity Appendix 4 Overall Sensitivity A4.1 Overall Sensitivity of SD5 (2MHz Wired Probe) Two-way Attenuation Diameter of Overall Sensitivity B=∑B Target Distance Reflection (r.m.s) (r.m.s) (S=A(d)+B+C) ... -
Page 49: A4.2 Overall Sensitivity Of Sd5 (3Mhz Wired Probe)
SD5/SD6 Ultrasonic TableTop Doppler User Manual Overall Sensitivity A4.2 Overall Sensitivity of SD5 (3MHz Wired Probe) Diameter of Two-way Attenuation (r.m. (r.m. Overall Sensitivity Target Distance Reflection B=∑B (S=A(d)+B+C) Reflector (d)(mm) Loss A(d) ∑B (T: ultrasonic attenuation... -
Page 50: A4.3 Overall Sensitivity Of Sd6 (2Mhz Wireless Probe)
SD5/SD6 Ultrasonic TableTop Doppler User Manual Overall Sensitivity A4.3 Overall Sensitivity of SD6 (2MHz Wireless Probe) Two-way Attenuation Overall Diameter of B=∑B Sensitivity Target Distance Reflection (r.m.s) (r.m.s) (S=A(d)+B+C Reflector (d)(mm) Loss A(d) ∑B (T: ultrasonic attenuation... -
Page 51: A4.4 Overall Sensitivity Of Sd6 (3Mhz Wireless Probe)
SD5/SD6 Ultrasonic TableTop Doppler User Manual Overall Sensitivity A4.4 Overall Sensitivity of SD6 (3MHz Wireless Probe) Diameter of Two-way Attenuation Overall Sensitivity Target Distance Reflection B=∑B (r.m.s) (r.m.s) (S=A(d)+B+C) Reflector (d)(mm) Loss A(d) ∑B (T: ultrasonic attenuation...
Need help?
Do you have a question about the SD5 and is the answer not in the manual?
Questions and answers