Table of Contents
Advertisement
Quick Links
Advertisement
Table of Contents

Related Manuals for Xomax XM-RSU256BT


Summary of Contents for Xomax XM-RSU256BT
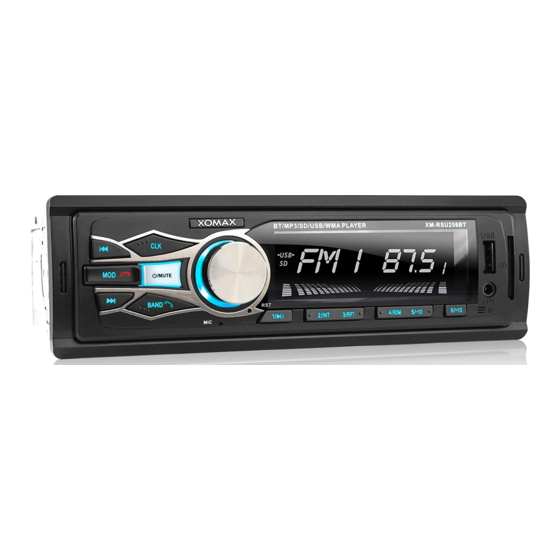
- Page 1 XOMAX User Manual XM-RSU256BT ENGLISH XOMAX X M - R S U 2 3 6 B T...
- Page 2 XOMAX XM-RSU256BT Thank you for purchasing one of our XOMAX products! We appreciate your confi - dence. Enjoy your brand new multimedia unit! Please read the following manual carefully before you install and use the unit. Please save this manual in case you will need to clarify further possible ques- tions regarding installation and usage of our product.
-
Page 3: General Operation
【GENERAL OPERATION】 /Mute Press /Mute button in short time to turn the player on A. When machine is on status You can immediately mute play back without turning off the player of changing the volume by pressing the /Mute button. Pressing the button again returns to the original volume. ●... - Page 4 You can adjust the setting by turning the knob. ● If you make no change for 3 seconds, the player automatically reverts to the previous function. ● By default the knob adjusts the volume BASS Adjust bass tone(-7..00...+7) TREBLE Adjust treble tone(-7..00...+7) BALANCE Adjust left/right balance(L10...01/L=R/R01...10) FADER...
- Page 5 ● When the function is active the display shows LOUD. : AMS/ BAND/AMS Button (Automatic Memory for Stations and Automatic Scan for the Memory of Preset Stations) Press BAND/AMS button for over 1 second, the player will search signals in the present wave band based on the present wave band.
- Page 6 ANSWER A CALL When the phone which has already been connected to the device is called, the player device will automatically shift to the on-a-call status whenever the player is in any mode,and the phone number will appear on LCD. Then, you can press BAND/ button ( either on the unit player or phone is available to answer the call).
- Page 7 Press the button briefly to manually tune in to the desired station, or press and hold the buttons to scan automatically for the stronger stations. The scan stops when the player reaches the next available station. If you press and hold one of the slot numbers 1 through 6 for 2 seconds, the current station is stored in that location.
- Page 8 play the tracks from the one you inserted last. ● This unit can play MP3 directly from USB/SD/MMC storage device. ● If the player emits no sound or does not recognize the USB/SD/SDHC/MMC memory, remove the storage device and connect it again. If this does not work either, press the button to select the signal source.
-
Page 9: Setting The Current Time
buttons jump to a random track in this mode. 5/-10 & 6/+10 1. You can use these buttons to jump 10 tracks forward or backward during playback. If there are less than 10 tracks remaining at the start or end of the playlist, the player goes to the first or last track. - Page 10 the player while driving can result in accidents. If needed, stop the car while manipulatingthe player. ● Do not listen to the player too loud. Set a volume that allows you hear external sounds while driving. Extreme volumes can also cause permanent damage to your ears. ·Spend as little time as possible watching the display.
- Page 11 ● The warranty is not applicable to damage caused by irresponsible or improper installation or use. 【PRECAUTIONS】 CLEANING Use a soft, dry cloth and a brush for regular cleaning. To remove stronger stains, wet the cloth slightly with water. Avoid scratching the display's surface;never wipe the display when it is dry, and do not use a coarse cloth to clean the display.
- Page 12 ● SD cards are preferred over USB sticks because their design allows you to connect them in a safer and more stable way. In addition, SD cards do not stick out of the player, which reduces the risk of damaging the player by accidentally hitting the connected device or the magnetic lid.
-
Page 13: Installation
apply when you are connecting an audio player. 【INSTALLATION】 DIN FRONT-MOUNTING METHOD 1. Dashboard 2. Holder After inserting the holder into the dashboard, select the appropriate tab according to the thickness of the dashboard material and bend them inwards to secure the holder in place. 3. -
Page 14: Performance Index
【PERFORMANCE INDEX】 FM TUNER FM frequency range......87.5 - 108.0 MHz Usable sensitivity..........3.0 µV Sensitivity...........30 dB S/N >10 dB IF frequency.............10.7 MHz Channel separation..........>45 dB Signal/noise level..........>50 dB USB/SD/SDHC/MMC USB system..........USB 1.1/2.0 Max. Current............500 mA File system..........FAT 12/16/32 MP3 decoder......MPEG-1 AUDIO Layer-3 Number of channels........2-CH, stereo Channel separation..........>55 dB Signal/noise level..........>60 dB... -
Page 15: Troubleshooting
【TROUBLESHOOTING】 Before going through the check list, check the wiring connection diagram firstly. If any of the problems persist after checklist has been made, consult your nearest service dealer. Symptom Causes Solution If the power supply is properly The car ignition key has not connected to the car accessory been switched on terminal, switch the ignition key to... - Page 16 The proper disposal of these products contributes to environment protection. To fi nd the nearest collection point or recycling yard please consult your municipal administration. XOMAX distribution worldwide Purchase XOMAX car radio online: https://www.carmediashop.de XOMAX in the world wide web XOMAX manufacturer's information: http://www.xomax.de...
Need help?
Do you have a question about the XM-RSU256BT and is the answer not in the manual?
Questions and answers