Table of Contents
Advertisement
WARNING: This manual contains information on limitations regarding product use
and function and information on the limitations as to liability of the manufacturer.
The entire manual should be carefully read.
I o P a s s ™
S t a n d - A l o n e D o o r C o n t r o l l e r
I n s t a l l a t i o n M a n u a l
DN1445-0303 / V.2.22
Advertisement
Table of Contents

Related Manuals for Kantech IoPass SA-500


Summary of Contents for Kantech IoPass SA-500
- Page 1 WARNING: This manual contains information on limitations regarding product use and function and information on the limitations as to liability of the manufacturer. The entire manual should be carefully read. I o P a s s ™ S t a n d - A l o n e D o o r C o n t r o l l e r I n s t a l l a t i o n M a n u a l DN1445-0303 / V.2.22...
- Page 2 Warning! Please Read Carefully door. If warning devices are located on a different level of the premise, then it is less likely that the occupants will be alerted or awakened. N o t e t o I n s t a l l e r s Audible warning devices may be interfered with by other noise sources This warning contains vital information.
- Page 3 During the pose) And of all other obligations or liabilities on the part of Kantech warranty period, Kantech Systems shall, at its option, repair or replace...
-
Page 5: Table Of Contents
Tab l e o f C o n t e n t s Section 1 • Introduction to IoPass™ 5.3.2 - Modifying the Main Password ......18 5.3.3 - Modifying the Auxiliary Password ....18 1.1 Product Overview ............7 5.3.4 - Modifying the Guard Password .......18 1.2 About this Manual ............7 5.4 Adding &... -
Page 7: Section 1 • Introduction To Iopass
In t r o du c ti o n to Io P as s™ - Pr o duc t O v e rv i e w S e c t i o n 1 • I n t r o d u c t i o n t o I o P a s s ™ 1.1 Product Overview Custom language selection: the IoPass unit can be operated in five languages (English, French, Spanish,... -
Page 8: Specifications
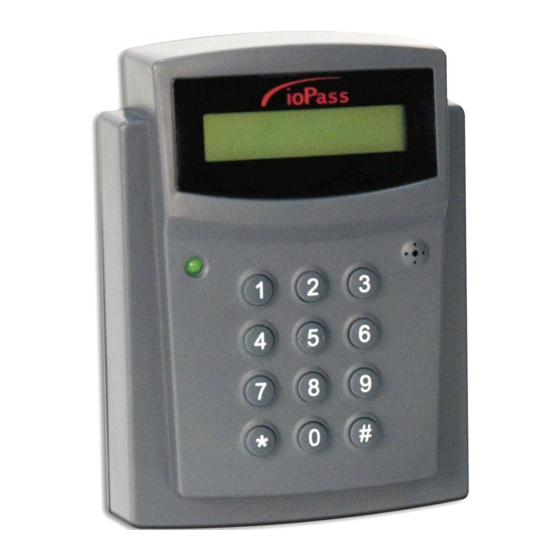
In t r o du c t i on t o I oP a s s™ - Specifications 1.4 Specifications • Typical read range—Up to 10 cm (4") • Input voltage—12VDC; • Current DC maximum—300mA; • Display—16 characters, 2 lines, LCD with backlight; •... -
Page 9: Section 2 • Installing And W Iring Iopass
In st a lli ng an d Wir in g Io Pa ss™ - U n p a c k i n g t h e I o P a s s U n i t S e c t i o n 2 • I n s t a l l i n g a n d Wi r i n g I o P a s s ™ 2.1 Unpacking the IoPass Unit 2.4 Typical Mounting Diagram Check that the following parts are in your IoPass package:... -
Page 10: Mounting The Ioprox P100 Reader
In stal li ng an d Wir in g Io Pa ss ™ - Mounting the IoProx P100 Reader 2.6 Mounting the IoProx P100 Reader 2.8 Connecting the T.Rex Exit Detector or Exit Button NOTE: For model SA-600 only. To install the T.Rex Exit Detector/push button, refer to the To mount the IoProx proximity reader, please refer to manufacturer’s instructions. -
Page 11: Setting Relay 1 Functions
In st al lin g a n d Wiri n g Io Pas s ™ - S ett ing R elay 1 F u nctio ns 2.11 Setting Relay 1 Functions Depending on how you intend to use Relay-1, you will need to configure the jumpers, located on the SA-RM56 relay module, before you mount it inside the wall. -
Page 12: General Wiring Diagram
In stal li ng an d Wir in g Io Pa ss ™ - Connecting the Power... -
Page 13: Section 3 • Program M Ing Iopass™ - Introduction
P r o g r a mm i n g I o P a s s™ - I nt r o d uc t io n - Io Pass Prog ra mmin g Mod e S e c t i o n 3 • P r o g r a m m i n g I o P a s s ™ - I n t r o d u c t i o n 3.1 IoPass Programming Mode Factory Description... - Page 14 P r o g r am m in g I oP ass ™ - In t r o du c ti on - IoPass Factory Defaults...
-
Page 15: Section 4 • Program M Ing Iopass™ - Features
P r o gr am m in g Io P a ss™ - Fe atu res - A c c e s s M o d e S e l e c t i o n S e c t i o n 4 • P r o g r a m m i n g I o P a s s™ - F e a t u r e s 4.1 Access Mode Selection 4.4 Relay-1 Functions Before you start registering cardholders, you must select... -
Page 16: Door Ajar Alarm Function
P r o g r am m in g I oP ass ™ - F ea tu r e s - Door Ajar Alarm Function 4.11 Loop Type Selection (without card or password or both). When this occurs, a “door forced open” type of event is generated. The IoPass unit allows the installer to modify the loop type NOTE: For more information refer to “5.11 Configuring the of the exit button and door contact. -
Page 17: Section 5 • Program M Ing Iopass™ -Step By Step
P r o g r am m in g I oP as s™ -St e p b y S te p - Se le ctin g t he Syst em La ngu ag e S e c t i o n 5 • P r o g r a m m i n g I o P a s s ™ - S t e p b y S t e p 5.1 Selecting the System Language master password, refer to “Managing Passwords”... -
Page 18: Modifying The Main Password
P r o g r am m in g I oP ass ™- S t e p by S t e p - Managing Passwords 5.3.2 - Modifying the Main Password To Modify the Guard Password Enter the master password (default is [111111]) then The main password is a “global”... -
Page 19: Adding & Deleting Cards
P ro gra m mi n g Io Pa ss™ - S t e p b y S t e p - A ddin g & D ele ting C ards 5.4 Adding & Deleting Cards • You can type in the number (XX:XXXXX) printed on the card followed by the [#] sign using the keypad. -
Page 20: Adding & Deleting Auxiliary Cards
P r o g r am m in g I oP ass ™- S t e p by S t e p - Viewing Cards To Add/Delete a group of cards: To Add/delete Auxiliary Cards: Enter the master password (default is [111111]) fol- Enter the master password (default is [111111]) fol- lowed by the [#] key. -
Page 21: Verifying A Card Number
P r o g r a m m i ng I o P a s s™ - S te p b y S t ep - Ve rif y ing a Ca rd N um ber Press [1-Access Card] to view access cards OR press 5.7.1 - Enabling the Guard Function [2-Aux. -
Page 22: Viewing The Audit Trail
P r o g r am m in g I oP ass ™- S t e p by S t e p - Auxiliary Function Configuration (Relay-1) To disarm the system: • Enroll auxiliary cards (if required). See “5.4.3 - Adding &... -
Page 23: Configuring The Duress Function (Relay-1)
P r o g r am m in g Io P a ss ™- S t e p by S t e p - Co nfig uring t he Du re ss F un c tion (R elay-1) 5.9 Configuring the Duress Function (Relay-1) Press [3-Duress]. -
Page 24: Using The Tamper Alarm Function
P r o g r am m in g I oP ass ™- S t e p by S t e p - Configuring the Forced Entry Alarm 5.10.2 - Using the Tamper Alarm Function 5.11.2 - Using the Force Entry Function Once the function is enabled in the system, follow this Follow this procedure to STOP the force entry alarm if it procedure to STOP the tamper alarm if it has been... -
Page 25: Activating The Alarm Relay On Door Ajar
P r o gr am m in g Io P a ss ™- S t e p b y S t e p - P IN E r r o r F u n c ti o n C o n fi g u r a ti o n 5.12.2 - Activating the Alarm Relay on Door Ajar 5.12.4 - Using the Door Ajar Function Enter the master password (default is [111111]) fol-... -
Page 26: Beeper Key Tone Configuration
P r o g r am m in g I oP ass ™- S t e p by S t e p - Beeper Key Tone Configuration 5.15 Loop Type Configuration 1. ENROLL 2. PASSWD 3. TIMER 4. SYSTEM The IoPass unit allows the installer to modify the loop type Press [4-System]. -
Page 27: Setting The Strike Relay Timer
P r o g r a m m i ng I o P a s s™ -S te p b y Ste p - Se tt in g th e S tr i ke R ela y T i mer 3.DURESS 4.AJAR PRESS 1 Press [2-Alarm]. -
Page 28: Quick Reference Programming Table
P r o g r am m in g I oP ass ™- S t e p by S t e p - Resetting the IoPass Unit to Factory Defaults Quick Reference Programming Table 1.ENROLL 1.ACCESS CARD PROGRAM CARDS 1.S_ADD VIEW CARDS 2.S_DEL 3.B_ADD... -
Page 29: Programming Worksheet
P r o g r a m m i ng I o P a s s™ -S te p b y Ste p - R e s e t t i n g t h e I o P a s s U n i t t o Fa c t o ry D e f a u l t s Programming Worksheet Installation Information Site Name:... -
Page 30: Card Information Record Sheet
P r o g r am m in g I oP ass ™- S t e p by S t e p - Resetting the IoPass Unit to Factory Defaults Card Information Record Sheet NOTE: Make copies of this sheet to record cardholder information. Auxiliary Cardholder Name Card Number... -
Page 31: Using The Iopass™ System
P r o g r a m m i ng I o P a s s™ -S te p b y Ste p - R e s e t t i n g t h e I o P a s s U n i t t o Fa c t o ry D e f a u l t s Using the IoPass™... - Page 32 P r o g r am m in g I oP ass ™- S t e p by S t e p - Resetting the IoPass Unit to Factory Defaults READY FOR CARD DOOR OPEN The “Door Open” message is displayed (and blinking) and will remain on the LCD until the door is closed properly.
- Page 33 P r o g r a m m i ng I o P a s s™ -S te p b y Ste p - R e s e t t i n g t h e I o P a s s U n i t t o Fa c t o ry D e f a u l t s...
- Page 34 P r o g r am m in g I oP ass ™- S t e p by S t e p - Resetting the IoPass Unit to Factory Defaults...
- Page 36 Tel: +1(978) 731-6252 • Toll Free: US & Canada: 1 888 222-1560 • Fax: +1(978) 731-7759 Web Site: www.Kantech.com E-mail: techlink@tycoint.com © 2003, Kantech Systems. All rights reserved. Specifications may be modified without notice. ™ Trademarks of Kantech Systems. Printed in USA • DN1445-0303...