
Subscribe to Our Youtube Channel
Related Manuals for Yardworks 060-3808-8


Summary of Contents for Yardworks 060-3808-8
- Page 1 Electric Lawn Edger model number 060-3808-8 | contact us: 1-866-523-5218 IMPORTANT: Operator’s Read and follow all safety rules and operating Manual instructions before using this product.
- Page 2 060-3808-8 | contact us: 1-866-523-5218 SPECIFICATIONS KNOW YOUR EDGER SYMBOLS SAFETY INFORMATION EXPLODED VIEW PART LIST ASSEMBLY OPERATION MAINTENANCE TROUBLESHOOTING WARRANTY Input: 120 V, 60 Hz, 12 A Blade length: 7 1/2 in (19 cm) Weight: 13 lb (5.9 kg)
-
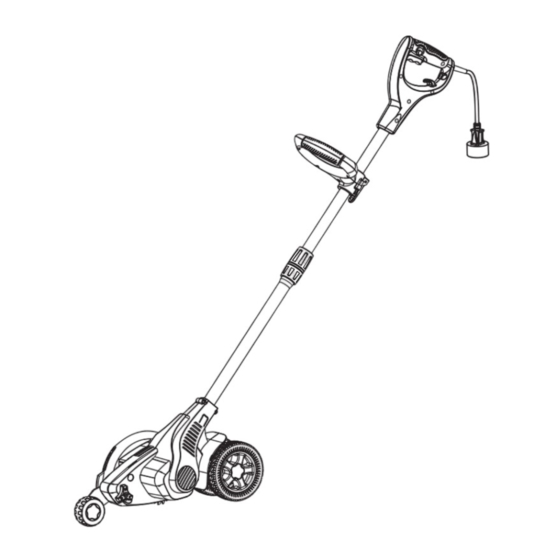
Page 3: Front Handle
060-3808-8 | contact us: 1-866-523-5218 1. Lock-off button 2. Adjustable auxiliary handle 3. Rear handle 4. Cord retainer 5. Trigger accelerator 6. Upper tube 7. Middle tube 8. Lower tube 9. Edge guard 10. Wheel 11. Blade 12. Spring assist front wheel 13. - Page 4 060-3808-8 | contact us: 1-866-523-5218 Some of the following symbols may be used on this product. Please study them and learn their meaning. Proper interpretation of these symbols will allow you to operate the product better and safer.
- Page 5 060-3808-8 | contact us: 1-866-523-5218 READ ALL INSTRUCTIONS • Read the Operator’s Manual carefully. Be thoroughly familiar with the controls and the proper use of the equipment. Know how to stop the unit and disengage the controls quickly in case of emergency.
- Page 6 060-3808-8 | contact us: 1-866-523-5218 • To reduce the risk of electric shock, this tool has a polarized plug (one blade is wider than the other) and will require the use of a polarized extension cord. The plug will fit into a polarized extension cord only one way.
-
Page 7: Specific Safety Rules
060-3808-8 | contact us: 1-866-523-5218 • Do not force the edger. It will do the job better and with less likelihood of a risk of injury at rate for which it was designed. • Maintain the edger with care. Keep the sharp cutting edge clean for best performance and to reduce the risk of injury. - Page 8 060-3808-8 | contact us: 1-866-523-5218 • Do not attempt to remove cut material nor hold material to be cut when the motor is running or when the cutting blade is moving. • Always keep your right hand on the rear handle and your left hand on the front handle when the blade is rotating.
-
Page 9: Extension Cords
060-3808-8 | contact us: 1-866-523-5218 EXTENSION CORDS When using a power tool at a considerable distance from a power source, be sure to use an extension cord that has the capacity to handle the current the product will draw. An undersized cord will cause a drop in line voltage, resulting in overheating and loss of power. - Page 10 060-3808-8 | contact us: 1-866-523-5218 Method of securing extension cord THE CORD AS SHOWN CONNECT PLUG AND RECEPTACLE WARNING: Keep the extension cord clear of the working area.Position the cord so that it will not get caught on lumber, tools, or other obstructions while you are working with a power tool.
- Page 11 060-3808-8 | contact us: 1-866-523-5218...
- Page 12 060-3808-8 | contact us: 1-866-523-5218 Item Description Drawing Bare tool assembly 31101270 Auxiliary handle assembly 31102270 Bolt 3220436 Left wheel assembly 31307270 Knob 34110263-2 Front wheel assembly 31103270 Spring 33401263-1 Right wheel assembly 31104270 8’’ Blade 3330126-1 Board...
- Page 13 060-3808-8 | contact us: 1-866-523-5218 CONNECTING THE POLE Before using the edger, a one-time assembly is required. When removed from the box, the three poles are connected by an electrical cord as shown below. Remove packaging material from cord and discard.
-
Page 14: Assembling The Front Wheel
060-3808-8 | contact us: 1-866-523-5218 ASSEMBLING THE FRONT WHEEL Screw off the adjusting knob from the hole (1). Put the front wheel down. Insert the adjusting knob into the hole (2) and tighten it. ADJUSTING KNOB NOTE: Do not plug the extension cord into the outlet until it has been connected to the cord retainer and plugged into the mower . -
Page 15: Connecting To Power Supply
060-3808-8 | contact us: 1-866-523-5218 APPLICATIONS Y ou may use this product for the purpose listed below: Edging around walkways, driveways, curbs, and flower beds; Trenching. CONNECTING TO POWER SUPPLY This product is designed with a cord retainer that prevents the extension cord from being pulled loose while using. -
Page 16: Starting And Stopping
060-3808-8 | contact us: 1-866-523-5218 STARTING AND STOPPING To start the motor: Plug the edger into an AC power outlet. Press and hold the lock-off button (1) and press the switch trigger (2). The motor of the edger will stay ON as long as the trigger switch (2) is held. - Page 17 060-3808-8 | contact us: 1-866-523-5218 ADJUSTING THE POLE HEIGHT Disconnect the edger from the power supply. Allow sufficient time for the blade to stop rotating. Rotate the knobs (1) counterclockwise to loosen them up. Remove the bolts (2).
- Page 18 060-3808-8 | contact us: 1-866-523-5218 ADJUSTING THE DEPTH OF THE CUT The front wheel can be adjusted to allow a deeper or shallower cut, and to increase the life of the blade. Change the edging depth from the shipping position to your desired depth by: Release the power switch.
-
Page 19: Operating Tips
060-3808-8 | contact us: 1-866-523-5218 OPERATING TIPS • Set the initial cut depth at 1” (2.5 cm) . • Before starting the edger, line up the tool so the edger guide lines up against the edge of the paved surface. Both rear wheels should be on the paved surface when edging. -
Page 20: General Maintenance
060-3808-8 | contact us: 1-866-523-5218 GENERAL MAINTENANCE Avoid using solvents when cleaning plastic parts. Most plastics are susceptible to damage from various types of commercial solvents and may be damaged by their use. Use clean cloths to remove dirt, dust, oil, grease, etc. -
Page 21: Replacing The Blade
060-3808-8 | contact us: 1-866-523-5218 REPLACING THE BLADE Replace the blade that is damaged or worn. To increase blade life span, keep initial cutting depth at minimum and increase depth setting only as blade wears. Stop the motor and allow sufficient time for the moving parts to stop and unplug the edger. -
Page 22: Power Cord
060-3808-8 | contact us: 1-866-523-5218 STORING THE EDGER Be sure the tool is unplugged. Remove and clean any debris from the outside of the edger and inside of the guard before storage. If necessary, the edger may be stored by hanging on a hook by the handle. - Page 23 060-3808-8 | contact us: 1-866-523-5218 PROBLEM POSSIBLE CAUSE SOLUTION 1. Then power cord is not 1. Plug in the power cord. Motor fails to start plugged in or the connection when switch trigger is loose. is depressed. 2. The household circuit 2.
-
Page 24: Year Limited Warranty
Normal deterioration of the exterior finish from the sale of its products. due to use or exposure. Made in China Imported by Yardworks Canada Toronto, Canada M4S 2B8 Yardworks CANADA will not be liable for incidental or consequential loss or damage.
Need help?
Do you have a question about the 060-3808-8 and is the answer not in the manual?
Questions and answers