
Subscribe to Our Youtube Channel
Related Manuals for Yardworks 060-1780-2


Summary of Contents for Yardworks 060-1780-2
- Page 1 40.0 V Lithium-Ion Mower 060-1780-2 Owner's Manual TOLL FREE HELPLINE: 1 866 523-5218 IMPORTANT: Read all safety rules and instructions carefully before using this product.
-
Page 2: Table Of Contents
Cutting Path 16” (40.6 cm) Height Adjustments 1 5/16 – 3 1/4” (3.3 – 8.3 cm) 2-in-1: mulch or rear bagging Functions Mower Weight 50 lbs (22.7 kg) Battery Weight 10 lbs (4.5 kg) Use Yardworks 40.0V Lithium-Ion replacement battery: 060-7552-0... -
Page 3: Safe Operation
SAFE OPERATION GENERAL SAFETY RULES READ ALL INSTRUCTIONS CAREFULLY WARNING: This symbol indicates important safety instructions. If these instructions are not followed, it could endanger the personal safety and/or property of the operator and others. Read and understand all instructions in this manual before attempting to operate the mower. - Page 4 SAFE OPERATION 7. Always wear a face mask or a dust mask when operating the mower in a dusty environment. 8. Dress properly. Do not wear loose clothing or jewellery that can get caught in moving parts. The wearing of protective gloves and safety footwear is recommended. 9.
- Page 5 BATTERY & CHARGER CAUTION: USE ONLY YARDWORKS APPROVED REPLACEMENT BATTERIES, OTHER BATTERIES MAY CAUSE INJURY OR DAMAGE TO THE MOWER. Use with YARDWORKS 40V 10Ah battery 060-7552-0. The battery that is supplied with this mower is a maintenance-free, sealed, 40 V storage battery.
- Page 6 SAFE OPERATION CHARGER SAFETY RULES Charge the mower battery in a dry area that is protected from the weather. Do not expose the mower or the charger to rain. Do not charge the battery in a wet location. Operate the battery charger in temperatures between 23 °...
- Page 7 SAFE OPERATION BATTERY & CHARGER Battery meter (Fig. 1) Since the mower battery is shipped in a low charge condition, the battery must be charged before use. The battery has four LED lights to indicate battery capacity. These lights will illuminate when the button is pressed.
-
Page 8: Battery Pack
SAFE OPERATION BATTERY & CHARGER Charging the battery pack (Fig. 2) 1. Remove the battery pack from the battery box. 2. Plug the charger connector into the receptacle on the mower battery. 3. Insert the 120 Volt plug of the charger into the wall receptacle. 4. - Page 9 SAFE OPERATION BATTERY & CHARGER Safety notes and precautions 1. Do not disassemble the battery. 2. Keep away from children. 3. Do not expose the battery to water or salt water. You should place the battery in a cool and dry environment.
-
Page 10: Assembling Your Lawn Mower
• Do not discard the packing material until all parts have been examined. • If any parts are damaged or missing, call 1-866-523-5218 for assistance. Fig. 3 40 V Lithium Lawn Mower 060-1780-2 Owner's Manual TOLL FREE HELPLINE: 1 866 523-5218 IMPORTANT:... - Page 11 ASSEMBLING YOUR LAWN MOWER ASSEMBLING THE HANDLE (Fig. 4) 1. Remove any packing material that may have been inserted between the upper and lower handles for shipping purposes. 2. Align the holes (1) on the lower handle (2) and the handle mounting bracket (3). Secure the lower handle (2) to the handle mounting bracket with a cam lock (4) and a spacer (5) in each side.
-
Page 12: Mower
ASSEMBLING YOUR LAWN MOWER ASSEMBLING THE BATTERY (Fig. 5) BATTERY INSTALLATION 1. Open the battery cover (2) by pulling up. 2. Rotate the latch (1) to the unlocked position. 3. Install battery (3) into compartment by pushing down to engage motor connector. 4. - Page 13 ASSEMBLING YOUR LAWN MOWER INSTALLING THE GRASS CATCHER BAG (Fig. 6) 1. Lift the chute cover (1). 2. Lift the grass catcher by its handle (2) and place under the chute cover so that the hooks (3) on the grass catcher frame are seated into the slots in the handle bracket. 3.
- Page 14 ASSEMBLING YOUR LAWN MOWER INSTALLING THE MULCHING PLUG (Fig. 7) 1. To remove the mulching plug, lift the chute cover (1). 2. Grasp the handle (2) of the mulching plug and pull the mulching plug out using the handle. 3 .The mulching plug (3) is inserted on an angle, so it requires some force to remove it. 4.
-
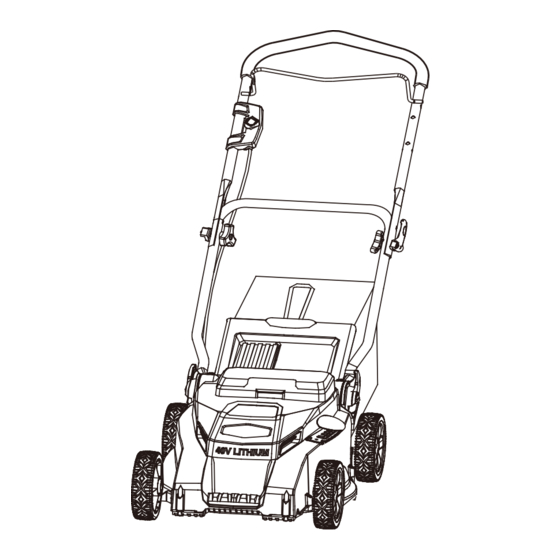
Page 15: Description Of Parts
DESCRIPTION OF PARTS DIAGRAM OF THE MOWER Read this owner's manual and safety rules carefully before operating the mower. Compare the illustration below to the mower in order to become familiar yourself with the location of the various controls and adjustments. Save this manual for future reference. 1. -
Page 16: Operating The Lawn Mower
OPERATING THE LAWN MOWER STARTING AND STOPPING (Fig. 8-9) To start the motor: 1. Open the battery cover (1) and insert the fuse key (2) into the slot (3). (See Fig. 8) 2. Press and hold the start button (4). This makes the bail switch operational. (See Fig. 9) 3. - Page 17 OPERATING THE LAWN MOWER CUTTING HEIGHT ADJUSTMENT (Fig. 10) When shipped, the wheels on the mower are set to a low-cutting position. Before using the mower for the first time, raise the cutting position to the height best suited for your lawn. The average lawn should be between 1-1/2 in.
-
Page 18: Slope Gauge
SLOPE GAUGE & OPERATION SLOPE GAUGE WARNING: Slopes are a major factor related to accidents involving slips and falls, which can result in severe injury. Operating the mower on a slope requires extra caution. If you feel uneasy on a slope, do not mow it. For your safety, use the slope gauge that is included as part of this manual to measure slopes before operating this unit on a sloped or hilly area. -
Page 19: Mowing Tips
SLOPE GAUGE & OPERATION MOWING TIPS NOTE: A sharp blade will greatly enhance the performance of the mower, especially when cutting high grass. Be sure to check the blade and to sharpen it at least once per year, as described in the Maintenance section. -
Page 20: Maintenance
ALWAYS remove the fuse key when servicing or transporting the mower. Use only a YARDWORKS replacement blade (xx-xxxx-x). 1. REMOVE BATTERY. 2. While wearing leather padded gloves, wedge a block of wood between the blade and the mower deck in order to prevent the blade from turning when the nut is being removed. -
Page 21: Cleaning The Mower
MAINTENANCE CLEANING THE MOWER WARNING: In order to reduce the risk of electric shock, do not expose the mower to water. The underside of the mower deck should be cleaned after each use, because grass clippings, leaves, dirt, and other debris will accumulate, which will cause rust and corrosion. Remove any build-up of grass and leaves on or around the motor cover (do not use water). -
Page 22: Service
SERVICE 1. When servicing the mower, use only replacement parts that are available from the manufacturer. In order to obtain replacement parts, call the toll-free helpline, at 1-866-523-5218. The use of parts that do not meet the original equipment specifications may lead to improper performance, and may compromise safety. -
Page 23: Environmentally Safe Battery Disposal
ENVIRONMENTALLY SAFE BATTERY DISPOSAL The batteries used in this chain saw's battery pack contain the following toxic and corrosive material: LITHIUM-ION. WARNING: Toxic materials must be disposed of in a specified manner in order to prevent contamination of the environment. Before disposing of damaged or worn out Lithium-Ion battery packs, contact your local waste disposal agency for information and specific instructions. -
Page 24: Troubleshooting
TROUBLESHOOTING Problem Possible Cause(s) Corrective Action 1. The battery is not charged. 1. Charge the battery 2. Replace the switch (call the toll- 2. The switch is defective. free helpline, at 1 866 523-5218 The mower does not start. 3. The battery is not attached to the 3. -
Page 25: Warranty
WARRANTY For TWO YEARS from the date of purchase within Canada, YARDWORKS ® CANADA will, at its option, repair or replace for the original purchaser, free or charge, any part or parts that are found to be defective in material or workmanship. -
Page 26: Exploded View/Parts List
EXPLODED VIEW/PARTS LIST... - Page 27 EXPLODED VIEW/PARTS LIST Part No. Model No. Description Upper handle assy. 31103468 33304250-1 Bail switch 31107250-3 Motor engagement box Lower handle 33309470-1 31102467 Cam lock assy. 3410835-4 Handle knob 3411135 Cord guide 34105468 Battery cover 34106468 Lock block (L) 34107468 Lock block (R) 36602906 40V 10Ah Lithium battery pack...
- Page 28 EXPLODED VIEW/PARTS LIST Part No. Model No. Description 33303470 Front lift rod 33902470 Retention spring 33201470 Height adjustment axle 33305470 Height adjustment bracket Height adjustment spring 33901470 33301468 Height adjustment lever 33306470 Height adjustment clip 33304470 Rear lift rod 34104468 Height adjustment knob (Lower) 34103468 Height adjustment knob (Upper)
Need help?
Do you have a question about the 060-1780-2 and is the answer not in the manual?
Questions and answers