
Related Manuals for AUDAC PRE16


Summary of Contents for AUDAC PRE16
-
Page 1: User Manual
PRE16/26 AUDAC PROFESSIONAL AUDIO EQUIPMENT PRE16/26 6 Channel Pre-Amplifier – Single/Double Output Zone User Manual & Installation Guide... - Page 2 A U D A C P R O F E S S I O N A L A U D I O E Q U I P M E N T User Manual & Installation Guide AUDAC http://www.audac.eu info@audac.eu...
-
Page 3: Table Of Contents
Index INTRODUCTION ............................................. 3 ENVIRONMENT ............................................4 SAFETY REQUIREMENTS ........................................5 CAUTION – SERVICING ........................................5 OVERVIEW FRONT AND REAR PANEL ..................................6 FRONT ..............................................6 REAR ..............................................6 OVERVIEW INPUT CONTROLS ......................................7 INPUT (FRONT)............................................. 7 OVERVIEW OUTPUT CONTROLS ..................................... 7 OUTPUT ( FRONT ) .......................................... -
Page 4: Introduction
The Audac PRE16/26 stereo preamplifiers are designed to be used in combination with the Audac D, T, Q and CPA Series Amplifiers, but can also be used for various other applications. It has 2 balanced XLR microphone inputs which are both equipped with a gain control, a 3-band tone control, phantom power and a talk over function. -
Page 5: Environment
Chapter Environment Do not place this unit in an enclosed environment such as a bookshelf or closet. Ensure that there is adequate ventilation to cool the unit. Do not place the unit in environments which contain high levels of dust, heat, moisture or vibration. -
Page 6: Safety Requirements
Safety Requirements Always handle the unit with care. Only use a grounded socket outlet and a power cord with grounding plug to plug in the unit. This unit is not a toy. It should not be operated by children. Do not stick objects through the openings. Do not open the unit (risk for electrical shock). -
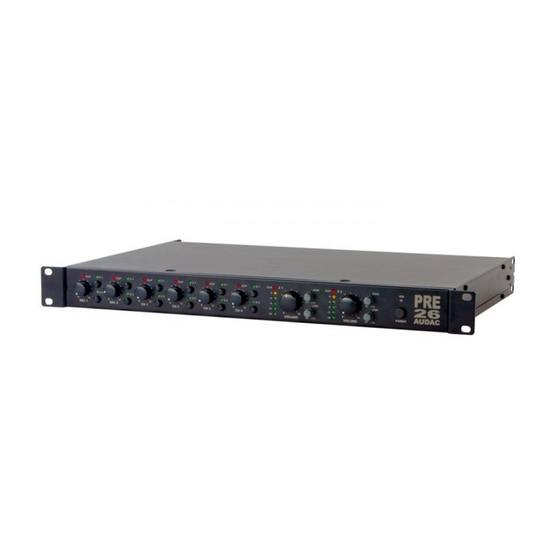
Page 7: Overview Front And Rear Panel
Chapter Overview front and rear panel FRONT PANEL REAR PANEL... -
Page 8: Overview Input Controls
Details front and rear panel Overview Input Controls INPUT (FRONT) 1. Input Volume Control 2. Clip LED indicator 3. Signal routing buttons (ONLY PRE26) 4. Routing indication LED’s (ONLY PRE26) Overview Output Controls OUTPUT ( FRONT ) 5. 6 segment LED bar 7. -
Page 9: Front Panel Description
With this knob, the overall volume of the corresponding output channel can be adjusted. 8. Power button and power indicator LED: The power switch has to be used for turning the device on/off. A blue power indicator LED lights up when the PRE16/26 is turned on. -
Page 10: Overview Input Connections
Overview Input Connections INPUT (BACK) 9. Unbalanced 10. Balanced 11. 3 Band Tone 12. Balanced Stereo Line Inputs Stereo Line Input Control Microphone input 13. Microphone 14. Microphone Talk over Phantom Power Switch switch Overview Output Connections OUTPUT (BACK) 15. Balanced Stereo Line output 16. -
Page 11: Output (Rear)
These unbalanced line level inputs can be connected to equipment with unbalanced line level outputs. A gain control potentiometer is provided to control the level of the input signal. There are three stereo unbalanced line inputs available on the PRE16/26. 10. Balanced stereo line input: The balanced stereo line input allows connecting a music source with balanced line outputs. -
Page 12: Connections And Connectors
Chapter Connections and Connectors The in- and output connections of AUDAC audio equipment are performed corresponding to international wiring standards for professional audio equipment. Cinch (RCA): tip = signal (left or right) ring = ground XLR: 1 = ground / shield... -
Page 13: Getting Started
The volume of the input signals can be controlled by turning the volume knobs of the input signals on the front panel of the PRE16/26. The master volume knob and the 2 band tone control knobs allow you to adjust the volume, bass and treble of the output signal. A VU-bar indicates the... -
Page 14: Block Diagram
Block Diagram... -
Page 15: Additional Information
Ch 1: 2 x 600 Ohm balanced XLR Ch 2-4: 47kOhm unbalanced RCA/Cinch Output level 1,2 V Output impedance 2 x 600 Ohm balanced XLR (PRE16) 4 x 600 Ohm balanced XLR (PRE26) 15V DC ± 3V Phantom power Power supply... -
Page 16: Personal Notes
Personal notes... - Page 17 PROFESSIONAL AUDIO EQUIPMENT PRE16/26 6-Kanal Vorverstärker - einzige/doppelte Ausgangszone Bedienungs- und Installationsanleitung...
- Page 18 AUDAC PROFESSIONAL AUDIO EQUIPMENT Bedienungs- und Installationsanleitung AUDAC http://www.audac.eu info@audac.eu...
- Page 19 Inhalt EINLEITUNG ............................................4 UMGEBUNG .............................................5 SICHERHEITSHINWEISE ........................................6 WARNUNG – WARTUNG ........................................6 ÜBERBLICK FRONTBLENDE UND GERÄTERÜCKSEITE ..........................7 FRONTBLENDE ..........................................7 GERÄTERÜCKSEITE ........................................7 ÜBERSICHT EINGANGSKONTROLLE ..................................8 EINGANG (FRONTBLENDE) ......................................8 ÜBERSICHT AUSGANGSKONTROLLE ..................................8 AUSGANG (FRONTBLENDE) ......................................8 BESCHREIBUNG FRONTBLENDE ....................................9 ÜBERSICHT EINGANGSVERBINDUNGEN ................................10 EINGANG (GERÄTERÜCKSEITE)..................................... 10 ÜBERSICHT AUSGANGSVERBINDUNGEN ................................
-
Page 20: Einleitung
Dieser Abschnitt gibt einen kurzen Überblick über die Ausstattungsmerkmale des PRE16/26 Vorverstärkers. Der PRE16/26 Vorverstärker wurde entwickelt wie eine benutzerfreundliche, flexible Lösung für multifunktionale Verwendung. Während der Entwicklung des PRE16/26 wollten die AUDAC Ingenieure zum 4 Ziele kommen: Eine flexible Audio Lösung lancieren um mehrfache Funktionen zu kontrollieren. Benutzerfreundlichkeit. -
Page 21: Umgebung
Umgebung Stellen Sie den Apparat nicht in einer abgeschlossenen Umgebung wie ein Büchergestell oder einen Schrank. Sorgen Sie für ausreichende Ventilation um den Apparat ab zu kühlen. Stellen Sie diesen Apparat nicht in einer Umgebung wo es viel Staub, Hitze, Feuchtigkeit oder Vibration gibt. Benutzen Sie den Apparat nicht dicht zu Wasser oder andere Flüssigkeiten. -
Page 22: Sicherheitshinweise
Sicherheitshinweise Hantieren Sie diesen Apparat immer mit Sorge. Gebrauchen Sie nur eine Steckdose mit Erdung und ein Stromkabel mit einem Stecker mit Erdung um den Apparat ein zu schalten. Dieser Apparat ist kein Spielzeug. Kinder dürfen es nicht bedienen. Stechen Sie keine Gegenstände in den Öffnungen. Machen Sie den Apparat nicht auf (Risiko auf Stromschlag). -
Page 23: Überblick Frontblende Und Geräterückseite
Überblick Frontblende und Geräterückseite Frontblende Geräterückseite... -
Page 24: Übersicht Eingangskontrolle
Details Frontblende und Geräterückseite Übersicht Eingangskontrolle Eingang (Frontblende) Übersicht Ausgangskontrolle Ausgang (Frontblende) -
Page 25: Beschreibung Frontblende
7. Haupt Lautstärke Kontrolle: Mit diesem Knopf kann man die allgemeine Lautstärke des ähnlichen Ausgangskanals anpassen. 8. Stromknopf und LED Stromindikator: Der Stromschalter muss man anwenden um das Gerät ein/aus zu schalten. Wenn der PRE16/26 eingeschaltet ist wird einen Blauen LED Indikator erleuchten. -
Page 26: Übersicht Eingangsverbindungen
Übersicht Eingangsverbindungen Eingang (Geräterückseite) 9.Unbalancierte Stereo 10.Balancierte Stereo 11.3-Band 12.Balancierter Linie Eingänge Linie Eingang Tonregelung Mikrofon Eingang 13.Mikrofon Phantom 14.Mikrofon Stromschalter Crossover Schalter Übersicht Ausgangsverbindungen Ausgang (Geräterückseite) 15.Balancierte Stereo Linie Eingang 16.AC Speisungseingang mit Sicherung... -
Page 27: Beschreibung Geräterückseite
Linie Niveau Ausgänge. Einen Verstärkungskontrolle Potentiometer ist ausgestattet um das Niveau des Eingangssignals zu kontrollieren. Es gibt 3 Stereo unbalancierte Linie Eingänge auf den PRE16/26. 10. Balancierte Stereo Linie Eingang: Der balancierte Stereo Linie Eingang erlauben Sie eine Musikquelle mit balancierte Linie Ausgänge zu verbinden. -
Page 28: Verbindungen Und Anschlüsse
Verbindungen und Anschlüsse Die Ein-und Ausgänge der Verbindungen der Audac Audio Equipment funktionieren ähnlich den internationalen Verdrahtung Richtlinien für professional Audio Equipment. Cinch (RCA): Tip = Signal (links oder rechts) Ring = Erdung XLR: 1 = Erdung, Schutz 2 = + sig... -
Page 29: Sich An Die Arbeit Machen
Sich an die Arbeit machen Der PRE16/26 kann man einschalten wenn man drückt auf den Stromknopf auf die Frontblende. Der blaue ‚EIN‘ LED wird erleuchten wenn Sie das Gerät einschalten. Jeder Kanal hat einen Clip LED Kontrollelämpchen auf die Frontblende, so können Sie die Eingangsniveaus kontrollieren. -
Page 30: Blockdiagramm
Blockdiagramm... -
Page 31: Technische Spezifikationen
Ch 1: 2 x 600 Ohm balanciert XLR Ch 2-4: 47kOhm unbalanciert RCA/Cinch Ausgangsniveau 1,2 V Ausgang Impedanz 2 x 600 Ohm balanciert XLR (PRE16) 4 x 600 Ohm unbalanciert XLR (PRE26) Phantomspeisung 15V DC ± 3V Speisung 110~240V AC / 50~60 Hz... -
Page 32: Notizen
Notizen...
Need help?
Do you have a question about the PRE16 and is the answer not in the manual?
Questions and answers