
Related Manuals for SHOWTEC EVENTLITE 6/3


Summary of Contents for SHOWTEC EVENTLITE 6/3
- Page 1 MANUAL ENGLISH EventLITE 6/3 WDMX Ordercode: 44000 Highlite International B.V. – Vestastraat 2 – 6468 EX – Kerkrade – the Netherlands...
-
Page 2: Table Of Contents
Control Modes ................................13 Multiple EventLITE 6/3 WDMX (DMX512 Mode) ....................13 Multiple EventLITE 6/3 WDMX (Slave Mode) .......................14 One EventLITE 6/3 WDMX (Color Mode + Program Mode + AutoRun Mode) ..........15 One EventLITE 6/3 WDMX (Sound Mode) ......................15 Control Panel ................................16 DMX Control Mode ..............................16... -
Page 3: Warning
Save the carton and all packing materials. In the event that the fixture must be returned to the factory, it is important that the fixture be returned in the original factory box and packing. Your shipment includes: ● Showtec EventLITE 6/3 WDMX ● Schuko to IEC power cable 1,5m ● User manual LED Expected Lifespan LEDs gradually decline in brightness over time. - Page 4 For replacement, use fuses of same type and rating only. The user is responsible for correct positioning and operating of the Showtec EventLITE 6/3 WDMX. The manufacturer will not accept liability for damages caused by the misuse or incorrect installation of this device.
-
Page 5: Operating Determinations
The Showtec EventLITE 6/3 WDMX can be placed to any kind of truss by a clamp. Improper installation can cause serious injuries and/or damage of property! -
Page 6: Connection With The Mains
EventLITE 6/3 WDMX Connection with the mains Connect the device to the mains with the power plug. Always check if the right color cable is connected to the right place. International EU Cable UK Cable US Cable BROWN YELLOW/COPPER PHASE... -
Page 7: Description Of The Device
EventLITE 6/3 WDMX Description of the device Features The EventLITE 6/3 WDMX is a compact and lightweight LED effect from Showtec Input Voltage (battery charger): AC 100V-240V, 60Hz/50Hz (only power in, no power out) Battery: 11.1V, 12AH Power consumption at full output: LED: 3 in 1 RGB LED’s (6*Tri-3W) combined with dedicated high class... -
Page 8: Overview
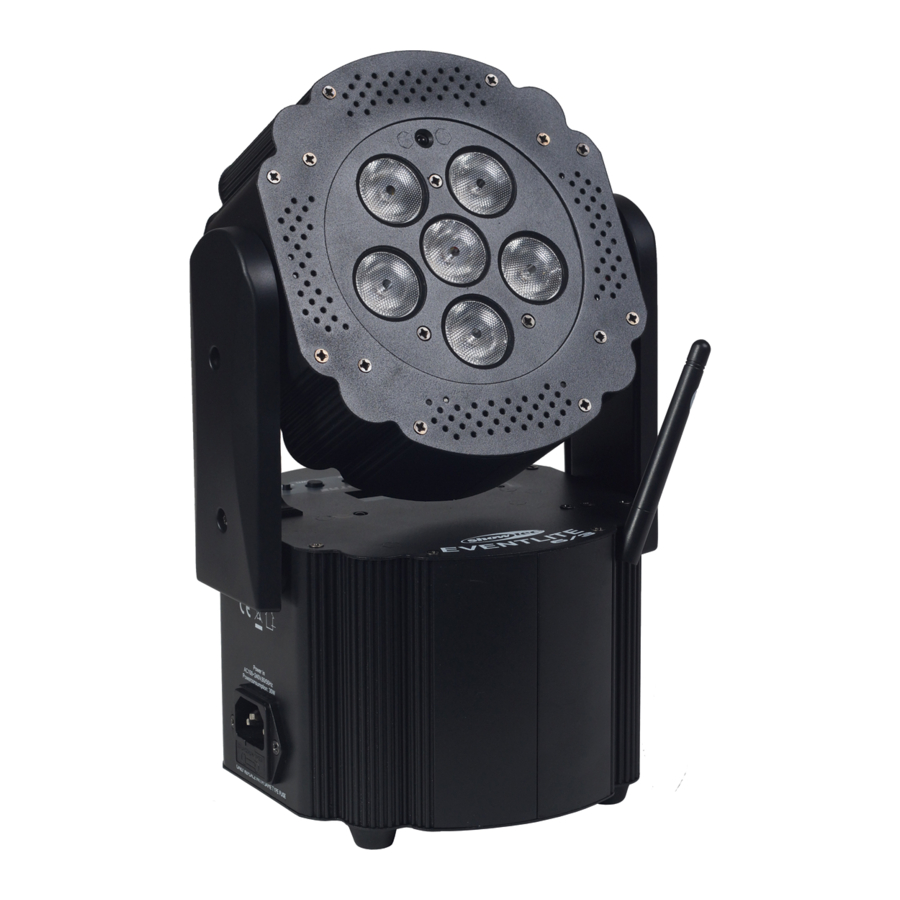
EventLITE 6/3 WDMX Overview Fig. 01 01) IEC Power Connector + Fuse F1A / 250V 02) 6x 3-in-1 RGB LEDs 3W 03) Wireless DMX Antenna 04) DMX signal connector (IN) 3-pin 05) DMX signal connector (OUT) 3-pin Fig. 02 06) Battery Level LEDs... -
Page 9: Installation
Do not attempt to operate a 120V specification product on 230V power, or vice versa. Important From software version V3.0 and newer, ”Lock” will appear on the display when the EventLITE 6/3 WDMX is switched on. The EventLITE 6/3 WDMX can be unlocked by pressing and holding the MODE and DOWN button simultaneously for 3 seconds. - Page 10 In Program Mode, AutoRun Mode, Color Mode and Sound Mode, the EventLITE 6/3 WDMX cannot send a signal to another EventLITE 6/3 WDMX wirelessly !! In one of these modes, the slave The EventLITE 6/3 WDMX fixtures must always be connected via a DMX signal cable.
- Page 11 Example (Fig. 04): The Showtec Operator Air (50726) sends out a wireless signal with 512 channels and the EventLITE 6/3 WDMX picks up this signal. It uses the first 5 channels for its own setup and sends the rest of the channels through a DMX cable to the other Compact Pars 7 (42580).
-
Page 12: Connect The Eventlite 6/3 Wdmx To The Wireless Dmx Signal Transmitter
Please recharge the battery in time. Example: When the battery is low on power or out of power. If you do not use the EventLITE 6/3 WDMX for a long time, please recharge the battery at least once a month, in order to prevent the lithium battery from damaging. -
Page 13: Fixture Linking
DMX signal. Maximum recommended DMX data link distance: 100 meters Maximum recommended number of EventLITE 6/3 WDMX on a DMX data link: 30 fixtures Data Cabling To link fixtures together you must obtain data cables. You can purchase DAP Audio certified DMX cables directly from a dealer/distributor or construct your own cable. -
Page 14: Control Modes
03) Plug the end of the electric mains power cord into a proper electric power supply socket. 04) Use a 3-p XLR cable to connect the EventLITE 6/3 WDMX and other devices. 05) Link the units as shown in (Fig. 07), Connect a DMX signal cable from the first unit's DMX "out" socket to the second unit's "in"... -
Page 15: Multiple Eventlite 6/3 Wdmx (Slave Mode)
02) Always use a safety cable (ordercode 70140 / 70141). 03) Plug the end of the electric mains power cord into a proper electric power supply socket. 04) Use a 3-p XLR cable to connect the EventLITE 6/3 WDMX. The pins: 1. -
Page 16: One Eventlite 6/3 Wdmx (Color Mode + Program Mode + Autorun Mode)
01) Fasten the effect light onto firm trussing. Leave at least 0,5 meter on all sides for air circulation. 02) Always use a safety cable (ordercode 70140 / 70141). 03) When the EventLITE 6/3 WDMX is not connected with a DMX-cable and Wireless DMX is switched off, it functions as a stand-alone device. -
Page 17: Control Panel
EventLITE 6/3 WDMX will respond to the controller. Please note when you use the controller, the unit has up to 5 channels. When using multiple EventLITE 6/3 WDMX, make sure you set the DMX addresses right. Therefore, the DMX address of the first EventLITE 6/3 WDMX should be 1(001); the DMX address of the second EventLITE 6/3 WDMX should be 1+5=6(006);... -
Page 18: Menu Overview
EventLITE 6/3 WDMX Menu overview Ordercode: 44000... -
Page 19: Main Menu Options
DMX512 Mode When a DMX signal is present, the DMX LED will light up. With this menu you can set the DMX address and the personality of the EventLITE 6/3 WDMX 01) Press the MODE button, until the display shows: You can choose 512 different DMX addresses. -
Page 20: Slave Mode
Color Mode With this menu you can set the Static Colors (R,G,B) of the EventLITE 6/3 WDMX. Press the MODE button on the EventLITE 6/3 WDMX, until the display shows: Use SETUP to change the static colors (Red, Green, Blue). -
Page 21: Program Mode
AutoRun Mode 01) Press the MODE button on the device, until the display shows: 02) With this menu you can set the Auto Mode of the EventLITE 6/3 WDMX. 03) Press SETUP to enter the AUTO Menu. You can choose 3 different sub menus. -
Page 22: Dmx Channels
EventLITE 6/3 WDMX DMX Channels 2 Channels Channel 1 – Colors, Built-in Programs, Sound 10-19 20-29 Red+Green 30-39 Green 40-49 Green+Blue 50-59 Blue 60-69 Red+Blue 70-79 Red+Green+Blue 80-89 Program 1 90-99 Program 2 100-109 Program 3 110-119 Program 4 120-129... - Page 23 EventLITE 6/3 WDMX 3 Channels Channel 1 – Red 0-255 Gradual adjustment Red from 0 – 100% Channel 2 – Green 0-255 Gradual adjustment Green from 0 – 100% Channel 3 – Blue 0-255 Gradual adjustment Blue from 0 – 100% 5 Channels Channel 1 –...
-
Page 24: Maintenance
03) If all of the above appears to be in order, switch the unit on again. 04) If you are unable to determine the cause of the problem, do not open the EventLITE 6/3 WDMX, as this may damage the unit and the warranty will become void. - Page 25 EventLITE 6/3 WDMX See the table below for more problem solving. Problem: Probable cause(s): Remedy: Check whether the power is One or more switched on, the power cable is in fixtures do not No power to the fixture order, the cable is connected function.
-
Page 26: Product Specifications
EventLITE 6/3 WDMX Product Specifications Input Voltage (battery charger): AC 100V-240V, 60Hz/50Hz (only power in, no power out) Battery: 11.1V, 12AH Power consumption at full output: LED: 3 in 1 RGB LED’s (6*Tri-3W) combined with dedicated high class optics ensuring a bright and well defined beam... -
Page 27: Notes
EventLITE 6/3 WDMX Notes Ordercode: 44000... - Page 28 ©2015 Showtec...
Need help?
Do you have a question about the EVENTLITE 6/3 and is the answer not in the manual?
Questions and answers