
Related Manuals for Honda UMK435T


Summary of Contents for Honda UMK435T
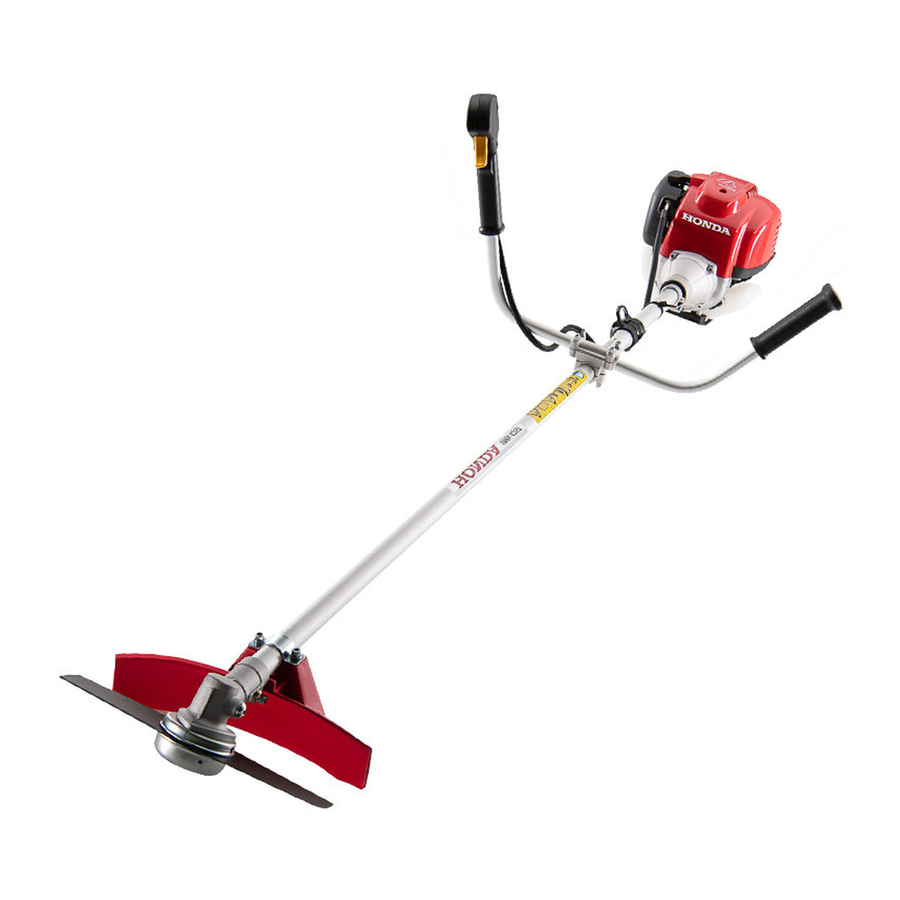
- Page 1 BRUSH CUTTER UMK435T OWNER´S MANUAL © Honda Motor Co., Ltd. 2005 3MVK9600 2008.09 00X3M-VK9-6010 PRINTED IN THAILAND...
-
Page 2: General Safety
1. GENERAL SAFETY SEGURIDAD GENERAL DO NOT USE INSIDE HOUSE KEEP AWAY FROM FLAMMABLE MATERIALS MORE than 1 m (3 ft) -
Page 3: Stop Engine
NO SMOKING STOP ENGINE DO NOT SPILL (Fuel tank capacity 0.63L) - Page 4 WEAR EYE PROTECTION AND PROTECTIVE DEVICES 1. GOGGLES 2. FACE SHIELD 3. HELMET 4. EAR MUFFS 5. CLOTHES (LONG SLEEVE) 6. ARM COVER 9. LEG PROTECTOR 7. GLOVES 10.SAFETY BOOTS (WITH TOE PROTECTOR) 8. CLOTHES (LONG PANTS)
- Page 5 USE SHOULDER HARNESS DO NOT OPERATE IF THERE ARE ANY BREAKAGES, CRACKS AND BENDS AND LOOSE BOLT DO NOT OPERATE WITHOUT DEFLECTOR...
- Page 6 REMOVE SCATTERED OBJECTS KEEP PEOPLE AND ANIMALS AWAY 15 m (50 ft) 15 m 50 ft KEEP FEET AND HAND AWAY UNTIL ROTATION STOPS DO NOT TOUCH MUFFLER, WHEN ENGINE IS HOT.
-
Page 7: Pre-Operation Check
2. PRE-OPERATION CHECK OIL LEVEL CAUTION: Be sure to check the engine on a level sur- face with the engine stopped. 1. Check the oil level on a level surface. -
Page 8: Fuel Level
2. Fill the oil to the edge of the oil filler neck. (Oil capacity 0.1L) 4-STROKE MOTOR OIL SAE 30, 10W-30 API SE or later (or equivalent) FUEL LEVEL 1. Check the fuel level from the outside of the fuel tank. 2. - Page 9 Upper level (Fuel tank capacity 0.63L) Never use an oil/gasoline mixture or dirty gasoline.
-
Page 10: Air Cleaner
Do not use gasoline that contains more than 10% ethanol. Never use gasoline containing more than 5% methanol. AIR CLEANER 1. Check for dirt in the air cleaner element. - Page 11 2. If the element is dirty, clean it. Wash Soak → Squeeze → → →...
- Page 12 A: THROTTLE CABLE B: ADJUSTING NUT FREE PLAY 0.5 – 2.5 mm C : FIXING NUT 0.5 – 2.5 mm 0.5 – 2.5 mm 0.5 – 2.5 mm 1. Check the throttle cable free play at the tip of the cable. Adjust the free play with adjusting nut and fixing nut, if necessary.
- Page 13 BLADE 1. Check the blade mounting bolts and nuts for looseness. Tighten the blade mounting bolts and nuts, if necessary. 2. Check the blade for crack, nicks, bend and wear. Replace it, if necessary.
- Page 14 DEFLECTOR 1. Check the deflector mounting bolts for looseness. Tighten the deflector mounting bolts if necessary. Deflector contacts with gear case. 2. Check the deflector for damage. Replace it, if necessary.
-
Page 15: Starting The Engine
3. Keep the deflector position & direction same as picture. RETIGHTENING BOLTS AND NUTS 1. Check for loose bolts and nuts. Tighten them, if necessary 3. STARTING THE ENGINE Check that the blade does not touch the ground etc. before the engine starts. - Page 16 1. Turn the engine swtch to the “ON” position. ON ···· 2. Turn the choke lever to the close position, if neces- sary. 3. Press the priming pump several times until fuel stays in the priming pump.
-
Page 17: Stopping The Engine
4. Pull the starter grip lightly until you feel resistance, then pull briskly. Return the starter grip gently. 5. Turn the choke lever to the open position. 4. STOPPING THE ENGINE 1. Release the throttle trigger. -
Page 18: Operation
2. Turn the engine switch to the “OFF” position. OFF ···· 5. OPERATION 1. Wear the shoulder harness. Adjust the belt of the harness for fitting. - Page 19 2. Attach the hanger of the brush cutter to the hook of the harness. 3. Pull the throttle trigger at the desired position.
-
Page 20: Maintenance Schedule
6. MAINTENANCE MAINTENANCE SCHEDULE Check Change Clean Check-Readjust Grease Replace if necessary. - Page 21 First (1) These items should be serviced by an authorized Honda dealer.
-
Page 22: Oil Change
OIL CHANGE 1. Remove the oil filler cap. 2. Drain the oil by tilting the engine. 3. Fill the oil to the edge of the oil filler neck. -
Page 23: Spark Plug
SPARK PLUG 1. Remove the plug. 2. Clean the deposit. 3. Measure the clearance. 0.6 - 0.7 mm (0.024 - 0.028 in) NGK: CMR5H... - Page 24 FUEL FILTER SERVICE and FUEL TANK CLEANING 1. Remove the fuel filler cap. 2. Drain the fuel by tilting the engine.
-
Page 25: Cooling Fin
3. Pull out the fuel filter and clean it gently. 4. Remove water and dirt stood in the fuel tank by rinsing its inside. COOLING FIN 1. Check the cooling fin for dirt through the fin cover. -
Page 26: Blade Replacement
FUEL TUBE 1. Check the fuel tube and the fuel return tube for deterioration. BLADE REPLACEMENT 1 NUT (Left-hand thread) TORQUE: 24 N·m... - Page 27 MOWING BLADE REPLACEMENT 2 6 mm NUTS and 6 x 12 mm SOCKET BOLTS TORQUE: 10 N·m When replacing the blade, change the nuts and washers * Use genuine parts.
- Page 28 7. STORAGE 1. Drain the fuel from the fuel tank. 2. Press the priming pump several times and drain the fuel from the fuel tank again. 3. Remove the oil filler cap and drain the oil.
- Page 29 4. Fill the oil to the edge of the oil filler neck. 5. Store the brush cutter in the clean area.
-
Page 30: Troubleshooting
8. TROUBLESHOOTING ENGINE NOT START 1. Check fuel from the outside of the fuel tank. 2. Check fuel in the priming pump by pressing the priming pump several times. START... - Page 31 Remove the plug. Clean, gap or replace the spark plug. Bersihkanlah sela-selanya dan gantilah busi tersebut. Bersihkan ruang atau gantikan palam pencucuh.
- Page 32 BRUSH CUTTER VIBRATES ABNORMALLY 1. Stop the engine immediately. OFF ···· 2. Check the blade(s) and blade mounting nut(s). (see page 13)
Need help?
Do you have a question about the UMK435T and is the answer not in the manual?
Questions and answers