Advertisement
ASSEMBLY AND INSTALLATION
356-9231 / 356-9232
WARNING:
NOTES: 1. Before installing, consult local electrical codes for wiring and grounding requirements.
2. Customer Service: 1-800-887-6326 (weekdays 9 a.m. – 5 p.m. CST)
3. READ AND SAVE THESE INSTRUCTIONS.
Hardware Package (included):
Mounting Screw X2
Mounting Screw X2
#6/32 X1/2 in
#8/32X1/2 in
Important to Know:
1. If you are not familiar with state and local electrical
codes, it is recommended that you consult with a
qualified electrician.
2. This fixture requires a 120 VAC, 60 Hz power
source.
3. For general safety and to avoid any possible
damage to the sensor, be sure the power is
switched "off" before adjustment.
Maximum Wattage: 2-150 W (bulb included)
Working Temperature Range: - 4
Note: Fixture can be wall mounted or eave mounted.
Wall Mounted
Read notes section on page 4 for additional information about mounting location of fixture.
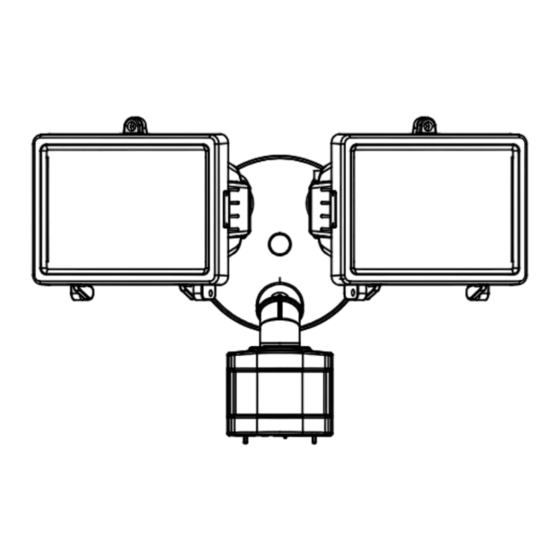
Light fixture and sensor should be mounted as shown above when installed (depending upon type of installation)
Before installing the light fixture under an eave, the sensor head must be rotated as shown in the next two steps for
proper operation and to avoid the risk of electrical shock.
For eave mounted only:
Rotate the sensor head towards the back plate.
INSTRUCTIONS
TO AVOID RISK OF ELECTRICAL SHOCK, BE SURE TO SHUT OFF
POWER BEFORE INSTALLING OR SERVICING THIS FIXTURE.
Mounting Screw X2
Mounting Strap
#10/24 X1/4 in
0 F ~ 113 0 F
Controls
Back Plate
Decorative cover
Features:
1. Motion sensor: turns light ON automatically when
motion is detected and turns light OFF automatically
when motion stops.
2. Photocell keeps the light OFF during daylight hours.
Rotate the sensor head clockwise 180˚ so the controls face down.
Page 1 / 6
Fixture Mounting Screw
Wire Nut X3
Eave Mounted
Controls
150619
Gasket
Controls
Advertisement
Table of Contents

Related Manuals for Patriot Lighting 356-9231


Summary of Contents for Patriot Lighting 356-9231
- Page 1 ASSEMBLY AND INSTALLATION INSTRUCTIONS 356-9231 / 356-9232 WARNING: TO AVOID RISK OF ELECTRICAL SHOCK, BE SURE TO SHUT OFF POWER BEFORE INSTALLING OR SERVICING THIS FIXTURE. NOTES: 1. Before installing, consult local electrical codes for wiring and grounding requirements. 2. Customer Service: 1-800-887-6326 (weekdays 9 a.m. – 5 p.m. CST) 3.
-
Page 2: Installation Steps
Decorative cover Light Head FRONT Outlet Box T3 Halogen Bulb Max.150W (included) Mounting Strap Sensor Wire Nut Back Plate Installation Steps Turn off the power at fuse or circuit box. 1. Install the mounting strap to the outlet box with the stamped word “FRONT” facing away from the outlet box, using two mounting screws that best fit the outlet box. -
Page 3: Adjusting The Light Head
Adjusting the Sensor Head: 1. Aim sensor head toward desired detection area, maintaining a 5° - 40° downward angle to allow moisture to drain. Note: Make sure sensor head is positioned with controls facing toward the ground. 2. You can move the sensor head up and down to change the coverage area. - Page 4 ● When slide the mode selector to “3H” or “6H” or “D2D”, the light turns to low-level brightness automatically. It turns to high-level brightness when motion is detected, and stays on as long as the motion continues. Then switches back to low-level brightness about 5 seconds after motion is no longer detected. 2.
-
Page 5: Troubleshooting
Notes: 1. The sensitivity of the motion sensor will increase as the environmental temperature gets cooler. For best performance, gently clean the lens with a soft cloth every 1 or 2 months to ensure maximum sensitivity. 2. For best performance, install fixture at least 8 feet above the ground. At such a height, the fixture will provide a detection distance of up to 70 feet at 77 degrees Fahrenheit. -
Page 6: Year Limited Warranty
This warranty excludes coverage of finish or color against tarnishing, flaking, and discoloration. If the original purchaser ceases to own the Patriot Lighting product this warranty and any implied warranty will be void. This warranty does not cover damage caused by misuse or abuse, including but not limited to improper installation, improper usage, accident, negligence, unauthorized repair, unauthorized modifications, or unauthorized maintenance of the fixture.
Need help?
Do you have a question about the 356-9231 and is the answer not in the manual?
Questions and answers