DuraLabel Kodiak User Manual
Hide thumbs
Also See for Kodiak:
- Quick start manual (12 pages) ,
- User manual (27 pages) ,
- Quick start manual (17 pages)
Table of Contents
Troubleshooting

Related Manuals for DuraLabel Kodiak


Summary of Contents for DuraLabel Kodiak
- Page 1 DuraLabel Kodiak User Guide v0.6 (Prerelease) Page 1 of 28 DuraLabel Kodiak User Guide Document Version 0.6 (Prerelease) [Image not final.] Graphic Products® and DuraLabel® are registered trademarks of Graphic Products, Inc. ...
-
Page 2: Table Of Contents
Graphic Products. Graphic Products assumes no responsibility or liability for any errors or inaccuracies that may appear in this manual. Contents Introduction ............................ 4 Warranties ............................ 4 5‐Year DuraLabel Printer Warranty ...................... 4 5‐Year DuraLabel Premium Vinyl Warranty .................... 5 Safety Instructions .......................... 5 Getting to Know Your Kodiak ....................... 6 In the Box .............................. 6 Your Kodiak ............................... 6 Kodiak Main Screen ........................... 8 Loading Supplies .......................... 10 Loading Label Stock .......................... 10 Loading Printing Ribbons ........................ 11 Creating Signs and Labels ........................ 13 Label Designer ............................ 13 Arc Flash .............................. 14 Chemical Labeling ........................... 16 NFPA/RTK .............................. 18 Pipe Marking ............................ 20 Additional Functions .......................... 20 Supply Status Utility .......................... 20 Printing Preferences .......................... 21 ... - Page 3 DuraLabel Kodiak User Guide v0.6 (Prerelease) Page 3 of 28 Troubleshooting ............................ 23 Specifications ............................. 24 Certifications ............................. 26 FCC Compliance ............................ 26 Standard Conformity .......................... 26 Printer Disposal/Recycle ......................... 27 Third‐Party Software .......................... 28 ...
-
Page 4: Introduction
DuraLabel Kodiak User Guide v0.6 (Prerelease) Page 4 of 28 Introduction With your DuraLabel Kodiak, you can create fully customized industrial signs and labels, on‐site and on‐ demand. Kodiak uses built‐in label design software and two‐color printing capabilities for powerful, effective, and efficient sign creation. Kodiak can even connect to a wireless network and dynamically populate your label designs with information from a database, using ODBC functionality. This guide will provide information and instructions on your Kodiak. You can also watch instructional videos right on your system, and you can get help from Graphic Products’ world‐class support team by calling 800.788.5572 or visiting Graphic Products.com. Warranties 5-Year DuraLabel Printer Warranty Graphic Products’ DuraLabel printers are warrantied to be free from defects in materials and workmanship for a period of five (5) years from the date of purchase. Within this period, Graphic Products, Inc. will, at its sole option, repair or replace any components which fail in normal use. Such repairs or replacement will be made at no charge to the purchaser for parts or labor, provided that the purchaser shall be responsible for any transportation cost. This warranty does not cover loss, damages from accident, or equipment or parts which have been misused, altered, neglected, carelessly handled, used for purpose other than those for which the printer was manufactured, or damages resulting from unauthorized service. Repairs Repairs are warrantied for 90 days. If the original warranty is still in effect, repaired units will remain under their original warranty or for 90 days from the date of service, whichever is longer. Warranty Details The warranties and remedies contained herein are exclusive and in lieu of all other warranties whether express, implied, or statutory, including any liability arising under any warranty of merchantability or fitness for a particular purpose, statutory or otherwise. This warranty gives the purchaser specific legal rights, which may vary from state to state. In no event shall Graphic Products be liable for any incidental, special, indirect, or consequential damages, whether resulting from the use, misuse, or inability to use the product for any reason including defect. Some states do not allow the exclusion of incidental or consequential damages, so the above limitation may not apply in all areas. Graphic Products retains the exclusive right within all warranty periods to repair, replace, or offer a full ... -
Page 5: 5-Year Duralabel Premium Vinyl Warranty
DuraLabel Kodiak User Guide v0.6 (Prerelease) Page 5 of 28 General maintenance and cleaning of the DuraLabel printer is the purchaser’s responsibility and is not covered by the warranty. Expendable items or parts such as label supply and ribbon are not covered by this warranty. NOTE: Specific preparation may be required before shipping. Please contact your Graphic Products representative to ensure correct return procedure: please call 800.788.5572 for details. Graphic Products, Inc. shall not be responsible for any loss or damages incurred during shipping. 5-Year DuraLabel Premium Vinyl Warranty DuraLabel supplies are tested for durability under various conditions, including UV exposure, moisture, heating and cooling cycles, abrasion, and chemical exposures. Graphic Products warranties labels made from its Premium vinyl supplies for a period of five (5) years. Within five years of purchase and after proper application, Graphic Products will replace labels made with DuraLabel Premium Vinyl which become unreadable or fail to maintain adhesion with the labeled surface. In such instance, Graphic Products, Inc. will provide a one‐time replacement roll of the same supply. Safety Instructions Please review the following safety instructions before using the printer. Kodiak is intended for indoor use only. Keep the printer away from humidity and prolonged exposure to direct sunlight. Disconnect the printer from its power source when not in use. Do not pour liquids onto the printer or printer parts. For ordinary cleaning, follow the instructions included in this guide. Only qualified service personnel should attempt to repair the printer. NOTE: Changes or modifications not expressly approved by the party responsible for compliance could void the user’s authority to operate the equipment. In addition, to prevent damage to Kodiak and to avoid nullifying the Kodiak warranty, please follow these rules: ... -
Page 6: Getting To Know Your Kodiak
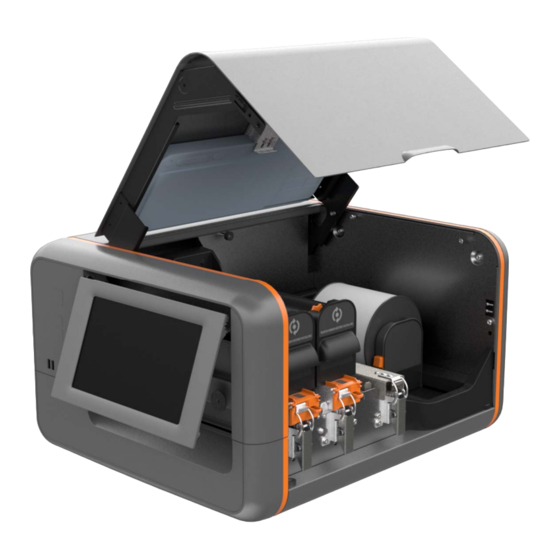
DuraLabel Kodiak User Guide v0.6 (Prerelease) Page 6 of 28 Getting to Know Your Kodiak Kodiak is a thermal transfer printer, meaning that it uses heat to transfer a solid resin or “ink” from a printing ribbon onto a label stock. With two separate print heads and two separate ribbons, Kodiak can print in two colors on the same label. Kodiak is larger and heavier than some printers, weighing about 42 pounds (about 20 kilograms). We recommend having two people work together to unpack or reposition the printer. In the Box In Kodiak’s box, you will find the following materials: Kodiak Printer Power Cord Wireless Keyboard (stowed inside the printer’s lid) Kodiak Quick Start Guide Wi‐Fi USB Adapter (already connected to Kodiak) You should also have the following, shipped separately: Ribbon Cartridges (2) Your Kodiak Front View [Image not final] Print Button ‐ Prints one copy of the current label design (if any) X (Cancel) Button ‐ Cancels the current print job (if any) ... - Page 7 DuraLabel Kodiak User Guide v0.6 (Prerelease) Page 7 of 28 Cutter Back View [Image not final] Power Socket Power Switch Ethernet Port USB‐B Port Behind Removable Panel: Additional USB‐A Ports (2) Inside [Images not final] Adjustable Supply Holders Supply Holder Adjustment Tab Feed Roller Bar and Latch Adjustable Supply Guides Supply Sensor Print Heads and Latches (2) Ribbon Cartridges (2) ...
-
Page 8: Kodiak Main Screen
DuraLabel Kodiak User Guide v0.6 (Prerelease) Page 8 of 28 Kodiak Main Screen [Image. Callouts: Home Button, Hamburger Menu, Desktop Area, Supply/Ribbon Information, Printing Preferences/Status, Wi‐Fi Signal, Date/Time, Main Menu] The Kodiak main screen shows the main functions of the system. The main menu on the right of the screen shows your main options: Label, Learn, Utilities, Tools, and Settings. Label This menu includes options for creating or printing labels and signs. The options here are: Templates: Browse existing templates for signs or labels on your Kodiak. Label Designer: Design new signs or labels from scratch, or modify existing designs. Arc Flash: Enter data for specialized electrical safety signage, and print labels that comply with the NFPA 70E and CSA Z462 standards. Chemical Labeling: Create GHS‐style chemical labels for safety and compliance, using an editable database of chemical details. Labels can follow HazCom 2012 (United States) or international GHS (UN) formats. NFPA/RTK: Create supplemental chemical labels with the NFPA 704 hazard ratings, using an editable database of chemical details. Pipe Marking: Quickly design pipe labels to match ANSI/ASME A13.1 or the IIAR Bulletin No. 114 standards. Learn This menu includes ways for you to learn about major topics or find the answers to your questions. The options here are: Best Practice Guides: Expert guides on a variety of topics, to help you understand concepts and practices in safety and industrial improvement. Label Examples: Examples of completed labels and signs in a variety of styles. Manuals: Documentation for your Kodiak and its associated software. Videos: Helpful how‐to videos, including how to load supplies into your Kodiak. ... - Page 9 DuraLabel Kodiak User Guide v0.6 (Prerelease) Page 9 of 28 PDF Viewer: Read documents in the standard PDF style. Text Editor: Read or write plain text documents. Video Player: View video files in .ogv format. Settings This menu is for your Kodiak’s system settings. The options here are: Supply Status Utility: See which supplies are currently loaded, and how much of each is remaining. You can also access this utility by tapping on the small supply icons in the main toolbar at the top of the screen. Date and Time: Adjust Kodiak’s internal clock or calendar. You can also access these settings by tapping on the time or date displayed in the main toolbar at the top of the screen. WiFi: View or change Kodiak’s Wi‐Fi settings to connect to a wireless network. You can also access these settings by tapping on the Wi‐Fi signal icon in the main toolbar at the top of the screen. ...
-
Page 10: Loading Supplies
DuraLabel Kodiak User Guide v0.6 (Prerelease) Page 10 of 28 Loading Supplies To load your Kodiak with supplies, raise the hinged lid. The lid will hold at the fully‐raised position. Loading Label Stock The label stock is the base material for your labels or signs, serving as the “paper” for the printing process. Label stock is available in a wide variety of materials, types, sizes, and colors. Each roll of Kodiak label stock is sold as a roll with geared plastic end caps. Do not remove these end caps, or the supply will not fit properly in your Kodiak. When loading label stock, make sure that it is not folded, and lies flat and smooth. This will prevent supply jams during printing. To load label stock, follow these steps: 1. Squeeze the orange tab on the front adjustable supply holder, and slide the holder to the position marked for your supply width. (The adjustable supply holders are paired to move together and keep your supply centered properly.) 2. Hold the roll of label stock so that the end cap with a Kodiak label faces you. Then, rest the gears on the supply’s end caps into the slots on the supply holders. 3. Unlatch the feed roller bar and allow it to raise. (This bar is spring‐loaded.) Pull the end of your label stock away from the roll, and under this bar. 4. Slide the adjustable supply guides so that the edges of your label stock fit under the white rollers. Then, feed the label stock under these rollers, and under the metal guide immediately to the left of those supply guides. 5. Lower the feed roller bar and latch it down. When you finish loading supplies, Kodiak will automatically detect which type of label stock has been loaded. [Images not final] ... -
Page 11: Loading Printing Ribbons
There are two print heads, marked with the numbers “1” and “2.” Each print head needs a ribbon cartridge loaded with ribbon and installed properly in order for Kodiak to print. Loading Ribbon Into a Ribbon Cartridge Start with an empty ribbon cartridge. If your cartridges are already loaded into your Kodiak, you can remove them by unlatching each print head and raising it by lifting its orange tab. When the print head is fully raised, it will lock into place, and you can simply slide the cartridge out by pulling its handle. To load a new ribbon into a ribbon cartridge, follow these steps: 1. Insert an empty ribbon take‐up roll into the slots at the top of the cartridge. Press firmly at each end to latch the take‐up roll into place. 2. Insert a fresh ribbon roll into the side of cartridge. Align the arrow on the ribbon end cap with the arrow on the side of the cartridge; the flat edge of the ribbon’s large end cap should rest on the bottom of its channel. Press firmly at each end to latch the ribbon into place. 3. Find the end of the roll of ribbon. Pull it out, and unwind it around the bottom of the cartridge, and up to the take‐up roll. Adhere the ribbon to the take‐up roll, using a piece of tape, if needed. 4. Take up any slack in the ribbon by turning the take‐up roll. Your cartridge is now ready to install into Kodiak. [Images not final] Installing a Ribbon Cartridge Into Kodiak If a print head is in its lowered position, you will need to raise it in order to install a ribbon cartridge there; unlatch the print head and raise it by lifting its orange tab. ... - Page 12 DuraLabel Kodiak User Guide v0.6 (Prerelease) Page 12 of 28 To install a loaded ribbon cartridge into your printer, follow these steps: 1. Holding a loaded ribbon cartridge by its handle, slide the cartridge onto the print head. The loose section of ribbon should fit just below the print head, and the cartridge should slide smoothly on its rails. 2. Gently push the cartridge all the way back, so the number on the print head is visible. You may hear the cartridge snap into position. 3. Lower the print head by its orange tab, and latch it down. [Images not final] When you finish loading supplies, Kodiak will automatically detect which type of ribbon has been loaded at each print head. ...
-
Page 13: Creating Signs And Labels
DuraLabel Kodiak User Guide v0.6 (Prerelease) Page 13 of 28 Creating Signs and Labels Kodiak includes several ways to create new labels or signs. Each of the labeling modules is available through the Label menu on the main screen. Label Designer The Label Designer module is meant for creating or editing completely custom designs, using text, images, or barcodes. These items can be placed and modified with the menus, and can be moved around your label by dragging them on the design area. [Image needed. Callouts: Toolbar, Design Area, Insert menu, Dimensions menu, Order menu, Details menu, Color menu, Data Source menu, Label Settings menu, Print Settings menu] Toolbar The toolbar across the top of the screen shows some common controls and options for the Label Designer. Hamburger Menu: Access common file options, such as creating a new design, saving and loading designs, and choosing program settings. Quick Save: Save the current label design with its current file name. If you haven’t saved the file yet, you will be prompted to choose a file name and location. Group/Ungroup: Set a group of selected objects to act as a single large object, or reverses this selection. Undo/Redo: Cancel a recent action, or repeat a canceled action. Copy/Paste/Delete: Duplicate or remove the selected object. Zoom Out/In/Fit: Adjust your view of the design to allow fine tuning. Close: Close the Label Designer. Insert Menu This menu allows you to add different types of content to your design. Click on the desired item type to add it to the center of your label. When an object has been added to the design, the new object will automatically be selected for editing. ... -
Page 14: Arc Flash
DuraLabel Kodiak User Guide v0.6 (Prerelease) Page 14 of 28 Dimensions Menu When an object is selected, use this menu to precisely control the object’s size, location, or rotation. You can also quickly control a selected object’s size by dragging the control boxes at its corners, or move the object by dragging it across the design area. Order Menu When an object is selected, use this menu to adjust the object’s arrangement relative to other objects or the label as a whole. You can center objects on the label, or align multiple selected objects to each other. You can also control whether an object covers up another, or is covered instead. Details Menu When an object is selected, use this menu to adjust the unique options available for that type of object. For example, for text objects, you can change the font and size, while for barcode objects, you can choose the barcode format. Color Menu When an object is selected, use this menu to choose the colors for that object. You can select a wide variety of colors, even if the appropriate supplies are not currently loaded, but only colors that match your loaded supplies can be printed accurately. Data Source Menu Connect your label design to a database. The design will automatically update for a batch of labels, with each label using information from a given row in your spreadsheet or database. In this menu, you can choose which column of data should be shown in the selected object. You can also choose which record (or row) is used for the current label. Label Settings Menu Choose basic label design options, such as the size of the label you are creating (or a dynamic size, which extends or shrinks to match your content) and the supplies you plan to use when printing your label. Print Settings Menu Adjust printing options, such as the common printing preferences, as well as choosing which labels to print from an automatically‐generated set of labels that use a Data Source. ... - Page 15 DuraLabel Kodiak User Guide v0.6 (Prerelease) Page 15 of 28 Hamburger Menu: Access common file options, such as creating a new record, saving records, and exporting label designs. Search Records: Search the arc flash database by equipment name, date, or project name. Record Number: Identify the current record, out of the current database or search results. Zoom Out/In/Fit: Adjust your view of the design to allow fine tuning. Close: Close the Arc Flash labeling module. Navigating Records The fastest way to find a specific record in the Arc Flash database is with the toolbar’s search function. 1. Choose whether to search by Name (of the equipment), Date (of the arc flash risk assessment), or Project. The default search is by equipment name; to change this selection, click the current search type (such as “Name”) in the toolbar, and make a new selection. 2. Type your search terms in the search box, and click the magnifying glass button or press Enter on your keyboard. 3. The first match (in alphabetical order, by equipment name) will be shown in the design area. Use the right or left arrows in the toolbar to browse through the search results. The number in the white box on the toolbar shows which search result you are currently seeing; the number below the box shows the total number of search results. If you do not enter any search terms, you can browse through the entire current database. Creating and Editing Records To create a new entry in your current Arc Flash database, click the New Record button in the menu on the right. This creates a new, blank record. Then, click the Edit button to slide out the editing menu. This is where you will enter the details for the current label: 1. Label Options: Choose the language for the label’s text, select the Danger/Warning/Caution header, and choose a project (or type a new project name) to keep related labels together. 2. Label Information: Enter the basic information for this label (equipment name, nominal voltage, ...
-
Page 16: Chemical Labeling
DuraLabel Kodiak User Guide v0.6 (Prerelease) Page 16 of 28 Templates, Sizes, and Settings To print Arc Flash labels in different sizes, or to use custom templates, open the Label Settings menu and select the appropriate template with the drop‐down Label Templates menu. The default templates are named so that the size of the label is shown first (with dimensions in inches). In the same menu, you can also choose a font for the text of your label, and you can toggle optional label elements (such as grid lines or a border). You can also choose whether to print the colored stripe at the top of the label and/or the text and alert symbol; disable these options if you are using pre‐printed label stock with those elements already in place. This menu also lets you select which arc flash database you are using, if more than one database is available. Printing a Label When you are ready to print, click the Print Settings button. Here, choose which labels you want to print, and how many copies of each. You can also check a Print Preview here. Pressing the physical Print button on the front of your Kodiak will print one copy of the current label design, using the current print setting. Chemical Labeling The Chemical Labeling module uses a searchable, editable database of chemical information to make GHS‐style container labels. The module allows you to choose from standardized GHS (international), HazCom 2012 (US/OSHA), and custom templates. [Image needed. Callouts: Toolbar, Design Area, New Record button, Edit button, Save Database button, Save Label button, Delete Record button, Label Settings menu, Print Settings menu] Toolbar The toolbar across the top of the screen shows some common controls and options for the Chemical Labeling module. Hamburger Menu: Access common file options, such as creating a new record, saving records, and exporting label designs. Country/Authority Menu: Choose the format for your chemical labels: OSHA’s HazCom 2012 format, the UN’s international GHS format, or another style. You can also select a language here. ... - Page 17 DuraLabel Kodiak User Guide v0.6 (Prerelease) Page 17 of 28 1. Choose whether to search by Product Name or one of the material’s identifying numbers (UN number, CAS Number, or EC Number). The default search is by chemical name; to change this selection, click the current search type (such as “Name”) in the toolbar, and make a new selection. 2. Type your search terms in the search box, and click the magnifying glass button or press Enter on your keyboard. 3. The first match (in alphabetical order, by equipment name) will be shown in the design area. Use the right or left arrows in the toolbar to browse through the search results. The number in the white box on the toolbar shows which search result you are currently seeing; the number below the box shows the total number of search results. If you do not enter any search terms, you can browse through the entire current database. Creating and Editing Records To create a new entry in your current chemical database, click the New Record button in the menu on the right. This creates a new, blank record. The Edit menu will slide out to let you add the details for this new material. (To edit an existing chemical entry, simply find that entry in the database and click the Edit button in the menu.) 1. Edit Label: Set the basic details for this entry, such as the product name, identifying numbers, signal word, and any supplemental information. 2. Hazard Symbols: Click on a symbol to make it appear on this label. Current symbols will be highlighted in orange; click on the symbol again to remove it. 3. Click the Hazard Statements button to open a new window and select the hazard statements for your material. a. In this window, select an appropriate statement from the full list on the left (sorted by reference code). To find a specific statement, type in the search box in the lower left. When the desired statement has been selected, click Add Statement to add it to the current list, on the right. b. For hazard statements with additional details, select the statement and type the ...
-
Page 18: Nfpa/Rtk
DuraLabel Kodiak User Guide v0.6 (Prerelease) Page 18 of 28 d. When you’ve added the appropriate Precautionary Statements, click OK to continue. 5. Supplier: If you have already entered information for the supplier or other responsible party, you can select that organization from the drop‐down list. To add a new supplier or edit supplier information, click the pencil button; this will open a new window for supplier details. When the details have been entered, click the Save Database button to add your new entry to the Chemical Labeling module’s current database. The Save Label button will export your current label design to its own file, so you can adjust the design in the Label Designer module. If you want to remove the current record from the database, click the Delete Record button. Templates, Sizes, and Settings To print chemical labels in different sizes, open the Label Settings menu and select the appropriate template with the drop‐down Label Templates menu. The default templates are named so that the size of the label is shown first (with dimensions in inches). In the same menu, you can also choose a font for the text of your label. This menu also lets you select which chemical database you are using, if more than one database is available. Printing a Label When you are ready to print, click the Print Settings button. Here, choose which labels you want to print, and how many copies of each. You can also check a Print Preview here. Pressing the physical Print button on the front of your Kodiak will print one copy of the current label design, using the current print setting. NFPA/RTK The NFPA/RTK module uses a searchable, editable database of chemical information to make supplemental chemical labels based on the NFPA 704 hazard rating system. This system assigns a numeric rating for a material’s hazards in each of three categories (health, flammability, and instability). The NFPA 704 labeling system and its variations were originally intended to protect first responders in an emergency. These labels may not satisfy the regulatory requirements that apply in your case; check with your local authorities to ensure compliance. [Image needed. Callouts: Toolbar, Design Area, New Record button, Edit button, Save Database button, Save Label button, Delete Record button, Label Settings menu, Print Settings menu] ... - Page 19 DuraLabel Kodiak User Guide v0.6 (Prerelease) Page 19 of 28 Authority Menu: Choose the format for your chemical labels, using the familiar NFPA Diamond layout or an alternative RTK Color Bar format. Search Records: Search the NFPA chemical database by product name or CAS number. Record Number: Identify the current record, out of the current database or search results. Zoom Out/In/Fit: Adjust your view of the design to allow fine tuning. Close: Close the NFPA/RTK module. Navigating Records The fastest way to find a specific record in the NFPR/RTK database is with the toolbar’s search function. 1. Choose whether to search by the material’s Name or CAS Number. The default search is by chemical name; to change this selection, click the current search type (such as “Name”) in the toolbar, and make a new selection. 2. Type your search terms in the search box, and click the magnifying glass button or press Enter on your keyboard. 3. The first match (in alphabetical order, by equipment name) will be shown in the design area. Use the right or left arrows in the toolbar to browse through the search results. The number in the white box on the toolbar shows which search result you are currently seeing; the number below the box shows the total number of search results. If you do not enter any search terms, you can browse through the entire current database. Creating and Editing Records To create a new entry in your current NFPA‐style chemical database, click the New Record button in the menu on the right. This creates a new, blank record. The Edit menu will slide out to let you add the details for this new material. (To edit an existing chemical entry, simply find that entry in the database and click the Edit button in the menu.) 1. NFPA Information: Set the basic details for this entry, such as the product name, CAS number, and signal word. ...
-
Page 20: Pipe Marking
DuraLabel Kodiak User Guide v0.6 (Prerelease) Page 20 of 28 When the details have been entered, click the Save Database button to add your new entry to the Chemical Labeling module’s current database. The Save Label button will export your current label design to its own file, so you can adjust the design in the Label Designer module. If you want to remove the current record from the database, click the Delete Record button. Templates, Sizes, and Settings To print NFPA‐style chemical labels in different sizes, open the Label Settings menu and select the appropriate template with the drop‐down Label Templates menu. The default templates are named so that the size of the label is shown first (with dimensions in inches). In the same menu, you can also choose a font for the text of your label, and toggle optional elements such as PPE symbols and comments. Not all templates allow for PPE symbols and/or comment text. This menu also lets you select which NFPA‐style chemical database you are using, if more than one database is available. Printing a Label When you are ready to print, click the Print Settings button. Here, choose which labels you want to print, and how many copies of each. You can also check a Print Preview here. Pressing the physical Print button on the front of your Kodiak will print one copy of the current label design, using the current print setting. Pipe Marking [This section in progress.] The Pipe Marking module uses the recommendations of the ANSI/ASME A13.1 standard to create simple and effective pipe labels. Additional Functions Supply Status Utility This utility shows the currently loaded supplies, and how much of each is remaining. Click the supply rolls on Kodiak’s main toolbar to open this utility. In order to print, Kodiak requires a label stock and two printing ribbons. This utility can help you check ... -
Page 21: Printing Preferences
DuraLabel Kodiak User Guide v0.6 (Prerelease) Page 21 of 28 Printing Preferences These are the detailed controls for how your Kodiak will handle print jobs. When you load supplies, Kodiak will automatically adjust many of its settings to match those supplies, so you may only need to change these settings for unusual tasks. Click the printer icon on Kodiak’s main toolbar to open these settings. You can also reach these settings through the label design modules. This window has five tabs, with different options: Basic Setup: Choose the most common options, like landscape/portrait print orientation, mirroring or negative printing, and cut options. You can also choose a “preset” for all settings. Speed/Color: If needed for troubleshooting, adjust the overall printing speed, and the individual heat adjustment for each print head. Cut/Media: If needed for troubleshooting, manually select the supply type and the feed or cut offsets. Advanced: If needed for troubleshooting, adjust the printing offsets (horizontal and vertical) for each print head. You can also adjust the way Kodiak handles multi‐color printing and shades of color. Manage Presets: Edit or create custom presets to quickly adjust all print settings. If you access these controls from the main Kodiak toolbar (by clicking the printer icon), the window title will be shown as System Preferences. These will be the default controls used for all programs, but any changes will not affect programs that are currently running. If you access these controls through a program’s individual options, the window title will be shown as Printing Preferences, and any changes will only affect print jobs for that session of labeling. The Manage Presets tab will not be present. Wi-Fi Settings To connect your Kodiak to a wireless network, click the Wi‐Fi icon on Kodiak’s main toolbar. This utility shows the current network state. It offers a simple on/off toggle for Wi‐Fi connectivity, as well as a list of any available Wi‐Fi networks. To connect to a network: 1. Turn on Wi‐Fi connectivity. 2. Select the network you would like to connect to, and click Connect. ... -
Page 22: Maintenance And Troubleshooting
Connectivity (ODBC). Start by selecting the database type with the dropdown menu. To create a new database, enter a name for the new database and press the Add Database button. To adjust, import, export, or copy an existing database or connection, select the existing database from the list, and use the buttons below the list or the editable fields to the right to fill in the appropriate information. Touch Calibration If Kodiak’s touchscreen seems to respond strangely, you can recalibrate it with the Touch Calibration utility. You will be asked to touch a series of targets on the screen; when each target has been touched, the calibration will be complete. Calibration may be repeated any number of times. Updater The Updater utility shows the currently installed software on your Kodiak. If an internet connection is available, the utility will check if any updates are available from Graphic Products, and give you the option to download and install them. If you have a USB flash drive or other USB‐connected storage device with software updates on it, you can install those updates using the Updater utility by clicking the USB button. Users and Passwords By default, Kodiak will not be locked; any person can use the system. To require a password, use the Users and Passwords utility to add an authorized user. Each individual user will have their own password, and there is no limit to the number of users that may be added. Once an authorized user has been added, you can click the Lock button in this utility to lock the system. Any authorized user can also add or remove other authorized users in this utility. If your Kodiak has been locked, but all user passwords have been lost or forgotten, contact Graphic Products for support. Maintenance and Troubleshooting If you have any questions on how to maintain or troubleshoot your Kodiak, contact Graphic Products for support by calling 800.788.5572 or visiting Graphic Products.com. Cleaning Your Kodiak Periodic cleaning will help prevent jams, and keep your printer running smoothly. When cleaning your Kodiak, turn it off and disconnect its power cord. ... -
Page 23: Troubleshooting
DuraLabel Kodiak User Guide v0.6 (Prerelease) Page 23 of 28 Cleaning Inside Kodiak To clean the inside of your Kodiak, where the supplies are loaded, lift Kodiak’s lid to its fully‐raised position. 1. Unlatch the two print heads, and lift them by their orange tabs until they hold in their fully‐ raised positions. Slide the ribbon cartridges out of place, and put them somewhere safe. (If the cartridges have ribbon loaded, you can rest the cartridges upside‐down to avoid getting dust on the ribbon.) 2. Unlatch the spring‐loaded feed roller bar, and let it rise out of the way. Turn your roll of label stock by hand to rewind any supply that is still feeding through the printer. 3. Using a pre‐moistened cleaning swab or a soft cloth with some isopropyl alcohol, wipe the underside of each print head, paying attention to the green strip of heating elements and the shiny metal feeding guide. 4. Wipe the rubber rollers clean, starting with the ones under the print heads, then the roller in the raised feed roller bar, and finally the textured roller below the feed roller bar. 5. Check the adjustable supply guides for any adhesive build‐up, especially under the small white rollers, and clean them as well. [Image needed.] Cleaning the Cutter The best way to reach the cutter for cleaning is from the front of the printer. 1. Raise Kodiak’s touchscreen to its highest position. Behind the screen, just above each end of the cutter slot, you’ll see two Philips screws. These screws hold the cutter faceplate on; remove the two screws, and set them somewhere safe. 2. Press the cutter faceplate downward to release it, and put the faceplate somewhere safe. This will expose the cutter blades. Be careful; while the faceplate is removed, the cutter motor will not engage, but the blade is still sharp. 3. Using a pre‐moistened cleaning swab or a soft cloth and some isopropyl alcohol, remove any ... -
Page 24: Specifications
DuraLabel Kodiak User Guide v0.6 (Prerelease) Page 24 of 28 2. Locate the jam. Ordinarily, label stock should move smoothly from the supply roll, under the feed roller bar, between and under the adjustable supply guides, under each of the print heads, and out through the cutter. 3. Remove the jammed material. This may require you to turn rollers by hand; this will not damage the printer. If material has jammed inside the cutter mechanism, you may need to remove the cutter faceplate; if so, be careful of the blade, which is sharp. (See the instructions for cleaning the cutter.) 4. Re‐load supplies. You may need to cut off a section of supply, if it is too wrinkled to feed smoothly through the system. This can typically be done with scissors. For a perfectly clean cut, after supplies have been loaded, you can use the Trim function in the Supply Status Utility. Unexpected Colors in Printed Labels Kodiak allows you to design labels with a variety of colors, but can only print using the supplies that you have loaded. If your design includes a color that your supplies can’t provide, Kodiak may print your design with its best match of the available supply colors. If you would prefer to leave those elements unprinted, follow these steps: 1. Open the Printing Preferences window in your design program, or open the System Preferences window by clicking the Printer icon on the Kodiak main toolbar. 2. On the Advanced tab, set the Color Matching option to “Print Only If Color Matches.” If you need the elements to be printed in their designed colors, you will need to load the appropriate supplies. Specifications Kodiak specifications are subject to change without notice. Capabilities Create, edit, save, and print label designs with internal software ... -
Page 25: Power Requirements
DuraLabel Kodiak User Guide v0.6 (Prerelease) Page 25 of 28 Max. Print Width: 8.4 inches Max. Print Length: 100 inches Interface Touchscreen size: 9" (diagonal) Buttons: Print, X (Cancel), ? (Help) Communication and Data Storage Communications: USB 2.0 (front: 2x USB‐A, back: 2x USB‐A, 1x USB‐B), Ethernet, Wi‐Fi USB Adapter Data Storage: roughly 2 GB internal storage available; 4 GB external USB flash drive Power Requirements Input: 100‐240 VAC (50‐60 Hz), 8A Different AC power cords available for worldwide usage Environment Operating Temperature: 50°F ‐ 104°F (10°C ‐ 40°C) Operating Humidity: 30% ‐ 85%, non‐condensing Storage Temperature: ‐4°F ‐ 140°F (‐20°C ‐ 60°C) Ventilation: keep ventilation holes clear Label Stock Type: Continuous, Black Mark, or Die‐Cut ... -
Page 26: Certifications
DuraLabel Kodiak User Guide v0.6 (Prerelease) Page 26 of 28 Certifications Radio Compliance United States FCC This equipment has been tested and found to comply with the limits of a Class A digital device, pursuant to Part 15 of the FCC Rules. Operation is subject to the following two conditions: (1) This device may not cause harmful interference, and (2) this device must accept any interference received, including interference that may cause undesired operation. These limits are designed to provide reasonable protection against harmful interference when the equipment is operated in a commercial environment. This equipment generates, uses, and can radiate radio frequency energy, and if not installed and used in accordance with instructions may cause harmful interference to radio communications. Changes and modifications could void the user’s authority to operate this equipment. Industry Canada This device complies with Industry Canada license‐exempt RSS standard(s). Operation is subject to the following two conditions: (1) this device may not cause interference, and (2) this device must accept any interference, including interference that may cause undesired operation of the device. Le présent appareil est conforme aux CNR d’Industrie Canada applicables aux appareils radio exempts de licence. L’exploitation est autorisée aux deux conditions suivantes: (1) l’appareil ne doit pas produire de brouillage; (2) l’appareil doit accepter tout brouillage radioélectrique subi, même si le brouillage est susceptible d’en compromettre le fonctionnement. Standard Conformity Kodiak conforms to the following US, Canadian and European Radio, Safety, and EMC standards. US/Canada FCC 15.107:2017 Class A, FCC 15.109:2017 Class A, FCC 15.109(g):2017 Class A, FCC 15.207:2017, FCC 15.225:2017, ICES‐003:2016 updated April 2017 Class A, RSS‐210:2016 Europe EN 300 330 V2.1.1:2017, EN 301 489‐3 V2.1.1:2016, EN 55032:2012/AC:2013 CLASS A, EN 55024:2010, EN 61000‐3‐2:2014, EN 61000‐3‐3:2013. The product herewith complies with the requirements of Radio Equipment Directive (RED) 2014/53/EU, Low Voltage Directive 2006/95/EC, EMC Directive 2014/30/EU, and WEEE and ROHS Directive 2002/95/EC. Safety EN 60950‐1:2006, IEC 60950‐1:2005 (2 Edition) ... -
Page 27: Printer Disposal/Recycle
DuraLabel Kodiak User Guide v0.6 (Prerelease) Page 27 of 28 Printer Disposal/Recycle The following symbol (X’ed trashcan) of a crossed‐out wheeled bin indicates that the Kodiak printer must be disposed of properly and not treated as general waste. Incorrect disposal could have a negative impact on human health and the environment. For more information on the correct disposal/recycling of this printer please contact Graphic Products at 800.788.5572. ... -
Page 28: Third-Party Software
DuraLabel Kodiak User Guide v0.6 (Prerelease) Page 28 of 28 Third-Party Software This is a comprehensive list of third‐party software and libraries used by Kodiak, organized by their license type. The licenses can be found in the Licenses file in Kodiak’s Manuals folder. GNU General Public License version 2 (GPL-2) obexftp: https://sourceforge.net/projects/openobex/files/obexftp openobex: https://sourceforge.net/projects/openobex/files/openobex obexpushd: https://launchpad.net/ubuntu/+source/obexpushd obexd: https://www.kernel.org/pub/linux/bluetooth rtl8188eu: https://github.com/lwfinger/rtl8188eu mtd‐utils: http://git.infradead.org/mtd‐utils.git mysql odbc: https://dev.mysql.com/downloads/connector/odbc psqlodbc: https://ftp.postgresql.org/pub/odbc/versions/src poppler: http://poppler.freedesktop.org cups‐filters: http://openprinting.org/download/cups‐filters GNU General Public License version 3 (GPL-3) ...
Need help?
Do you have a question about the Kodiak and is the answer not in the manual?
Questions and answers