Advertisement
Quick Links
HAVANA 2 DRAWER BEDSIDE CABINET ASSEMBLY INSTRUCTIONS
Thank you for purchasing the HAVANA 2 DRAWER BEDSIDE CABINET. Please read the
instructions carefully to ensure safe operation of the product.
PLEASE READ this sheet prior to assembly to familiarise yourself with the various stages of
construction.
Carefully open the pack supplied and check the contents against the parts and fittings check
list. Do not destroy any of the packaging until you are certain that you have all the necessary
parts for the assembly.
CAUTION: There are small components used in the construction of this unit. These loose
items should be kept away from young children whilst assembling your unit to avoid the
danger of choking hazards.
Tools Required
Size:47x42x56cm
Colour:3D OAK
Finish:PAPER FOIL
Batch No.: WMI 10538
Page 1 of 13
Advertisement

Subscribe to Our Youtube Channel
Related Manuals for Birlea HAVANA 2 DRAWER BEDSIDE CABINET


Summary of Contents for Birlea HAVANA 2 DRAWER BEDSIDE CABINET
-
Page 1: Tools Required
HAVANA 2 DRAWER BEDSIDE CABINET ASSEMBLY INSTRUCTIONS Thank you for purchasing the HAVANA 2 DRAWER BEDSIDE CABINET. Please read the instructions carefully to ensure safe operation of the product. Size:47x42x56cm Colour:3D OAK Finish:PAPER FOIL PLEASE READ this sheet prior to assembly to familiarise yourself with the various stages of construction. -
Page 2: Care Information
HAVANA 2 DRAWER BEDSIDE CABINET ASSEMBLY INSTRUCTIONS IMPORTANT - READ CAREFULLY - RETAIN THESE INSTRUCTIONS FOR FUTURE REFERENCE. INFORMATION This product is intended for a maximum weight of 20 kg. Do not exceed this weight. Due to the size of this product we recommend that it is assembled in the room intended for use. - Page 3 HAVANA 2 DRAWER BEDSIDE CABINET ASSEMBLY INSTRUCTIONS Please check the pack contents before assembling this product. If any components are missing, please contact your retailer.The fittings pack contains small items that should be kept away from small children. Batch No.: WMI 10538...
- Page 4 HAVANA 2 DRAWER BEDSIDE CABINET ASSEMBLY INSTRUCTIONS Parts Description: Top Panel Description: Left Side Panel Description: Right Side Panel Description: Left Front Post Qty: 1 PC Qty: 1 PC Qty: 1 PC Qty: 1 PC Carton no: 1 of 1...
- Page 5 HAVANA 2 DRAWER BEDSIDE CABINET ASSEMBLY INSTRUCTIONS Fittings(to scale) Dimensions CAM BOLT( 6x35mm) CAM LOCK ( 15x10mm) SCREW (4x40mm) DOWEL (6x30mm) SCREW (3x12mm) NAIL-20mm NAIL- 12x18mm CAM LOCK ( 15x12mm) (Not to scale) HANDLE RAIL CAUTION:There are many small components used in the construction of this product.
-
Page 6: Hints And Tips
HAVANA 2 DRAWER BEDSIDE CABINET ASSEMBLY INSTRUCTIONS Hints & Tips Don't screw too deep Layout Parts on Soft Surface Lay out all parts on a soft surface i.e. Rug, Carpet or Packaging Carton Batch No.: WMI 10538 Page 6 of 13... - Page 7 HAVANA 2 DRAWER BEDSIDE CABINET ASSEMBLY INSTRUCTIONS STEP 1 Parts Required 2 Left Side Panel x1 3 Right Side Panel x1 4 Left Front Post x1 5 Left Back Post x1 6 Right Front Post x1 7 Right Back Post x1...
- Page 8 HAVANA 2 DRAWER BEDSIDE CABINET ASSEMBLY INSTRUCTIONS STEP 2 Parts Required 2 Left Side Panel x1 3 Right Side Panel x1 E SCREW x12 J1 RAIL x2 J2 RAIL x2 NAIL x4 Batch No.: WMI 10538 Page 8 of 13...
- Page 9 HAVANA 2 DRAWER BEDSIDE CABINET ASSEMBLY INSTRUCTIONS STEP 3 Parts Required 2 Left Side Panel x1 3 Right Side Panel x1 8 Front Support Panel 1 x1 9 Front Support Panel 2 x1 10 Back Support Panel x1 A CAM BOLT x8...
- Page 10 HAVANA 2 DRAWER BEDSIDE CABINET ASSEMBLY INSTRUCTIONS STEP 4 Parts Required 1 Top Panel x1 A CAM BOLT x4 B CAM LOCK x4 D DOWEL x12 Batch No.: WMI 10538 Page 10 of 13...
- Page 11 HAVANA 2 DRAWER BEDSIDE CABINET ASSEMBLY INSTRUCTIONS STEP 5 Parts Required 11 Drawer Front Panel x2 12 Left Drawer Side Panel x2 13 Right Drawer Side Panel x2 14 Drawer Back Panel x2 15 Drawer Bottom Panel x2 A CAM BOLT x8...
- Page 12 HAVANA 2 DRAWER BEDSIDE CABINET ASSEMBLY INSTRUCTIONS STEP 6 Parts Required 16 Back Panel x1 G NAIL x18 Important: The cabinet MUST be 'square' when the back is attached. STEP 7 Parts Required Batch No.: WMI 10538 Page 12 of 13...
-
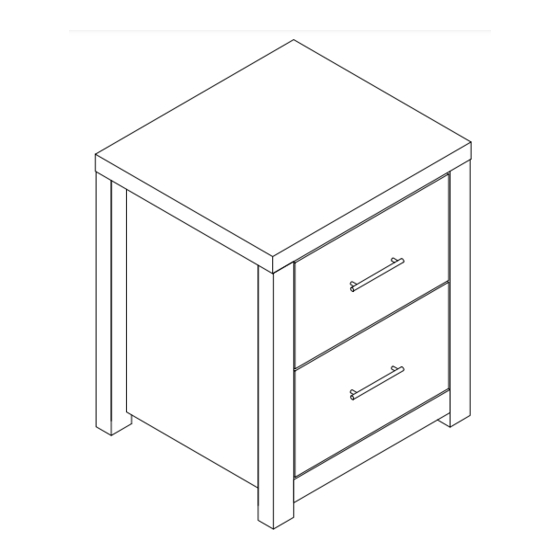
Page 13: Complete Assembly
HAVANA 2 DRAWER BEDSIDE CABINET ASSEMBLY INSTRUCTIONS Complete Assembly HAVANA 2 DRAWER BEDSIDE CABINET Your is now completely assembled. Periodically check to ensure that the components are in their proper position, free from damage. Also, make sure the connectors are tight and secure.
Need help?
Do you have a question about the HAVANA 2 DRAWER BEDSIDE CABINET and is the answer not in the manual?
Questions and answers