Table of Contents
Advertisement
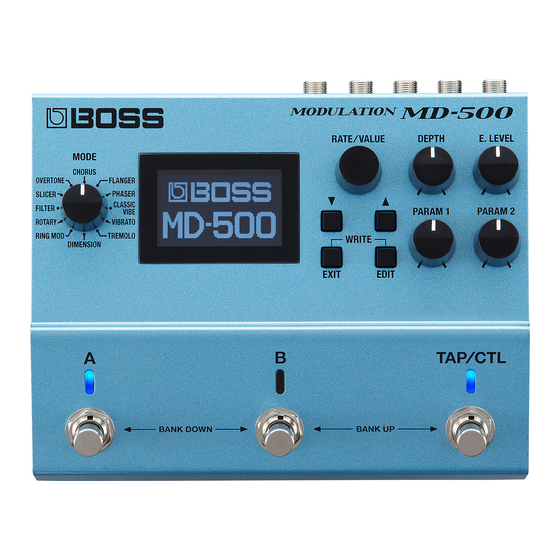
5 Thanks to 32-bit high-precision processing at a 96 kHz sampling rate from input to output, the MD-500
gives you stunningly high-quality modulation effect.
5 With an easily readable screen and an independent [TAP/CTL] switch, it delivers both high
functionality as well as ease of use during live performances.
5 Standard effects such as chorus, flanger, and phaser have been enhanced using cutting-edge
Boss technology. The MD-500 provides a total of 12 modulation effects, including models of the
Boss CE-1 and scanner vibrato.
5 The memory function lets you store and recall 297 different setups from internal memory.
5 The MD-500 provides "simul mode" which lets you use two effects simultaneously, and an "insert
loop function" which lets you shape your sound in conjunction with an external effect unit.
5 By connecting the MD-500 via a USB cable or MIDI cables, you can switch sounds and control
parameters in synchronization with your computer DAW or an external MIDI device.
Before using this unit, carefully read "USING THE UNIT SAFELY" and "IMPORTANT NOTES" (leaflet "USING THE UNIT SAFELY" and Owner's Manual
(p. 30)). After reading, keep the document(s) including those sections where it will be available for immediate reference.
© 2017 Roland Corporation
2
2
2
4
4
5
6
7
8
9
10
10
10
10
18
18
20
20
20
21
22
22
23
Owner's Manual
24
24
25
26
26
26
27
28
28
29
29
30
30
Advertisement
Table of Contents

Related Manuals for Boss MD500


Summary of Contents for Boss MD500
-
Page 1: Table Of Contents
5 Standard effects such as chorus, flanger, and phaser have been enhanced using cutting-edge Boss technology. The MD-500 provides a total of 12 modulation effects, including models of the Boss CE-1 and scanner vibrato. -
Page 2: Getting Ready
Getting Ready Installing the Batteries Install four alkaline batteries (AA, LR6) in the battery compartment located on the bottom of the unit. * When turning the unit over, be careful so as to protect the buttons and knobs from damage. Also, handle the unit carefully;... - Page 3 Getting Ready MEMO INPUT A/MONO, B jacks OUTPUT A/MONO, B jacks Connect your electric guitar, or another instrument or effect unit, to Connect these jacks to your You can connect an these jacks. amp or monitor speakers. external effect unit and use it in conjunction If you’re using a mono setup, * Use the INPUT A/MONO jack and B jack when connecting a stereo-...
-
Page 4: Basic Operation
CHORUS from a vintage chorus unit to a chorus effect sound. Lets you use the input to control the filter, or powered by BOSS’s cutting-edge technology. FILTER Generates a flanging effect. Turn the TURBO program the filter's modulation cycle. Repeatedly cuts the sound to produce a FLANGER SW “ON”... -
Page 5: Turning Effect On/Off
Basic Operation Turning Effect On/Off Patch A effect Each time you press the [A] switch, the effect alternately turns on (lit blue) / off (unlit). Patch B effect Each time you press the [B] switch, the effect alternately turns on (lit blue) / off (unlit). Blue: on Unlit: off Press once... -
Page 6: Switching Banks/Patches
Basic Operation Switching Banks/Patches Switch banks (01–99). Bank up (press the [B] and [TAP/CTL] switches simultaneously) Bank down (press the [A] and [B] switches simultaneously) Press a blinking switch ([A] or [B]) to switch patches. Blinking blue MEMO You can recall a different patch by turning the [RATE/VALUE] knob while you hold down the [EXIT] button. -
Page 7: Using The [Tap/Ctl] Switch To Control The Effect
Basic Operation Using the [TAP/CTL] Switch to Control the Effect By default, the [TAP/CTL] switch is used for tap input, but you can change the setting and use this switch to vary the way in which the effect is applied. Press the [EDIT] button. -
Page 8: Editing A Patch
Editing a Patch You can edit a variety of patch-related parameters. Press the [EDIT] button. Use the [ H ] [ I ] buttons to select “PATCH,” and then press the [EDIT] button. Use the [ H ] [ I ] buttons to select a parameter, and use the [RATE/ VALUE] knob to edit the value. -
Page 9: Saving A Patch
Saving a Patch Here’s how to save a patch that you’ve edited. Press the [EXIT] button and [EDIT] button simultaneously. Use the [RATE/VALUE] knob to select the save-destination number. Bank [A] switch [B] switch [TAP/CTL] switch Bank 01 Bank 02 Bank 99 * Patch C can be selected only if FSW MODE (p. -
Page 10: Parameter List
Parameter List PATCH Parameters Common to All Modes Parameter Value Explanation MODE Selects the type of effect (p. 4). The same function as the [MODE] knob. EFFECT LEVEL (*1) 0–100 Adjusts the volume of the effect sound. DIRECT LEVEL 0–100 Adjusts the volume of the direct sound. - Page 11 Parameter List Parameter Value Explanation CE-1 CHORUS, CE-1 VIBRATO RATE 0.01–20.00 Hz Adjusts the rate of the chorus. Specifies the tempo. 6.0–600.0 The range of this setting depends on the RATE or NOTE value. ` – Œ NOTE Adjusts the rate of the chorus, specified as a note value relative to BPM. DEPTH 0–100 Adjusts the depth of the chorus.
- Page 12 Parameter List FLANGER Parameter Value Explanation Selects the type of flanger. TYPE PRIME G For guitar PRIME B For bass RATE 0.01–20.00 Hz Adjusts the speed of modulation. Specifies the tempo. 6.0–600.0 The range of this setting depends on the RATE or NOTE value. ` –...
- Page 13 Parameter List Parameter Value Explanation Adjusts the rate of the step function which varies the rotation in a step-wise OFF, ª – ` STEP RATE manner. Higher settings make the change occur in smaller steps. Turn this “OFF” if you don’t want to use the step function. Specifies whether the two phase shift circuits are connected in series (ON) or Bi-PHASE OFF, ON...
- Page 14 Parameter List TREMOLO Parameter Value Explanation Selects the type of tremolo. PRIME T A tremolo unique to the MD-500. A wide range of settings are possible. Alternates the volume of the left and right channels; when played in stereo, this produces the impression that the sound is moving back and forth between the TYPE PRIME P...
- Page 15 Parameter List ROTARY Parameter Value Explanation SPEED SELECT SLOW, FAST Switches the speaker rotation speed between SLOW (slow) and FAST (fast). SLOW RATE 0.01–20.00 Hz Adjusts the speed of rotation when SPEED SELECT is set to SLOW. FAST RATE 0.01–20.00 Hz Adjusts the speed of rotation when SPEED SELECT is set to FAST.
- Page 16 Parameter List Parameter Value Explanation PATTERN FILTER RATE 0.01–20.00 Hz Adjusts the rate of the filter. Specifies the tempo. 6.0–600.0 The range of this setting depends on the RATE or NOTE value. ` – Œ NOTE Adjusts the rate of the filter, specified as a note value relative to the BPM. Selects the pattern.
- Page 17 Parameter List OVERTONE Parameter Value Explanation Selects the type of overtones. TYPE OVERTONE Thickens the sound by adding overtones. DETUNE Thickens the sound by adding slightly pitch-shifted sound. OVERTONE LOWER LEVEL 0–100 Adjusts the volume of the overtones one octave below. UPPER LEVEL 0–100 Adjusts the volume of the overtones one octave above.
-
Page 18: Control
Parameter List CONTROL You can specify the functions of the [TAP/CTL] switch and of a footswitch or expression pedal connected to the CTL 1,2/EXP jack. 5 “Using the [TAP/CTL] Switch to Control the Effect” (p. 7) 5 “Assigning a Function to an External Pedal” (p. 25) ASSIGN ASSIGN INPUT SENS Parameter... - Page 19 Parameter List Parameter Value Explanation Within the operating range of the source, this specifies the range that will ACT LOW 0–126 control the target parameter. The target parameter will be controlled within the range specified. Normally, you ACT HIGH 0–127 should leave ACT LOW at “0”...
-
Page 20: Bank
Parameter List BANK You can specify how patches A and B are connected and output when using simul mode. 5 “Using Two Patches Simultaneously (Simul Mode)” (p. 23) SYSTEM Parameter Value Explanation CONTRAST 1–16 Adjusting the contrast of the display INSERT LOOP OFF, ON Specifies whether the insert loop function (p. -
Page 21: Midi Pc Map
For details on MIDI, refer to “MIDI EFFECT B SW bypass. Implementation” (PDF). CTL1 CC External CTL1 switch http://www.boss.info/manuals/ CTL2 CC External CTL2 switch EXP CC External EXP pedal Selects the tempo clock input that is used for synchronization. INTERNAL Synchronizes to the internal tempo. -
Page 22: Convenient Functions
Convenient Functions Assigning the Functions of the [A], [B], and [TAP/CTL] Switches Press the [EDIT] button. Use the [ H ] [ I ] buttons to select “SYSTEM” and then press the [EDIT] button. Use the [ H ] [ I ] buttons to select “FSW MODE,” and use the [RATE/ VALUE] knob to select the mode. -
Page 23: Using Two Patches Simultaneously (Simul Mode)
Convenient Functions Using Two Patches Simultaneously (Simul Mode) If FSW MODE is set to “A/B SIMUL, ” you can use two patches A and B simultaneously (simul mode). Set FSW MODE to “A/B SIMUL” (p. 22). Selected patch Press the unlit [A] or [B] switch to make them both light. Now you can use two patches simultaneously. -
Page 24: Inserting An External Effect Unit
Inserting an External Effect Unit You can connect an external effect unit between the OUTPUT A jack and INPUT B jack, and use it in conjunction with the MD-500’s effect (insert loop function). You can also change the connection order of the effects. (Example) OUTPUT INPUT... -
Page 25: Assigning A Function To An External Pedal
Assigning a Function to an External Pedal You can assign a function to a footswitch (sold separately: FS-5U, FS-5L, FS-6, FS-7) or expression pedal (sold separately: EV-30, Roland EV-5 etc.) connected to the CTL 1,2/EXP jack. Press the [EDIT] button. Use the [ H ] [ I ] buttons to select “CONTROL,”... -
Page 26: Synchronizing With A Daw Or External Midi Device
Synchronizing with a DAW or External MIDI Device You can synchronize your MD-500 performance with a computer or an external MIDI device by sending and receiving MIDI messages. For example, an external MIDI device or DAW could switch patches on the MD-500 or control its tempo. -
Page 27: Midi Routing
If you experience problems connecting with your DAW Normally, you don’t need to install a driver in order to connect the MD-500 to your computer. However, if some problem occurs, or if the performance is poor, using the BOSS original driver may solve the problem. -
Page 28: Restoring The Factory Default Settings
Restoring the Factory Default Settings Here’s how to reset the settings to their factory state. If you like, you can also reset the system settings or just a specific range of patches. Press the [EDIT] button. Use the [ H ] [ I ] buttons to select “FACTORY RESET,” and then press the [EDIT] button. -
Page 29: Troubleshooting
Is the SYSTEM: FSW MODE (p. 22) setting what happens when you press the [A], [B], you expect correct? and [TAP/CTL] switches. Check the setting. Main Specifications BOSS MD-500: Modulation Alkaline battery (AA, LR6) x 4 Power Supply AC adaptor Current Draw 225 mA Alkaline batteries (AA, LR6): Approximately 4.5 hours... -
Page 30: Using The Unit Safely
Co.,Ltd. eParts is a trademark of eSOL Co., Ltd. in Japan. malfunction and damage. • Roland, BOSS, and SLICER are either registered trademarks or • If operating this unit on batteries, please use alkaline batteries. trademarks of Roland Corporation in the United States and/or other countries.
Need help?
Do you have a question about the MD500 and is the answer not in the manual?
Questions and answers