
Related Manuals for Ocean Digital MA-80


Summary of Contents for Ocean Digital MA-80
-
Page 1: Internet Radio
User Manual Internet Radio MA-80 Please read this user manual carefully before using the receiver. -
Page 2: Table Of Contents
Contents Location of Controls ........1 Remote control. -
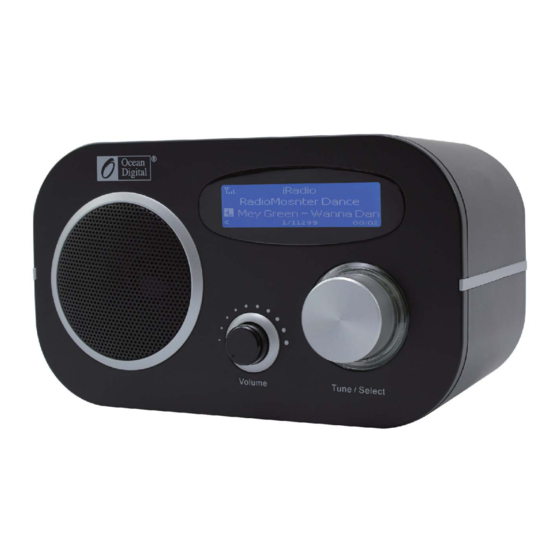
Page 3: Location Of Controls
Location of Controls 1. Standby 2 3 4 5 6 - Press to turn on the radio/standby 2-5. Individual favourite keys no. 1-4 Long press to preset; short FAV.+ press to recall Standby Menu Left Local Right 6. FAV Alarm / Sleep Timer - Recall list of favorite stations 7. -
Page 4: Remote Control
Remote Control 1. Power: Standby on/off 2. Mute: Speaker on/off 3. 0-9: Input numbers for encryption code, recall favorite stations, enter index number to select item from the list. Toggle the same numeric key gives you a choice to input letters : Return to Main Menu Mode 5. -
Page 5: Enter Encryption Code Of The Wi-Fi Router
Enter encryption code of the Wi-Fi router Using remote control When you want to enter the letters, numbers or symbols for the encryption code, using remote control would be easy to complete the job. Here is the definition of each key and press the same button to cycling through different letters / symbol available After each entry, press the right key to input the next. - Page 6 Before you start Please ensure the following is ready: You have a broadband internet connection. A wireless broadband router is connected to the internet successfully. The radio supports Wireless B, G and N connection (Wireless N router can also be used with the setting on B or G).
-
Page 7: Connect The Radio With Your Wi-Fi Router
Connect the radio with your Wi-Fi Router 1. Use the AC adaptor supplied with the product, one end to the DC socket located at the rear side of the radio and the other end to the wall socket outlet. Caution: Use only the adaptor supplied with the radio. Connecting a power supply with a different rating will cause permanent damage to the radio and may be hazardous. -
Page 8: Ethernet Connection
Ethernet connection If you want to connect the internet via Ethernet, simply plug in the Ethernet cable to the Ethernet socket at the rear side of the radio, you will see the Ethernet icon starts blinking, it’s now connecting to the network. Once the icon goes steady, it means the network is connected. -
Page 9: Internet Radio
the <FAV> key on the unit, you will see the icon appears as below. It means the station is added to the Favorite list. Preset icon HISTORY 1. fm Bay Smooth Jazz 128kbps, 44100 Hz, 2 ch < 00:39 The new added station will always showing in the last item on the Favorite list. You can store up to 99 presets Recall a station To recall the full list of your Favorite station, simply press the <FAV>... -
Page 10: Media Centre
Media Centre UPnP (Universal Plug and Play) You can stream music from the Networked device which supports UPnP function to the radio to play. For instance, most of the latest computer laptop supports UPnP, and you can stream music from Windows Media Player application on the computer and listen on your radio. Please make sure your computer laptop is on the same Wi-Fi network as the Radio before you start using this function 1. - Page 11 2.1.4 From the ‘Media Sharing’ windows, the radio will be listed as an unknown device. Click on the unknown device listed, then click the ‘Allow’ button and then click ‘OK’. Allowing the Radio to Connect: 2.2 Windows 7 / Windows Media Player 12 2.2.1 If you are using WMP 12, simply go to <File>...
- Page 12 iii) Set the network location iv) Choose Home network v) Create a homegroup, then choose the kind of media file to be accessed, such as music..etc.
-
Page 13: Alarm Setting
vi) Launch the Windows Media Player, select <Stream> and choose <Automatically allow devices to play my media> from the drop down list. vii) You can now enjoy the music streaming from the windows media player. Music streaming via UPnP 1. Once the UPnP server is configure to share media files with your radio, you can start music streaming. -
Page 14: Snooze
Alarm Volume – Adjust the volume of the alarm as you like by rotating the dial. 4. After the above settings are completed, press the left button to exit and make sure the Alarm is turned on. You will see the Alarm icon appeared on the display if it is activated. - Page 15 between different countries. Therefore it is necessary to choose the Wi-Fi channels to ensure the Wi-Fi performs satisfactory. We have already set the channels according to the requirement in different countries. Choose the country you are staying from the list to get the correct channel. The default country is set <Europe/United Kingdom>, press <Enter>...
-
Page 16: Add Your Favorite Url
Dim – the display will dim down after 15 seconds if no operation is made on the radio. Level: Bright and Dim Bright - the display will stay at the selected level when there is operation on the radio or if the mode is selected in <Normal>... -
Page 17: Music Streaming From Mobile Devices
4. You can input the name and URL of a new radio station under the Add channel section, then click Submit. The new station will sync to the Favorite list of your radio immediately. You can add up to 99 radio stations. Music Streaming from mobile devices Our radio supports playing music streams from mobile device which uses UPnP or iOS streaming. -
Page 18: Helpful Tips
1. If the Internet Radio keeps re-buffering radio station: The Internet Radio is streaming the data from the radio station via your broadband connection, if there is a high error rate on your broadband connection, or the connection is intermittent, then it will cause the Internet Radio to pause until the connection is re- established and it has received enough data to start playing again. -
Page 19: Technical Specification
This system is financed by the industry and ensures environmentally responsible disposal and the recycling of valuable raw materials. Ocean Digital Technology Ltd. Flat B, 12/F., Yeung Yiu Chung (No.8) Ind. Bldg., 20 Wang Hoi Road, Kowloon Bay, Hong Kong Email: support@oceandigital.com.hk...
Need help?
Do you have a question about the MA-80 and is the answer not in the manual?
Questions and answers