Table of Contents
Advertisement
Quick Links
SAR-600EW
4-Port Ethernet USB
Wireless-G ADSL Router
Easy Start
Version 1.0
Solwise
Ltd.
www.solwiseforum.co.uk
The Solwise Forum is designed to be the first port-of-call for technical support and sales
advice for the whole Solwise product range.
Please check the forum for coverage on any technical problems you have. Many people have
trodden your path before you, and a quick check on the forum will reduce the pressure on our
support staff
Contents:
1
Introduction................................................................................................................... 3
2
Minimum System Requirements .................................................................................. 3
3
ADSL Router Package ................................................................................................. 3
4
Wireless-G Router Overview........................................................................................ 4
5
Typical Wireless-G Router Connections ...................................................................... 6
6
Connecting the Wireless-G Router to Your Computer/Notebook ................................ 7
7
Configuring Your Ethernet Network Card / Installing Your USB Device .................... 10
8
Configuring Your Internet Browser............................................................................. 17
9
Setup Wireless-G Router Via Utility ........................................................................... 18
10
Setup Wireless-G Router Via Websetup Wizard ....................................................... 30
•
Product warranty does not apply to damage caused by lightning, power surges or
wrong voltage usage.
•
This product is for use only in UL Listed computers.
Advertisement
Table of Contents

Related Manuals for Solwise SAR-600EW


Summary of Contents for Solwise SAR-600EW
-
Page 1: Table Of Contents
Solwise Ltd. www.solwiseforum.co.uk The Solwise Forum is designed to be the first port-of-call for technical support and sales advice for the whole Solwise product range. Please check the forum for coverage on any technical problems you have. Many people have... -
Page 2: Declaration Of Conformity
Wireless-G Router Easy Start Declaration of Conformity Marking by the above symbol indicates compliance with the Essential Requirements of the R&TTE Directive of the European Union (1999/5/EC). This equipment meets the following conformance standards: EN300 328, EN301 489-17, EN60950 Countries of Operation and Conditions of Use in the European Community This device is intends to be operated in all countries of the European Community. - Page 3 Tel: 0845 458 4558 (local rate) Fax: 0845 458 4559 Support Tel: 0845 1931320 SBV: 1100 Email sales@solwise.co.uk Http www.solwise.co.uk Copyright All rights reserved. No part of this document may be reproduced in any form or by any means without written permission from the product manufacturer.
-
Page 4: Introduction
Wireless-G Router Easy Start 1 Introduction Thank you on your purchase of the SAR-600EW, 4-Port Ethernet USB Wireless-G ADSL Router! The Wireless 4-Port Router allows you to share high-speed broadband connection with multiple PC using a single device wired or wireless. -
Page 5: Wireless-G Router Overview
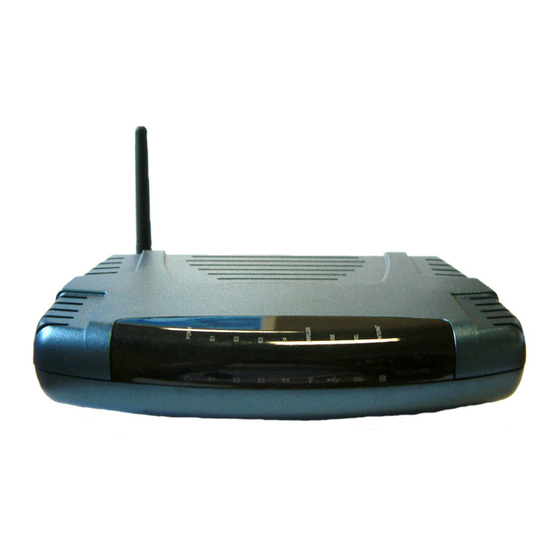
Wireless-G Router Easy Start Ethernet Modem. Please refer to Connecting to the ADSL Line for details. POTS-Splitter can also be purchased from your dealer. 4 Wireless-G Router Overview 4.1 Front Indicators POWER Lights up when power is supplied to the ADSL Router. ETHERNET (E1 ~ E4) Lights up when the Ethernet cable is properly connected from your ADSL Router to the Ethernet Card. -
Page 6: Back Panel
Wireless-G Router Easy Start 4.2 Back Panel Telephone jack (RJ-11) to connect to your Telephone Wall Socket (DSL line). USB jack to connect to your PC’s USB slot. RESET To reset your ADSL Router to factory default settings. (All customised settings that you have saved will be lost!). -
Page 7: Typical Wireless-G Router Connections
Wireless-G Router Easy Start and release. At this point, the Wireless indicator and DSL indicator will go off, The reset is in progress. - When the Wireless indicator starts blinking, it means that the reset process is completed. The default settings are now restored. - DSL line is synchronized once the DSL indicator colour is steady green. -
Page 8: Connecting The Wireless-G Router To Your Computer/Notebook
Wireless-G Router Easy Start 6 Connecting the Wireless-G Router to Your Computer/Notebook Power off your Computer/Notebook or/and any connected devices before connecting to the ADSL Router! 6.1 Connecting to the Ethernet Connect your computer(s)/notebook(s) to the Wireless-G ADSL Router as illustrated. The following illustration shows the connection of a single computer. -
Page 9: Connecting To The Adsl Line
Wireless-G Router Easy Start 6.2 Connecting to the ADSL Line 6.3 (a) To connect to the ADSL line 6.4 (b) To connect to the ADSL line and Telephone Set The POTS Splitter (with built-in Microfilter) is a device that allows you to connect both your Telephone cable and Telephone Set to the same Telephone Wall Socket. -
Page 10: Connecting To The Power Outlet
Wireless-G Router Easy Start 6.6 Connecting to the Power Outlet 6.7 Powering On Power on the Power Outlet that is connected to your ADSL Router. Power on your Computer(s)/Notebook(s). Please proceed to the next chapter. 9 of 33... -
Page 11: Configuring Your Ethernet Network Card / Installing Your Usb Device
Wireless-G Router Easy Start 7 Configuring Your Ethernet Network Card / Installing Your USB Device If your computer/notebook is connected to the Ethernet Port of the ADSL Router, proceed with section 7.1. If your computer/notebook is connected to the USB Port of the ADSL Router, proceed with section 7.2. - Page 12 Wireless-G Router Easy Start Ensure that your ADSL Router is powered on. Restart your system. Proceed to the next chapter. For Windows ® 2000 / ® XP Windows 7.1.2 Windows® 2000: From your Windows desktop, right-click on the icon My Network Places select Properties.
-
Page 13: Installing The Usb Device Driver
Wireless-G Router Easy Start Click again to close. Ensure that your ADSL Router is powered on. Restart your system. Proceed to the next chapter. 7.2 Installing the USB Device Driver Proceed with this section ONLY if your computer/notebook is connected to the USB Port of your ADSL Router! The following screen shots illustrated serve only as examples. - Page 14 Wireless-G Router Easy Start Click CD-ROM drives option and click Next. Select The updated driver (Recommended) DSL Router USB Remote NDIS Network Device and click Next. Click Next to proceed installation with the indicated driver. Depending on your system configurations, you may be prompted for your Windows CD-ROM during installation.
- Page 15 Wireless-G Router Easy Start Click Removable Media option and click Next Click Next again to proceed installation with the indicated driver. Click Finish to complete the USB driver installation. Restart your system when prompted. Proceed to the next chapter. Installing the USB Device Driver - For Windows ® 2000 7.2.3 Power on your computer to start Windows.
- Page 16 Wireless-G Router Easy Start Select Search for a suitable driver for my device (recommended) option and click Next. Click CD-ROM drives option and click Next. At the next prompt, click Next to proceed installation with the indicated driver. You may be prompted with dialog box during installation.
- Page 17 Wireless-G Router Easy Start Click Search removable media option and click Next. Click Finish to complete the first stage of the USB driver installation. Repeat step ii and iii. You may be prompted with Hardware Installation dialog box. (This happens when Windows detects your driver as a new version).
-
Page 18: Configuring Your Internet Browser
Wireless-G Router Easy Start 8 Configuring Your Internet Browser 8.1 Microsoft® Internet Explorer™ (based on IE 5.5) From your Windows desktop, double-click on your Internet Explorer icon to launch your Browser. From the Menu, click Tools and select Internet Options... Select the Connection tab. -
Page 19: Setup Wireless-G Router Via Utility
Wireless-G Router Easy Start 9 Setup Wireless-G Router Via Utility 9.1 For Windows 98 SE/ ME/ 2000/ XP Users ONLY This chapter is only for Windows User, please use the Wireless-G DSL Router Utility Installation CD provided to setup the Wireless-G DSL Router Utility 9.2 Install Wireless-G DSL Router Self-Installation Utility. - Page 20 Wireless-G Router Easy Start Please click “Next” to proceed with the installation of the wireless-G router utility. 19 of 33...
- Page 21 Wireless-G Router Easy Start After installation, a Wireless-G DSL Connection shortcut icon, will be created on the desktop. It will allow the user to connect or disconnect from the Internet. Please read the relevant information and click “Next” to proceed. Please determine which method you want to connect the Wireless-G router to the telephone outlet.
- Page 22 Wireless-G Router Easy Start Please refer to the next screen if you select “Direct Connection”, if you have selected “Connection Via POTS Splitter””, please skip to vi (b) Previously if you have chosen “Connection Via POTS Splitter”, please follow the instructions below.
- Page 23 Wireless-G Router Easy Start 22 of 33...
- Page 24 Wireless-G Router Easy Start Please follow the instructions on how to switch on the power for your wireless-G router. Click “Next” to continue. viii Please make a choice on how you would like to connect to the wireless-G router. You may choose Ethernet or USB.
- Page 25 Wireless-G Router Easy Start a) Please follow the diagram closely on how to setup the connection from your computer to the wireless-G router via Ethernet. Click “Next” to continue. b) Please follow the diagram closely on how to setup the connection from your computer to the wireless-G router via USB.
- Page 26 Wireless-G Router Easy Start Status window will display the processing status of how the wireless-G router is communicating with the computer via Ethernet or USB. Upon success detection of the wireless-G router, the relevant information will be displayed as the screen below. Click “Next” to continue. 25 of 33...
- Page 27 Wireless-G Router Easy Start For connecting to the Internet, please enter the username and password, VPI and VCI provided by your ISP. You need to select the protocol. Click “Next” to continue. For BT Enter PPPoA VC-Mux, VPI 0, VCI 38. For KC (Karoo) PPPoA LLC, VPI 1, VCI 50.
- Page 28 Wireless-G Router Easy Start Note: For better security, you may choose to hide the SSID of your wireless-G router from broadcasting to available clients. However you must manually set you wireless client with the same SSID. You can choose to enable your wireless security option. When enabled you will be able to either manually enter a 26 digit HEX keys or auto-generate the encryption key by clicking on the “Generate”...
- Page 29 Wireless-G Router Easy Start You have now completed setting up your Wireless-G router. A summary page as shown will let you review all the settings. Click “Finish” to confirm or “Back” to make changes. Note: You may want to have a reference of the wireless information to configure your wireless client.
- Page 30 Wireless-G Router Easy Start xvii After saving the configuration, Wireless-G Router Dialup screen will be prompted as shown below. You can confirm your ISP’s Username and Password, and click on “Connect” for connecting to the Internet. xviii Upon successfully connection, the Dialup application will be minimize and an icon will be created at the right-hand bottom of the task bar.
-
Page 31: Setup Wireless-G Router Via Websetup Wizard
Wireless-G Router Easy Start 10 Setup Wireless-G Router Via Websetup Wizard From your Internet Browser, key in 192.168.1.1 login.router at the address bar and hit <Enter> Upon Login successfully, the Setup Wizard page will be displayed. Next click on Begin. You need to enter the Username, Password, VPI and VCI provided by the ISP. - Page 32 Wireless-G Router Easy Start Once you have entered your ISP details then the next You can enter their SSID or let the setup wizard auto-generate a SSID by clicking on “Generate SSID”. You are allowed to select your country standard for wireless LAN in “Country Selection, select a wireless channel and can choose whether to hide the SSID.
- Page 33 Wireless-G Router Easy Start You are able to view the summary to check through the all the information you have entered. It is advisable to either Save or print out the Summary information for entering into your wireless client. Click Finish to complete the setup. A notification for saving of settings and wireless device restarting will be prompted.
- Page 34 Wireless-G Router Easy Start Upon successful connecting to the Internet, this page will be displayed. The Home Page will display all the valid information 33 of 33...
Need help?
Do you have a question about the SAR-600EW and is the answer not in the manual?
Questions and answers