Table of Contents

Related Manuals for Dake SE-712


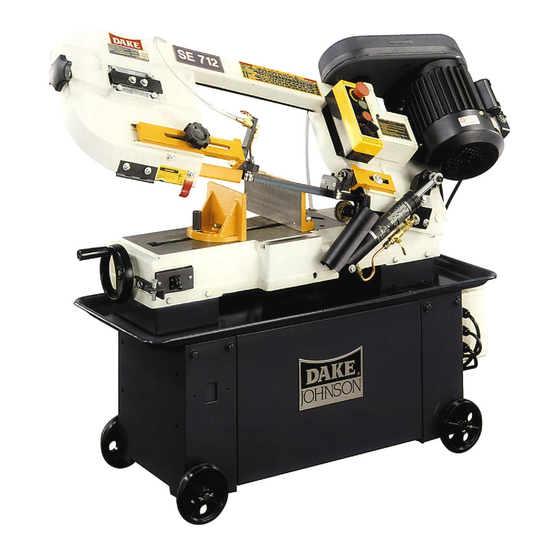
Summary of Contents for Dake SE-712
-
Page 1: Instruction Manual
INSTRUCTION MANUAL MODEL SE-712 METAL CUTTING BANDSAW MACHINE 724 Robbins Road Grand Haven, MI 49417 Phone: 616-842-7110 800-937-3253 Fax: 616-842-0859 800-846-3253 Web: www.dakecorp.com E-mail: customerservice@dakecorp.com - 0 -... -
Page 2: Table Of Contents
Table Of Contents Page No 1 Warning ….………………………………………………………………..… 2 Safety rules for all tools ..…………………………………………………… 3 Specification ………………………………………………………………… 4 Transportation of machine ………………………………………………..… 5 Installation …………………………………………………………………… 6 Minimum Room Space For Machine Operation …………………………… 7 Make proper tooth selection ……………………………………………….… 8 BI-Metal speeds and feeds .…………………………………………………... - Page 3 - 2 -...
-
Page 4: Warning
WARNING: FAILURE TO FOLLOW THESE RULES MAY RESULT IN SERIOUS PERSONAL INJURY As with all machinery there are certain hazards involved with operation and use of the machine. Using the machine with respect and caution will considerably lessen the possibility of personal injury. However, if normal safety precautions are overlooked or ignored, personal injury to the operator may result. - Page 5 B. USE OF MACHINE: (1). REMOVE ADJUSTING KEYS AND WRENCHES. Form habit of checking to see that keys and adjusting wrenches are removed from tool before turning it "on". (2). DON'T FORCE TOOL. It will do the job better and be safer at the rate for which it was designed.
- Page 6 wet locations, or expose them to rain. Keep work area well-lighted. (3). KEEP CHILEREN AND VISITIORS AWAY. All children and visitors should be kept a safe distance from work area. (4). DON’T install & use this machine in explosive, dangerous environment. E.
-
Page 7: Specification
frequently. SPECIFICATION MOTOR 0.55KW ( 3/4HP ) 60Hz 26 40 55 72 MPM Saw Blade Speed 50Hz 21 33 45 60 MPM Blade Size 19.05x0.8x2362 ( Carbon Blade ) Dimension LxWxH (mm) 1229x432x965 N.W / G.W (kgs) 125 / 150 (mm) 90°... -
Page 8: Minimum Room Space For Machine Operation
Transportation Recommendation: (1). Tighten all locks before operation. (2). ALWAYS Keep proper footing & balance while moving this 125kgs machine, and only use heavy duty fiber belt to lift the machine as Fig. A (3). TURN OFF the power before wiring, & be sure machine in proper grounding, Overload &... - Page 9 TOOTH SELECTION You need to consider: 1.The width of the cut. That is, the distance in the cut that each tooth must travel from the point it enters the workpiece until it leaves the workpiece, and 2.The shape of the workpiece. Squares, Rectangles, Flats (Symbol : ) Locate the width of cut on the chart.
-
Page 10: Bi-Metal Speeds And Feeds
NOTE: The band speed and cutting rate recommendations presented on this C a r b o n S t e e l chart are approximations and are to be used as a starting point for most A 3 6 ( S H A P E S ) , 1 0 4 0 2 6 9 8 2 applications. - Page 11 Ni-Cr-Mo 8615,8620,8622 Alloy Steel 4340,E4340,8630 Ni-Cr-Mo 8640, Alloy Steel E9310 Tool Steel A-10 H-11,H-12,H-13 Stainless Steel 410,502 440C 304,324 304L 316,316L TELLTALE CHIPS Chips are the best indicator of correct feed force. Monitor chip information and adjust feed accordingly. Thin or powdered chips – increase feed rate or reduce band speed.
-
Page 12: Assembly
6. ASSEMBLY A 3/4 HP, motor, split phase or capacitor-start it recommended for best economical performance. Counterclockwise rotation is required. Note that rotation can be reversed by ollowing directions given on terminal or nameplate. (1). Assemble the motor Mounting plate to the head using the long bolt Note that the flat side of the plate faces up. -
Page 13: Operation
7. OPERATION WORK SET UP (1). Raise the saw head to vertical position. (2). Open vise to accept the Piece to be cut by rotating the wheel at the end the base. (3). Place workpiece on saw bed. If the piece is long, support the end. (4). - Page 14 BLADE DIRECTION OF TRAVEL Be sure the Made is assembled to the pulleys such that the vertical edge engages the work piece first. BLADE MOVEMENT Blade Direction STARTING SAW Switch button function description (FOR CE ONLY) CAUIION: NEVER OPERATE SAW WITHOUT BLADE GUARDS IN PLACE. Be sure the blade is not in contact with the work when the motor is started.
- Page 15 cutting If the teeth of the Blade are so far apart that they straddle the work, severe damage to the workpiece and to the Made can result . CHANGING BLADE Raise saw head to vertical position and open the blade guards. Loosen tension screw knob sufficiently to allow the saw blade to slip off the wheels.
-
Page 16: Blade Guide Bearing Adjustment
(2). Adjust rear vise to the threaded hole position. (E) (3). Set the scale to the desired angle. (4). Adjust the front vise (F) to parallel the rear vise(E) (5). Tighten the A. B. C. D. Screw. 8. BLADE GUIDE BEARING ADJUSTMENT ATTENTION: This is the most important adjustment on your saw. -
Page 17: Blade Track Adjustment
(front) lightly. 2. Be sure the nut (E) is tightened. 3. Turn the eccentric shaft(B) counterclockwise, when the bearing(D) touches the saw blade properly, tighten the nut(E). 4. To adjust, loosen set screw(F) and move the blade adjustable up or down until it lightly touches the back of the blade(A). -
Page 18: Maintenance
(3). Loosen the hex head screw in the tilting machanism to a point where it is loose but snug. (4). With the machine running, adjust both the set crew and blade tension knob simultaneously to keep constant tension on the blade. The set screw and blade tension knob are always turned in opposite directions, ie, when one is turned clockwise the other is turned counterclockwise. -
Page 19: Lubrication
coating rust proof oil before leaving. (2) Weekly Maintenance (a) Clean and coat the leading screw with oil. (b) Check to see if sliding surface and turning parts lack of lubricant. If the lubricant is insufficant, fill it. (3) Monthly Maintenance (a) Check if the fixed portion llave been loose. -
Page 20: Trouble Shooting
11. TROUBLE SHOOTING Symptom Possible Cause(s) Corrective Action Excessive Blade 1. Materials loosen in vise. 1. Clamp work securely Breakage 2. Incorrect speed or feed 2. Adjust speed or feed 3.Blade teeth spacing too large 3. Replace with a small teeth spacing blade 4. - Page 21 Teeth Ripping from 1. Tooth too coarse for work 1. Use finer tooth blade. Blade. 2. Too heavy pressure; too slow 2. Decrease pressure, speed. increase speed 3. Vibrating work-piece. 3. Clamp work piece 4. Gullets loading securely 4. Use coarser tooth blade or brush to remove chips.
-
Page 22: Circuit Diagram
CIRCUIT DIAGRAM - 21 -... - Page 23 ELECTRICAL SPECIFICATION - 22 -...
-
Page 24: Circuit Diagram
CIRCUIT DIAGRAM - 23 -... - Page 25 ELECTRICAL SPECIFICATION - 24 -...
- Page 26 - 25 -...
- Page 27 - 26 -...
- Page 28 MODEL SE 712 ITEM PART NO. REF NO. DESCRIPTION SPECIFICATION 300935 181107-2 Swivel Base 300757 181108A Acme Screw W002 Washer 1/2"x28xt2 300860 S601 Hex. Socker Headless Screw 1/4"x1/2"L 300758 181606 Wheel-hand 300752 3027-1 Handle 181266 Fixed Bolt W008 Flat washer 3/8"x25xt2 300936 181114...
- Page 29 MODEL SE 712 ITEM PART NO. REF NO. DESCRIPTION SPECIFICATION N005 Hex. Nut 3/8" W014 Washer 3/8"x23xt2 181130 Thumb Screw S022 Hex. Head Screw 5/16"x3/4"L 300944 3021 Stock Stop Rod 300945 181125 Distance Set Bracket S019 Hex. Head Screw 5/16"x1-1/2"L 181112 Support Plate S014...
- Page 30 MODEL SE 712 ITEM PART NO. REF NO. DESCRIPTION SPECIFICATION S708 Cross Round Head Screw 3/16"x3/8"L 181103 Panel 181854 Hose OD16mmxID13mmx260m 300962 181256 Coolant Tank 82-1 300961 Filter 300754 Pump S701 Cross Round Head Screw 1/4"x1/2"L W004 Washer 1/4"x19xt1.5 181852 Coupler 3/8"PT ACC-4( 5)
- Page 31 MODEL SE 712 ITEM PART NO. REF NO. DESCRIPTION SPECIFICATION 300957 K008 5x5x30L CA6003LLU Bearing 301476 181224 Bearing Bushing 300495 C002 C-Retainer ring S607 Hex. Socker Headless Screw 5/16"x1/2"L 300958 181226 Spindle Pulley S604 Hex. Socker Headless Screw 1/4"x3/8"L 300744 181874 Belt 3Vx270...
-
Page 32: L 100
MODEL SE 712 ITEM PART NO. REF NO. DESCRIPTION SPECIFICATION W205 Spring Washer 5/16" S020 Hex. Head Screw 5/16"×1"L 181212 Spring 181213 Blade Adjustable Knob 181207-1 Bushing HCR04 C-Retainer ring 300734 CA6202Z Bearing 300948 181205-2 Idler Wheel 300732 181894 Blade 0.032"x3/4"x93"... - Page 33 MODEL SE 712 ITEM PART NO. REF NO. DESCRIPTION SPECIFICATION 0162 Nozzle Cock Support S416 Hex. Socket Head Screw 5/16"x1-1/4"L 181202 Knob 181202-1 Knob (For CE Only) W005 Washer 1/4"x16xt1.5 300739 181201 Blade Back Cover 300737 181238 Wheel Cover W005 Washer 1/4"x16xt1.5 S701...
- Page 34 MODEL SE 712 ITEM PART NO. REF NO. DESCRIPTION SPECIFICATION 181245 Bushing S708 Cross Round Head Screw 3/16"x3/8"L 181980 Fitting PET(3/8PT)x5/16" 330-1 181602 Pipe Jointer 330-2 181603 Pipe Nut W007 Washer 3/16"x12xt0.8 Wire Nipple 5/8" 181992 Bushing 181993 Cylinder Protector 181301-2 Cylinder Lower Support 301191 181302-2 Cylinder Upper Support...
Need help?
Do you have a question about the SE-712 and is the answer not in the manual?
Questions and answers