Advertisement
Quick Links
Download this manual
See also:
User Manual
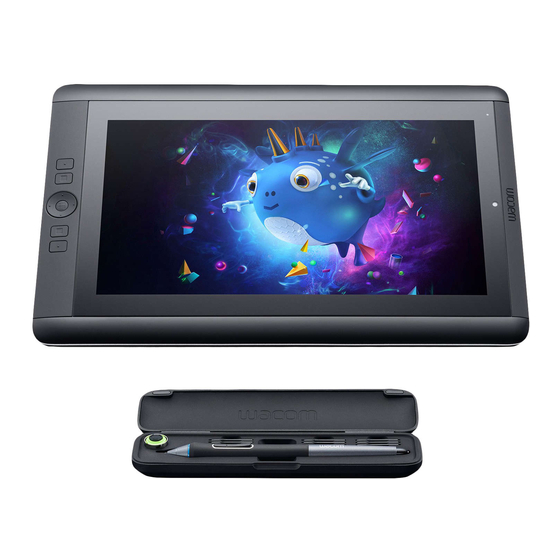
About the Cintiq 13HD
Your Cintiq 13HD creative pen display gives you many different ways to express
yourself. See
Cintiq 13HD features
pen display
for information on system requirements and setup instructions. To
view additional options for using your pen display, see
If you are using the Cintiq 13HD touch (Cintiq 13HDT), you can also use touch to
perform functions directly on your pen display screen using standard gestures.
Your Cintiq 13HD or Cintiq 13HDT can be used with the pen that came with your
product, or a Wacom accessory pen or tool specified for use with your Cintiq.
Please refer to the printed Quick Start Guide provided in the product box for
descriptions of the parts and components for your Cintiq 13HD, and instructions
on how to set it up. The product Help topics will help you make the best use of
your Cintiq. You can access Help from the ? icon in
from the Help dropdown in the
Included with your Cintiq 13HD
When you have unpacked your Cintiq 13HD, make sure that you have received
the following items and accessories:
Cintiq 13HD (or Cintiq 13HDT) creative pen display
Pen
Pen stand
Pen color rings
Pen case and extra nibs
Installation CD (not in all regions)
Quick Start Guide (booklet)
3-in-1 cable
AC power adapter and cable
Plug for AC power adapter
Nib removal tool
Cleaning cloth
Some configurations may include additional CDs or DVDs containing application
software. To install, see the instructions for those CDs or DVDs.
for illustrations of your tablet, and
Wacom Desktop
Getting
Started.
Wacom Tablet
Center.
Using your
Properties, or
Advertisement

Related Manuals for Wacom Cintiq 13HD


Summary of Contents for Wacom Cintiq 13HD
- Page 1 Getting Started. If you are using the Cintiq 13HD touch (Cintiq 13HDT), you can also use touch to perform functions directly on your pen display screen using standard gestures. Your Cintiq 13HD or Cintiq 13HDT can be used with the pen that came with your product, or a Wacom accessory pen or tool specified for use with your Cintiq.
- Page 2 your functions. See Using the Rocker Ring. Status LED: The Status LED should light white when the Cintiq 13HD has power and is connected to an active USB port for each of the following actions: Click with the tool tip...
- Page 3 You can customize the ExpressKeys to execute the functions that make your work quickest and easiest for you. Your Wacom pen display has four or more ExpressKeys, depending on the device. Select the ExpressKeys tab in Wacom Tablet Properties, then choose functions from the dropdown menus.
- Page 4 You can assign the positions of the Rocker Ring and Center Button to various settings, menu and keystroke defaults from the Rocker Ring tab in Wacom Tablet Properties. Important: Some applications can override and control the Rocker Ring functions you select from the Tablet Properties. For details, see Using integrated applications.
- Page 5 The above screenshot is for descriptive purposes; it may not match your screen. Note: The functions can be defined for use with specific applications. However, some applications can override and control the Rocker Ring functions you select from Wacom Tablet Properties. For details, see Using integrated applications.
- Page 6 You can access the Help topics from Wacom Tablet Properties by clicking the ? icon or from the Wacom Desktop Center Help menu. Note: The User Help is common to Windows and Mac computers. Screenshots are...
- Page 7 Information about your specific computer hardware, operating system, and application software is not included. Refer to the product information provided with those products. Stand Setup and Usage In landscape orientation, the Cintiq stand can be used in one of three inclined positions.
- Page 8 From the Wacom Desktop Center, select Updates, and then click the update to install it. If the Wacom Desktop Center is not available for your device, go to Customer Support and select Drivers to find the latest updates.
- Page 9 From the Wacom Desktop Center, select Updates, and then click the update to install it. If the Wacom Desktop Center is not available for your device, go to Customer Support and select Drivers to find the latest updates.
- Page 10 The above screenshot is for descriptive purposes; it may not match your screen. 5. If you are working with multiple monitors, select the monitor corresponding to your pen display from the dropdown menu. 6. Click Calibrate... to activate the calibration screen. 7.
- Page 11 Wacom Tablet Properties, the Display Toggle tab is automatically available when your pen tablet is installed on a multi-monitor system. This tab lets you select the monitor(s) to be included in the toggle sequence.
- Page 12 The above screenshot is for descriptive purposes; it may not match your screen. Active Area options determine the size of the area where the pen will function on the pen display. Force Proportions adjusts the size of the active area to maintain correct ...
- Page 13 Notes: Wacom Desktop Center is not supported by all devices. Wacom Tablet Properties will not launch unless at least one supported pen tablet or pen display is connected to the computer. Settings can only be viewed or changed for an attached pen tablet or pen ...
- Page 14 Pens designed for more advanced artwork, such as an Art Pen or an Airbrush, can be used with many pen tablets and pen displays. To discover other pens and tools that can be used with your pen tablet or pen display, go to the Wacom Store. Use your pen...
- Page 15 You do not have to touch the pen tip to the surface in order to use the button. To see what functions are assigned to the button, look on the Pen tab in Wacom Tablet Properties. If your pen has a long, thin button, press the upper part of the button for ...
- Page 16 Important: You can customize how your pen and pen buttons work by going to Wacom Tablet Properties Advanced Options. Store your pen Storing your pen properly keeps it in good condition and helps the pen tip last longer. Important: Store your pen so there is no pressure on the pen tip or eraser.
- Page 17 You can customize settings for your pen tip feel and pressure, eraser feel, side switch and application-specific pen functions. To customize your pen, choose it from the Tool list in the Wacom Tablet Properties. Select the Pen tab and choose from the available options.
- Page 18 The above screenshot is for descriptive purposes; it may not match your screen. Double-click the pen tip to change its function. At least one tool button should be set to the Click function. The tip must be set to Click in order to draw in most graphics applications. ...
- Page 19 Accessories such as the Art Pen and Airbrush that are compatible with your device are fully supported by the Wacom driver software. They appear in the Tool list after you touch the tablet surface with the tip of the pen. The...
- Page 20 The above screenshot is for descriptive purposes; it may not match your screen. Use the Eraser Feel slider to customize the amount of pressure needed to erase. From the Erase dropdown menu, select the function to perform when using ...
- Page 21 2. Get a replacement nib and slide the end of the new nib straight into the barrel of the pen. 3. Push the nib in slowly and firmly until it stops. Where to find replacement nibs For some devices, the nibs are included in the box with your device or are ...
- Page 22 Review tab in applicable applications. Windows Input Panel: Use handwriting or an on-screen keyboard to directly enter text with your Wacom pen. Note: The Pen Flicks and press-and-hold-to-right-click features are disabled in some graphics applications.
- Page 23 The Pen Feel Details dialog shows the selected pressure sensitivity curve and click threshold settings. Move the pressure controls to change the settings. Click Threshold determines the amount of force required to register pressure or generate a pen click. Sensitivity changes the slope of the pressure response curve.
Need help?
Do you have a question about the Cintiq 13HD and is the answer not in the manual?
Questions and answers