Wacom INTUOS 3 User Manual
For windows & macintosh
Hide thumbs
Also See for INTUOS 3:
- Manual del usuario (88 pages) ,
- User manual (88 pages) ,
- Brochure & specs (8 pages)
Table of Contents
Advertisement
Advertisement
Table of Contents
Troubleshooting

Related Manuals for Wacom INTUOS 3


Summary of Contents for Wacom INTUOS 3
- Page 1 Contents Index User’s manual for Windows & Macintosh ® ® Using a pen Customizing your pen Troubleshooting Using a tablet Customizing your tablet Digital inking Using a cordless mouse Customizing your cordless mouse Customizing the Pop-up Menu Application-specific settings Contents Index...
- Page 2 Copyright © Wacom Co., Ltd., 2007 All rights reserved. No part of this manual may be reproduced except for your express personal use. Wacom reserves the right to revise this publication without obligation to provide notification of such changes. Wacom does its best to provide current and accurate information in this manual.
-
Page 3: Table Of Contents
Contents Index CONTENTS About the manual Customizing the mouse Navigating the manual Customizing mouse buttons Customizing the mouse fingerwheel WORKING WITH INTUOS3 Tablet to screen mapping Intuos3 tablet features Pen mode Intuos3 input tools Mouse mode Intuos3 optional tools Orientation Setting up your work area Screen area Using the Grip Pen... - Page 4 Contents Index Technical support options Intuos3 12x19 / A3 Wide tablet (model PTZ-1231W) Obtaining driver downloads Intuos3 Grip Pen (model ZP-501E) APPENDIX Intuos3 mouse (model ZC-100) Caring for your tablet and tools Intuos3 Airbrush (model ZP-400E) Replacing the pen tip Intuos3 Ink Pen (model ZP-130) Uninstalling the software Intuos3 Art Pen (model ZP-600)
-
Page 5: About The Manual
Note: This manual does not contain information on installing your tablet. Please refer to your product Quick Start Guide and to the automated software installer (located on the Wacom Tablet CD) for details on installing your Wacom tablet. -
Page 6: Navigating The Manual
Contents Index NAVIGATING THE MANUAL Use the navigation controls to move through the manual: Go to front page. CONTENTS Go to table of contents. INDEX Go to index. Go back to previous view. Page back, or page forward. HEADING TEXT Go to beginning of section. -
Page 7: Working With Intuos3
Contents Index WORKING WITH INTUOS3 This section introduces you to the Intuos3 professional pen tablet. Intuos3 consists of a tablet that serves as your work area and the Intuos3 input tools you use on the tablet. The quickest way to learn about Intuos3 is to become familiar with its appearance and features. -
Page 8: Intuos3 Tablet Features
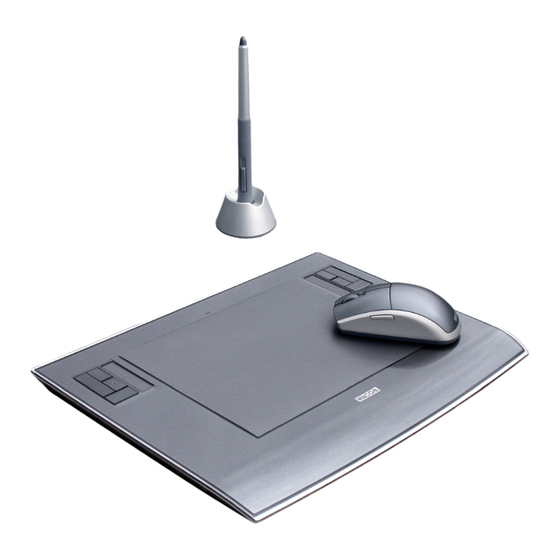
Contents Index INTUOS3 TABLET FEATURES Pen stand. Cable. Recessed cable Status LED. tracks on the back of the tablet allow the cable to exit the top or left of the tablet. Customizable ExpressKeys. Touch Strip controls. Note: 4x5 / A6 and 4x6 / A6 Wide tablet models come equipped with ExpressKeys and a... -
Page 9: Intuos3 Input Tools
Contents Index INTUOS3 INPUT TOOLS Various input tools are available for your tablet. All Intuos3 tools are cordless, battery-free, and ergonomically designed. Each tool also features a unique Tool ID, which enables you to work with multiple tools and to customize each tool differently. The Intuos3 Grip Pen is a pressure-sensitive freehand tool for image editing and creating natural-looking pen and brush strokes. -
Page 10: Intuos3 Optional Tools
For information on these and other available Intuos3 tablets, tools, or parts and accessories, see ordering parts and accessories. Visit Wacom’s web site for a list of applications supporting the Art Pen rotation and Airbrush fingerwheel features. See product information. -
Page 11: Setting Up Your Work Area
Note: Wacom makes no representation, promise or guarantee that Wacom products will cure or prevent, in whole or in part, mouse-induced repetitive stress symptoms, injuries or conditions. Individual results may vary. Always obtain competent medical advice to determine the most appropriate treatment for your specific situation. -
Page 12: Using The Grip Pen
Contents Index USING THE GRIP PEN The Intuos3 Grip Pen is cordless, battery-free, and pressure sensitive. There are four basic techniques for using the pen: pointing, clicking, double-clicking, and dragging. With a bit of practice, using the pen will become second nature to you. If you are unfamiliar with using the pen, try the exercises on the following pages. -
Page 13: Pointing
Contents Index POINTING The Intuos3 pen positions the pointer (or cursor) on your screen. You can position the screen cursor two different ways, like a pen (P mode) or like a mouse (M mode). OUSE • In P mode, the tablet’s active area is a mapped representation of your computer screen where every point on the active area corresponds to exactly one point on the display screen;... -
Page 14: Clicking
Contents Index CLICKING You typically click to highlight or select something on the screen, and double-click to open it. Clicking. To click, tap the pen tip once on the tablet, or press the pen tip on the tablet with enough force to register a click. -
Page 15: Using The Side Switch
Contents Index USING THE SIDE SWITCH The Intuos3 Grip Pen is equipped with a DuoSwitch. This switch has two programmable functions that can be selected by rocking the switch in either direction. You can use the DuoSwitch whenever the pen tip is within 6 mm (0.25 inch) of the tablet’s active area. -
Page 16: Drawing With Pressure-Sensitivity
Contents Index DRAWING WITH PRESSURE-SENSITIVITY The Intuos3 pen responds to the nuance and inflection of your hand movements, enabling you to create natural-looking pen and brush strokes. Many graphics applications have drawing tools that respond to the pressure you place on the pen. For example, in some drawing programs sliders are used to vary brush characteristics (width, color, and opacity). -
Page 17: Erasing
Contents Index ERASING The eraser on the Intuos3 pen works like the eraser on a pencil. In graphics applications that support the pen’s eraser, you can erase intuitively and naturally. When you use the pen’s eraser, the application will automatically switch to the eraser tool. In applications that support pressure sensitivity, you can select pressure-sensitive tools in an application’s tool palette to vary the width and depth of your erasures as you change the amount of pressure you exert upon the pen. -
Page 18: Eye-Hand Coordination Exercise
Contents Index EYE-HAND COORDINATION EXERCISE If you use a mouse, you may remember how long it took to get used to positioning the screen cursor. Your Intuos3 Grip Pen, likewise, will take a bit of practice to master the technique of positioning the screen cursor in P mode. -
Page 19: Using The Mouse
Contents Index USING THE MOUSE The Intuos3 mouse is a cordless, battery-free, maintenance-free mouse that works on any Intuos3 tablet. The left and right side buttons are set for B functionality within your Internet browser. ORWARD The right button is set to R IGHT by default, and displays LICK... -
Page 20: Using The Airbrush And Art Pen
Be sure to see the Intuos3 Tips and Tricks located on the Wacom Tablet CD for more information on using the Art Pen. Visit Wacom’s web site to learn where to purchase an Intuos3 Airbrush or Art Pen, and which applications currently support the Airbrush fingerwheel or Art Pen rotation. See product information. -
Page 21: Working With The Tablet
Contents Index WORKING WITH THE TABLET The middle area of the Intuos3 tablet is the working, or active, area for the pen and mouse. Rest your hand on the tablet and then work with the pen on the active area of the tablet just as if you were using a ball point pen on a piece of paper. -
Page 22: Using Expresskeys
Contents Index USING EXPRESSKEYS Press the ExpressKeys with your secondary hand to toggle between tools or change tool properties while you are using your primary hand to work with your pen on the Intuos3 tablet. The default settings were chosen to optimize your workflow in Photoshop and other graphics applications, using the following modifier keys and functions: Button 1: C modifier key for Windows. -
Page 23: Using The Touch Strips
Contents Index USING THE TOUCH STRIPS Slide your finger over the Touch Strip to quickly zoom in or out, scroll up or down, or perform other functions with your secondary hand while using your dominant hand to work with your pen or mouse. You can also set each Touch Strip to issue custom keystrokes. -
Page 24: Customizing
After you master the basics of using your Intuos3 professional pen tablet, you may want to customize the way Intuos3 works. This chapter describes how to use the Wacom Tablet control panel to adjust your Intuos3 tablet and tool settings. -
Page 25: Control Panel Overview
Contents Index CONTROL PANEL OVERVIEW Use the Wacom Tablet control panel to customize Intuos3. The upper portion of the control panel displays icons representing your s, and the A s with customized tool settings. ABLET PPLICATION Choose F UNCTIONS customize your tablet control and Pop-up Menu settings. -
Page 26: Control Panel Settings
Intuos3 tool(s). CONTROL PANEL SETTINGS Use these sections as a reference when working with the Wacom Tablet control panel; they provide detailed information about each tab and some of the more complex topics. Many of the sections also contain useful customizing tips. -
Page 27: Customizing The Pen
Index CUSTOMIZING THE PEN Customizing your Intuos3 pen is easy. First open the Wacom Tablet control panel using the pen. The pen will be selected in the T list and the appropriate tabs will be displayed. Select a tab and choose from the available options. -
Page 28: Adjusting Tip Feel And Double-Click
Contents Index ADJUSTING TIP FEEL AND DOUBLE-CLICK To adjust the tip sensitivity of your Intuos3 pen, select the P tab. To create broad brush strokes or to click with a light touch, use a soft tip setting. For maximum control while drawing thin lines, use a firm tip setting. Customizes the amount of pressure needed to click or draw. -
Page 29: Adjusting Eraser Feel
Contents Index ADJUSTING ERASER FEEL To adjust the eraser sensitivity of your Intuos3 pen, select the E tab. To erase with a broad stroke or to RASER click with a light touch, use a soft eraser setting. For maximum control while erasing, use a firm eraser setting. -
Page 30: Advanced Tip And Eraser Pressure Settings
Contents Index ADVANCED TIP AND ERASER PRESSURE SETTINGS To further customize tip or eraser pressure settings, from the P or E tab click on the D RASER ETAILS button to display the F dialog box. The options within this dialog box enable you to change the ETAILS tip or eraser pressure sensitivity and click threshold settings independently. -
Page 31: Customizing Tool Buttons
Contents Index CUSTOMIZING TOOL BUTTONS Select the P tab to change the functions assigned to the side switch and tip of your Intuos3 pen. Each tool button can be set to simulate a variety of mouse functions; the pull-down menus enable you to choose the function that will be performed. -
Page 32: Button Functions
Contents Index BUTTON FUNCTIONS The following list describes the options available for tool button, tablet control, or Pop-up Menu settings. Please note that not all options are available for all controls. . This option simulates a primary mouse button click. Be sure at least one LICK button performs this function so you can always navigate and click. - Page 33 Contents Index . (Macintosh.) Toggles the Ink A function of Inkwell on and off. OGGLE NYWHERE Inkwell automatically recognizes and converts your handwriting into text and inserts it into a document. Note that Ink must be turned on for this function to work. See your Macintosh help for information on working with Inkwell.
- Page 34 Contents Index • Keystroke..Enables you to simulate keystrokes. Selecting this option displays the D EFINE EYSTROKE dialog box where you can enter a keystroke or keystroke sequence to play back. You can manually enter a keystroke or keystroke combination in the K entry box.
- Page 35 Contents Index • . Lets you position a document or image in any direction within the active application CROLL window by pressing a button set for P and then dragging with the pen tip across the tablet’s CROLL active area. When you select P , the P CROLL...
- Page 36 Contents Index • ..Toggles between P mode and M mode. When first setting a tool button to OGGLE OUSE ..., the M dialog box is displayed where you can adjust the mouse acceleration OGGLE OUSE and speed. Sets the screen cursor tracking speed when in M mode OUSE...
-
Page 37: Customizing Tilt Sensitivity
Note: Tilt is direction-sensitive and can be used in some applications to control brush orientation. Returns the tab settings to their factory default conditions. Visit Wacom’s web site for a list of applications that currently support tilt. See product information. Contents Index... -
Page 38: Customizing The Mouse
Working with application-specific settings CUSTOMIZING MOUSE BUTTONS To modify your Intuos3 mouse button settings, use your mouse to open the Wacom Tablet control panel and select the M tab. As with the Intuos3 pen, you can select a function to perform for each button from the OUSE pull-down menus. - Page 39 Index CUSTOMIZING THE MOUSE FINGERWHEEL By default, the fingerwheel controls scrolling in most windows and applications. To customize the fingerwheel, use your Intuos3 mouse to open the Wacom Tablet control panel and select the M tab. OUSE These options control the fingerwheel function.
-
Page 40: Tablet To Screen Mapping
Contents Index TABLET TO SCREEN MAPPING To change the relationship between tool movement on your tablet surface and cursor movement on the monitor screen, select the M tab. The M options control how the screen cursor moves: APPING • Select P mode to set the screen cursor so that its movement corresponds with the position of your Intuos3 tool on the tablet –... -
Page 41: Mouse Mode
Contents Index MOUSE MODE The default M for the Intuos3 mouse is M mode. OUSE With M mode selected, the M tab looks like this: OUSE APPING The M you select controls how the screen cursor moves. In M mode, OUSE the screen cursor moves with relative positioning. -
Page 42: Screen Area
Contents Index SCREEN AREA In the M tab, the S options allow you to define which portion of the display screen your APPING CREEN tablet will map to: • . When selected, the entire monitor(s) area is mapped. This is the default setting. See mapping to multiple monitors for more information. -
Page 43: Force Proportions
Contents Index FORCE PROPORTIONS Check or uncheck the M tab’s F box to determine the tablet to screen mapping APPING ORCE ROPORTIONS relationship. When F ORCE ROPORTIONS unchecked, the correct scale or proportions are not maintained. The selected tablet area is mapped to the selected display area. -
Page 44: Tablet Area
Contents Index TABLET AREA The M tab’s T options allow you to define the tablet area that will be mapped to the screen APPING ABLET area: • . When selected, the entire active area of the tablet is used for tablet to display mapping. This is the default setting. -
Page 45: Mapping To Multiple Monitors
After you have correctly configured your computer for use with multiple monitors, you can then adjust the tablet mapping by opening the Wacom Tablet control panel and changing the appropriate options. When your system is configured with multiple monitors, you can assign the D... -
Page 46: Customizing The Tablet Functions
CUSTOMIZING THE TABLET FUNCTIONS It is as easy to customize your Intuos3 tablet as it is to customize the Intuos3 pen or mouse. Simply open the Wacom Tablet control panel and select the F icon in the T list. Select a tab to customize, UNCTIONS and change settings using the available options. -
Page 47: Customizing Expresskeys
Contents Index CUSTOMIZING EXPRESSKEYS Each key can be customized to perform a modifier, keystroke, display toggle, or other function. When you select the ExpressKeys tab, the currently selected function of each key appears in the corresponding pull- down menu. See using ExpressKeys for the default key settings, and button functions for a description of the available options. -
Page 48: Customizing Tablet Touch Strips
Contents Index CUSTOMIZING TABLET TOUCH STRIPS When you select the tablet T tab, the currently set function of each Touch Strip is displayed. OUCH TRIP Each Touch Strip can be customized to issue zooming, scrolling, or keystroke actions. You can also disable a Touch Strip until you choose to assign a new function or renew the default settings. - Page 49 Contents Index • Touch Strip scroll settings. Each tablet Touch Strip can be customized to issue scrolling only actions. When S is selected, an up or down motion on the Touch Strip will cause a scroll up or down action CROLL in most applications.
- Page 50 Contents Index • Touch Strip zoom settings. Each tablet Touch Strip can be customized to issue zoom only actions. When Z is selected, an up or down motion on the Touch Strip will cause a zoom in or out action in most graphics applications.
-
Page 51: Advanced Touch Strip Settings
Contents Index ADVANCED TOUCH STRIP SETTINGS The tablet Touch Strips can be further customized within the A dialog box. DVANCED OUCH TRIP ETTINGS When you click on the T OUCH TRIP tab’s A ... button, the DVANCED DVANCED OUCH TRIP ETTINGS dialog box is displayed. -
Page 52: Customizing The Pop-Up Menu
Contents Index CUSTOMIZING THE POP-UP MENU Use the P tab to define the available functions on the Pop-up Menu list. ENUS To display the Pop-up Menu, set one of your tool buttons to the P function. Whenever you press that button, the Pop-up Menu is displayed. Select from available items in the Pop-up Menu by clicking on them. -
Page 53: Working With Display Toggle
(the current setting from the M tab) and each of the APPING monitors sequentially. In the Wacom Tablet control panel, the D tab is automatically available when the Intuos3 ISPLAY OGGLE tablet is installed on a multi-monitor system. This tab lets you set which display will be included in the toggle sequence. -
Page 54: Working With Multiple Tools
WORKING WITH MULTIPLE TOOLS The Wacom Tablet control panel is designed to help you customize and keep track of your Intuos3 tool settings. The tool you use to open the control panel is automatically selected, and the appropriate tabs for that tool are displayed. - Page 55 Contents Index WORKING WITH APPLICATION-SPECIFIC SETTINGS You may wish to customize a tool for use with a particular application. For example, you may want a firm pen tip pressure setting in one application and a soft pressure setting in another. The A list PPLICATION enables you to add an individual application to the list and then customize your tool settings for that...
- Page 56 Contents Index CREATING AN APPLICATION-SPECIFIC SETTING To create an application-specific setting, first choose the tablet and tool for which you want to create an application-specific setting. Then click on the A list’s [ + ] button to display the A PPLICATION PPLICATION dialog box.
- Page 57 Contents Index CHANGING SETTINGS FOR A SPECIFIC TOOL AND APPLICATION To change tool settings for a specific application, select the tool and the application and then customize the tab settings. REMOVING APPLICATION-SPECIFIC SETTINGS To remove an application-specific setting: 1. In the T list, select the tool from which you want to remove the application-specific setting.
-
Page 58: Troubleshooting
Index TROUBLESHOOTING Most of the time your tablet will work flawlessly. But if you are having trouble, Wacom recommends you do the following: 1. If the Wacom tablet driver failed to load properly, first perform the recommended action in any error message that may appear on your screen. -
Page 59: Testing Your Tablet
Connect the tablet to a different powered USB port or try connecting to the powered USB port on another computer. Note: For best results when troubleshooting no power to the tablet (status LED does not light), Wacom recommends plugging the tablet directly into the system USB port located on your computer. -
Page 60: Testing Your Tools
[ – ] button. After the tool has been removed, place it back onto the tablet and the tool will be re-added to the T list with its default settings. Open the Wacom Tablet control panel and click on the A button. In the dialog box that appears, click on BOUT the D ... -
Page 61: Testing The Expresskeys
Contents Index TESTING THE EXPRESSKEYS 1. With the D dialog box open, observe the T column as you test the ExpressKeys. IAGNOSTICS ABLET If you have more than one tablet connected to your system, be sure to select the tablet in the T ABLET column. -
Page 62: Testing A Pen
Contents Index TESTING A PEN 1. While observing the P column, bring your Intuos3 tool within 6 mm (0.25 inch) of the OINTING EVICE tablet’s active area. A value for P , the D , and a D S/N (serial ROXIMITY EVICE EVICE... -
Page 63: Testing A Mouse
Contents Index TESTING A MOUSE 1. With the D dialog box open, place the Intuos3 mouse on the tablet’s active area and test the IAGNOSTICS buttons by clicking each button. The tablet status LED should change color, and the S state WITCHES should change for each button you click. -
Page 64: Troubleshooting Tables
Make sure the tablet driver software is installed and functioning. Insert the OUSE not draw with pressure Wacom Tablet CD into your computer and install the driver software for the sensitivity. tablet. The pen does not draw Some applications require that you turn on the pressure capabilities within with pressure sensitivity. - Page 65 (see adjusting tip feel and double-click). Windows: Try setting your system to launch programs with a single click. See clicking. The pen selects Open the Wacom Tablet control panel and go to the P tab. Move the T everything, will not stop slider toward F , or select the D ...
- Page 66 – do this without pressing down on the pen tip. From the Wacom Tablet control panel, verify that the side switch is set to the function you are expecting to occur for the application and tool that you are using.
- Page 67 OUSE WINDOWS-SPECIFIC PROBLEMS After changing right- and This action will reverse the right and left button settings on your Wacom left- handed settings in the tools. Restart Windows for your Wacom tool settings to be correctly computer’s mouse control recognized.
- Page 68 YSTEM REFERENCES recognition. 4. Test the Inkwell function using your Wacom tablet and pen. 5. If this procedure does not resolve your problem with Inkwell, contact Apple Support for further assistance. Wacom is not the software manufacturer for Inkwell and we are limited in our abilities to support a third party software application.
-
Page 69: Technical Support Options
Index TECHNICAL SUPPORT OPTIONS If you have a problem with your Wacom tablet, first check the tablet installation guide to be sure the unit is installed correctly. Then review the troubleshooting procedures within this manual. If you cannot find the answer in this manual, you may find updated information about your problem in the Read Me file for your platform (located on the Wacom Tablet CD). -
Page 70: Obtaining Driver Downloads
Index OBTAINING DRIVER DOWNLOADS Wacom periodically updates the tablet software driver to maintain compatibility with new products. If you are having a compatibility problem between Intuos3 and a new hardware or software product, it may be helpful to download a new Wacom tablet software driver (when available) from the Internet. -
Page 71: Appendix
Contents Index APPENDIX This section contains information and tips on caring for your tablet and tools, instructions on how to uninstall the tablet software, information about digital inking, your license and warranty, and more. Caring for your tablet and tools Uninstalling the software Changing the tablet mode Installing multiple tablets... -
Page 72: Replacing The Pen Tip
To order replacement parts, see other parts and accessories. UNINSTALLING THE SOFTWARE Follow the appropriate procedure below to remove the Wacom tablet driver software from your system. Important: When you remove the Wacom tablet software from your system, your Wacom tablet will no longer operate with full tablet functionality but will continue to function as a mouse device. -
Page 73: Changing The Tablet Mode
• If multiple tablets are installed, the tablet used to open the Wacom Tablet control panel is selected as the default tablet. To remove one of multiple tablets from the driver, in the Wacom Tablet control panel select the tablet to be deleted and click on the [ –... -
Page 74: Working With Application-Specific Settings
Contents Index INTUOS3 LENS CURSOR Available for use with 12x12 / A4 Oversize and 12x19 / A3 Wide tablet models, the lens cursor is an ideal tool for entering precise coordinate position information into your computer. The lens cursor reports the position of the cross-hair to the computer. -
Page 75: Customizing The Lens Cursor
Index CUSTOMIZING THE LENS CURSOR To modify your Intuos3 lens cursor button settings, use your lens cursor to open the Wacom Tablet control panel and select the M tab. As with the Intuos3 pen, you can select a function to perform for each OUSE button from the pull-down menus. -
Page 76: Working With Autocad
Intuos3 with tablet menus or to digitize drawings to proper scale, you will need to follow the procedures below. Note: To configure the lens cursor or mouse for left handed use in AutoCAD or similar applications, open the Wacom Tablet control panel, click on O ... and select L in the H group. - Page 77 Contents Index CONFIGURING TABLET MENUS AND SCREEN POINTING AREAS IN AUTOCAD A screen pointing area is a rectangular region on the tablet surface where the tablet acts like a system mouse. When the pointer is within a screen pointing area, the tablet can access windows, menus, and other applications outside AutoCAD’s drawing area.
-
Page 78: Calibrating Intuos3 For Autocad
Contents Index CALIBRATING INTUOS3 FOR AUTOCAD If you are using Intuos3 to digitize a drawing, you will need to calibrate Intuos3 with the paper drawing’s coordinate system. The calibration allows you to digitize points from the paper drawing into the appropriate coordinate system of your drawing file. -
Page 79: Pen And Digital Ink Capabilities In Windows Vista
Contents Index PEN AND DIGITAL INK CAPABILITIES IN WINDOWS VISTA Microsoft Windows Vista provides extensive support for pen and touch input. When using the pen tablet with a computer running Windows Vista, your experience is enhanced by powerful note taking, handwriting recognition, fast navigation, and other digital inking options designed to give you quick, intuitive results with the Intuos3 pen. -
Page 80: About The Windows Vista Tablet Pc Input Panel
Microsoft Office applications. Be sure to take advantage of the Windows Vista training tools, including the Tablet PC tutorial, available from Microsoft. You can visit also the Wacom web site at www.wacom.com/vista for additional information on working with your Intuos3 pen in Windows Vista. -
Page 81: Intuos3 4X6 / A6 Wide Tablet (Model Ptz-431W)
Contents Index PRODUCT SPECIFICATIONS GENERAL SPECIFICATIONS FOR ALL INTUOS3 TABLETS Coordinate resolution 200 lpmm (5080 lpi) Accuracy, pen +/- 0.25 mm (0.010 in) Accuracy, mouse +/- 0.5 mm (0.020 in) Accuracy, lens cursor +/- 0.15 mm (0.006 in) Tilt range (all pens) +/- 60 degrees (+/- 50 degrees on Intuos3 4x5 / A6 and 4x6 / A6 Wide tablets) Reading height 6 mm (0.25 in) -
Page 82: Intuos3 6X11 / A5 Wide Tablet (Model Ptz-631W)
Contents Index INTUOS3 6X11 / A5 WIDE TABLET (MODEL PTZ-631W) Active area (W x D) 271.0 x 158.8 mm (10.68 x 6.26 in) Physical size (W x D x H) 417.6 x 262.0 x 14.0 mm (16.5 x 10.3 x 0.6 in) Weight 1.4 kg (3.1 lb), approximately INTUOS3 9X12 / A4-REGULAR TABLET (MODEL PTZ-930) -
Page 83: Intuos3 Airbrush (Model Zp-400E)
Contents Index INTUOS3 AIRBRUSH (MODEL ZP-400E) Fingerwheel travel 10 mm (0.39 in) Fingerwheel resolution 1024 levels Pressure levels 1024 levels Eraser tip travel 1.3 mm (0.05 in), approximately Physical size (L x W x D) 162.5 x 17.5 x 32.5 mm (6.40 x 0.69 x 1.28 in) Weight 23.1 g (0.81 oz), approximately The Airbrush is an optional accessory. -
Page 84: Product Information
Wacom’s web site at http://www.wacomdirect.com (USA only). To purchase parts and accessories in Europe, call +49 (0)180.500.03.75 or send an email to spareparts@wacom.eu. Or, visit www.wacom.eu/solutionstore. You can also contact your local dealer, distributor, or technical support using the appropriate number for your region. - Page 85 Contents Index Intuos3 Grip Pen (ZP-501E). Sensitive to pressure and tilt, the Grip Pen is an all-purpose tool for use in drawing, erasing, and mouse operations. The easy-to-use DuoSwitch gives you two programmable switch functions. The pressure-sensitive pen has an ergonomic, waisted and rubberized grip area, optimum weight and balance, and superior tip sensitivity, making it the most natural freehand tool.
-
Page 86: Other Parts And Accessories
Contents Index OTHER PARTS AND ACCESSORIES Description Part Numbers Pen stand, for Grip Pen PST-A034 Replacement nibs for Grip Pen, Airbrush, or Classic Pen Standard nibs (white) PSI-A007 Stroke nibs PSI-A042 Stroke nibs are spring-loaded, providing additional tactile feedback when you are working with the Grip Pen. Airbrush, or Classic Pen. Stroke nibs are gray in color and are installed in the same manner as a standard pen nib. -
Page 87: Radio And Television Interference
EN 55022 Class B (electromagnetic emissions) Based on the results of these tests, Wacom declares that the above mentioned devices conform to Article 10.1 of the European Council Directive 89/336/EEC, and their amendment Directive 93/68/EEC, and indicates this conformity by the CE-sign on each device. -
Page 88: Software License
CD-ROM (the “Software”). The Software is licensed, not sold, to you for use only with Wacom products upon the terms of this license, and Wacom reserves any rights not expressly granted to you. Wacom grants to you a non-exclusive right to use this copy of the Software in conjunction with a Wacom product at a single location. -
Page 89: Warranty Service In The U.s.a. And Canada
ABOVE LIMITATION OR EXCLUSION MAY NOT APPLY TO YOU. In the event that any of the above limitations are held unenforceable, Wacom’s liability for any damages to you or any party shall not exceed the purchase price you paid, regardless of the form of any claim. -
Page 90: Warranty On Sales Outside Of The U.s.a. And Canada
For local distributor contact information, please visit: http://www.wacom-asia.com/distributor/dist_index.php Phone: +81-3-3509-1588 Inquiry form: http://club.wacom.co.jp/support-en/servlet/support.user.Swusr200Sv00 Should you have any questions about this Agreement, or if you desire to contact Wacom for any reason, please contact in writing: In North and South America contact:... -
Page 91: Software License Agreement
The purchase of this product from your dealer does not include Wacom's software and the associated rights of usage. Wacom grants you, the user, the right to use the software solely in accordance with the conditions of this software license agreement. By purchasing this product you agree to the terms of this license. - Page 92 Contents Index Wacom shall have no responsibility to repair or replace the product if (a), in the opinion of Wacom, the failure of the product has resulted from accident, abuse, misuse, negligence, misapplication, or unauthorized modification or repair, or (b) the product has been handled or stored other than in accordance with Wacom’s storage instructions, or (c) the failure is due to normal wear and tear, or (d) you fail to fulfill your obligations as described above.
-
Page 93: Glossary
Depending on your system and applications settings, the handwritten text you make with digital ink can be converted on-the-fly or at another time. Double-click assist. A function of the Wacom Tablet control panel that makes it easier to double-click by setting the size of the double-click distance. - Page 94 Contents Index Mouse speed. A setting that allows you to adjust the speed at which your screen cursor moves when your Intuos3 tool is in mouse mode. Nib. The replaceable pen tip. Pen mode. A method of positioning the screen cursor. Wherever you place your Intuos3 tool on the tablet, the screen cursor will jump to the corresponding point on the screen.
-
Page 95: Index
Contents Index INDEX About the manual Pop-up Menu Accessories and parts tablet ordering ExpressKeys other parts and accessories Touch Strips Adding a new tool tablet to screen mapping Airbrush tilt sensitivity holding tip feel replacing the tip advanced using tool buttons Application-specific settings Touch Strips changing settings... - Page 96 Contents Index Functions, button pointing with General problems, troubleshooting replacing the tip Holding testing Airbrush using using side switch Industry Canada notice Pen mode Information, product Pointing, with pen Input tools, features Pop-up Menu, customizing Installing multiple tablets Pressure sensitivity, drawing with Product information Interference, radio and television Lens cursor...
- Page 97 Windows-specific problems tablet Touch Strips Uninstalling software tablets Using tools Airbrush Tilt Art Pen drawing with mouse sensitivity, customizing mouse fingerwheel Tip feel, customizing advanced Wacom international offices Tip, replacing Windows-specific problems, troubleshooting Work area, setting up Contents Index...
- Page 98 Internet: http://tablet.wacom.co.jp Telephone General: +81.3.5309.1513 Fax: +81.3.5309.1514 Wacom China Corporation Wacom Digital Solutions Co., Ltd. 1108 Block One, Kuntai International Bldg Gangnam Telepia B/D 9th Fl, 662-18 12 Chao Wai Street, Chao Yang District Yeoksam-dong, Gangnam-gu, Seoul, 135-080 Beijing, China 100020...
Need help?
Do you have a question about the INTUOS 3 and is the answer not in the manual?
Questions and answers