
Related Manuals for Lasertec LDM120


Summary of Contents for Lasertec LDM120
- Page 1 L D M 1 2 0 1 2 0 L A S E R D I S T A N C E M E A S U R E R I N S T R U C T I O N M A N U A L...
- Page 2 SAFETY Read the following safety instructions before attempting to operate this product. SAVE ALL WARNINGS AND INSTRUCTIONS FOR FUTURE REFERENCE. WARNING: Read ▪ Do not place the laser in a understand all instructions. position which cause ▪ anyone intentionally Use the laser measurer only with the specified batteries.
-
Page 3: Item Checklist
ITEM CHECKLIST Please ensure the following items are included with your laser distance measurer. If anything is missing please contact your retailer. Lasertec LDM120 Carry pouch Rechargeable Carry strap USB cable batteries... -
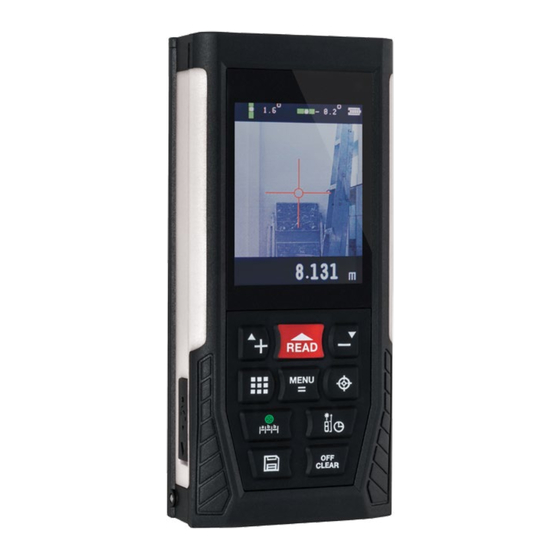
Page 4: Product Overview
PRODUCT OVERVIEW LASER MEASURER FRONT Laser emitter LCD screen Control panel USB connection port... - Page 5 LASER MEASURER BACK End piece 1/4" thread for Battery compartment operation on a tripod Unfold the end piece to access the battery compartment. LASER MEASURER BOTTOM Wrist strap attachment End piece...
-
Page 6: Control Panel
CONTROL PANEL Subtraction / scroll down Camera Read (laser emission on) Addition / scroll up Multi-function Digital bubble vial / staking out Data storage Menu / equal Power off / clear Benchmark / timer... -
Page 7: Display Screen
DISPLAY SCREEN Laser emission on Reference point Measuring mode Tilt angle Battery level 45.9° Measurement display Main measurement display Unit Measuring mode Backlight time Measurement timer Auto power off time Volume on / off Distance unit Angle unit (° or %) -
Page 8: Operation
USING YOUR LASER MEASURER POWER SUPPLY ▪ The instrument is supplied with three 1.2v AAA Ni-Mh rechargeable batteries. To replace batteries, unfold the endpiece and remove the battery door at the back of the device. Place batteries according to polarity and replace battery door. ▪... - Page 9 Unit setting a) The unit default setting is 0.000m. To reset the current unit of measurement press the menu / equal button. b) Press the subtraction / scroll down button to scroll down to the distance unit setting. c) Press the menu / equal button to adjust the units. Press the addition / scroll up button or the subtraction / scroll down button to scroll through the unit options.
-
Page 10: Single Measurement
MEASUREMENT Single measurement a) Press the read button. The laser will be emitted. b) Re-press the read button for a single distance measurement. Results will be displayed on the main measurement display. c) The previous three measurements will also be displayed above the main measurement display. -
Page 11: Area Measurement
Area measurement a) Press the multi-function button. Two rectangles will appear on the display screen. b) Press the read button to measure the first edge (width). c) Press the read button to measure the second edge (length). d) Area will be calculated automatically with results shown on the display screen. - Page 12 Pythagoras measurement To calculate the unilateral distance of a triangle pythagorean mode can be used. When taking measurements of the triangle, ensure the length of the right side is shorter than the length of the hypotenuse. If not, the instrument will display an error signal. To ensure the accuracy of measurement, take measurements from the same starting point of the first order hypotenuse.
- Page 13 2. Calculate the side of a right angle triangle Press the multi-function button four times to enter pythagorean mode. Follow the instructions displayed on the screen as follows: a) Press the read button to measure the length (a) of the hypotenuse. b) Press the read button to measure the length (b) of the rectangular side.
- Page 14 4. Calculate the third side of a triangle Press the multi-function button six times to enter pythagorean mode. Follow the instructions displayed on the screen as follows: a) Press the read button to measure the length (a). b) Press the read button to measure the length (b). c) Press the read button to measure the length (c).
-
Page 15: Other Functions
6. Calculate the area of an irregular triangle Press the multi-function button eight times to enter pythagorean mode. Follow the instructions displayed on the screen as follows: a) Press the read button to measure the length (a). b) Press the read button to measure the length (b). c) Press the read button to measure the length (c). - Page 16 Adding and subtracting single measurement Addition a) Take the first reading by pressing the read button. b) Press the addition / scroll up button. A “+” symbol will appear on the display screen. c) Take the second reading by pressing the read button. The values will be added automatically with the results shown on the display screen.
- Page 17 Adding and subtracting volume measurement a) Take the volume measurement as described in the Volume Measurement section (pg 11) . b) Press the addition / scroll up button or the subtraction / scroll down button. A “+” or “-” symbol will appear on the display screen. c) Take the second volume measurement as described in the Volume Measurement section (pg 11) .
- Page 18 Multi-directional electronic bubble vial a) Press and hold the staking out / digital bubble vial button. b) Press the off / clear button to exit. Vertical angle axis Horizontal angle axis Camera The camera function assists with targeting the laser diode in long range measurements and in bright sunlight.
- Page 19 Area / volume /pythagoras measurement with camera a) The camera can also be used during area, volume or pythagoras measurement. Press the multi-function button to enter the desired measurement mode. b) Press the camera button to view the target area through the camera.
- Page 20 MENU OPTIONS Navigating the menu a) Press the menu / equal button to enter the menu. b) Press the addition / scroll up button or the subtraction / scroll down button to scroll through the menu settings. c) Press the menu / equal button to adjust the setting. Press the addition / scroll up button or the subtraction / scroll down button to scroll through the options.
-
Page 21: Troubleshooting
TROUBLE SHOOTING Error code Cause & solution Signal is too weak. ERR1 Measure target locations that have stronger reflecting surfaces. Signal is too strong. ERR2 Measure target locations that have weaker reflecting surfaces. Battery voltage too low. ERR3 Charge or replace batteries. Memory damage. -
Page 22: Warranty
▪ To remove dust, clean the instrument with a damp, soft cloth. WARRANTY The Lasertec LDM120 comes with a 3 year manufacturers warranty. AUSTRALIA "Our goods come with guarantees that cannot be excluded under the Australian Consumer Law. You are entitled to a replacement or refund for a major failure and for compensation for any other reasonably foreseeable loss or damage. -
Page 23: Specifications
SPECIFICATIONS Specifications Lasertec LDM120 Product code 91425 Accuracy ±1mm Minimum measurement range (top 0.05m reference point) Maximum measurement range 120m Minimum unit displayed 0.05mm Measurement unit options m/in/ft Continuous measurement function Area measurement function Volume measurement function Add and subtract measurement function... - Page 24 ww w.spo ton.c om.au...
Need help?
Do you have a question about the LDM120 and is the answer not in the manual?
Questions and answers