Table of Contents
Advertisement
Advertisement
Table of Contents

Related Manuals for Bernette b33


Summary of Contents for Bernette b33
- Page 1 Instruction Manual...
-
Page 3: Table Of Contents
TABLE OF CONTENTS ESSENTIAL PARTS UTILITY STITCHES Names of Parts Zigzag Standard Accessories 3-step zigzag Dust cover Stretch-Overlock Stitch Sewing table Triple straight stitch Accessory box Triple zigzag Free arm sewing Sewing Buttons Four-step buttonhole GETTING READY TO SEW Zipper Application Connecting the Power Supply Blindstitch Controlling the Sewing Speed... - Page 4 IMPORTANT The following basic safety precautions must properly, if it has been dropped or dam- be observed when operating an electrical aged, or dropped into water. Return the device: machine to the nearest authorized dealer or service centre for examination, repair, Please read the instruction manual carefully electrical or mechanical adjustment.
-
Page 5: All Rights Reserved
All rights reserved 20. The machine may only be used in com- bination with a type C-1028 (100-120 V) For technical and product improvement rea- or KD-2902 (220-240 V) foot control. sons, the machine‘s features, parts and acces- 21. The sound pressure level during normal sory are subject to unannounced changes operation is lower than 75dB(A). -
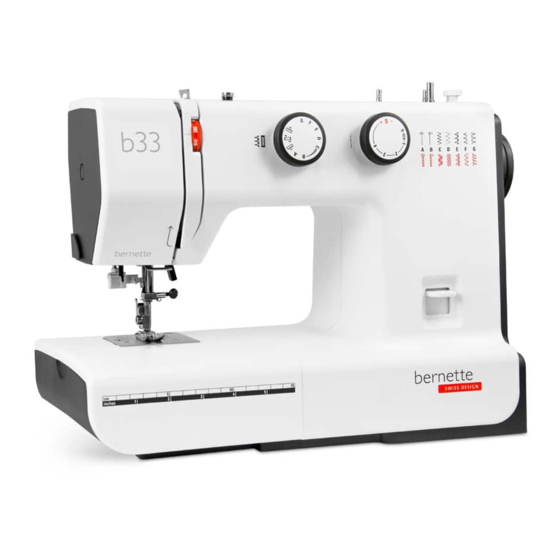
Page 6: Essential Parts Names Of Parts
ESSENTIAL PARTS Names of Parts Reverse sewing lever Stitch pattern selector knob Stitch length knob Bobbin winder stopper Bobbin winder spindle Spool pin Bobbin winder pre-tension Thread guide Thread take-up lever Thread tension dial Head cover Thread cutter Needle threader Stitch plate Sewing table (accessory box) Presser foot holder... -
Page 7: Standard Accessories
Standard Accessories Bobbins (3x) Seam ripper (buttonhole opener) Needle set Buttonhole foot with slide Blindstitch foot Zipper foot Button-sew-on foot More information on optional accessories can be found on our website: http://www.mybernette.com/accessories Dust cover Sewing instructions for your own personalized dust cover are available at: www.mybernette.com/cover Sewing table... -
Page 8: Free Arm Sewing
Free arm sewing Free arm sewing is used for stitching sleeves, waist- bands, pant legs or any other tubular garments. It is also useful for darning socks or mending knees or elbows. GETTING READY TO SEW Connecting the Power Supply Switch off the power switch. -
Page 9: Presser Foot Lever
Presser foot lever The presser foot lever raises and lowers the presser foot. It can be raised about 1/4" (0.6 cm) higher than the nor- mal top position to facilitate removal of the presser foot or to help you place heavy fabric under the foot. Lowered position Normal up position Highest position... -
Page 10: Changing The Needle
Changing the needle CAUTION: Always make sure to turn the power switch off and disconnect the machine from power supply before changing the needle. Raise the needle by turning the handwheel toward you and lower the presser foot. Switch off the power switch. Loosen the needle clamp screw by turning it coun- terclockwise. -
Page 11: Setting Spool Pins
Setting Spool Pins The spool pins are used for holding the spool of thread in order to feed thread to the machine. To use, pull up the spool pin. Push down for storage. PLEASE NOTE: When using thread which has tendency to tangle around spool pin, thread through the hole of spool pin as shown. -
Page 12: Winding The Bobbin
Winding the Bobbin Pull the handwheel out. Draw the thread from the spool. Guide the thread around the bobbin winder pre- tension. Insert the thread through the hole in the bobbin from the inside to the outside. Put the bobbin on the bobbin winder spindle. Push it to the right. -
Page 13: Threading The Machine
Threading the Machine Raise the thread take-up lever to its highest position by turning the handwheel toward you. Raise the presser foot. Place a spool on the spool pin as shown, with thread coming from back of the spool. Draw the thread into thread guide using both hands. While holding the thread near spool, draw thread down into the tension area and then around the check spring holder. -
Page 14: Drawing Up Bobbin Thread
Drawing Up Bobbin Thread Raise the presser foot and hold the needle thread slightly with your left hand. Use your right hand to slowly turn the handwheel counterclockwise until the needle has been low- ered. Continue turning the handwheel until the thread take-up lever is at its highest point. -
Page 15: Stitch Pattern Selector Knob
Stitch pattern selector knob Turn the stitch pattern selector knob so that the symbol with the desired stitch pattern points at the setting mark. Setting mark CAUTION To avoid needle or fabric damage, make sure the needle is up and out of the fabric while selecting a stitch. -
Page 16: Reverse Sewing Lever
Reverse sewing lever As long as you keep the reverse sewing lever depressed, the machine will sew in reverse. Lowering and raising the feed dog Remove the sewing table by pulling it to the left. Open the bobbin cover. Bobbin cover To lower the feed dog, press the lever down and move it in the direction indicated by the arrow (see figure). -
Page 17: Basic Sewing Straight Stitch
BASIC SEWING Straight stitch Stitch selection: A or B Presser foot: Zigzag foot Thread tension: 2 – 6 Stitch length: 1.5 – 4 • Starting sewing Raise the presser foot and position the fabric with its edge lining up with a seam guide line on the stitch plate. Lower the needle into the fabric. -
Page 18: Seam Guide Lines
Seam Guide Lines The numbers on the stitch plate indicate the distance between the center needle position and the guideline. The numbers in front are centimeters. The numbers in back are fractions of an inch. Number 10 15 20 3/8 4/8 5/8 6/8 Distance (cm) 1 1.5 2 —... -
Page 19: 3-Step Zigzag
3-step zigzag Stitch selection: Presser foot: Zigzag foot Thread tension: 1 – 4 Stitch length: 0.5 – 4 This stitch is used to finish the raw edge on synthetics and other fabrics that tend to pucker. Place your fabric to allow a 5/8" (1.6 cm) hem. Trim the seam allowance after sewing. -
Page 20: Triple Straight Stitch
Triple straight stitch Stitch selection: A or B Presser foot: Zigzag foot Thread tension: 2 – 6 Stitch length: The stitch is sewn with two forward stitches and one reverse stitch, creating a seam that is difficult to tear. Use it to reinforce areas such as crotch and armhole seams. -
Page 21: Sewing Buttons
Sewing Buttons Stitch selection: Presser foot: Button-sew-on foot Thread tension: 3 – 7 Stitch length: Feed dog: Lowered Lower the feed dog. Match the holes in the button with the horizontal slot on the presser foot. Adjust the stitch width matching the distance of the holes in the button. -
Page 22: Four-Step Buttonhole
Four-step buttonhole Stitch selection: Presser foot: Buttonhole foot with slide Thread tension: 1 – 5 Stitch length: Sew a test buttonhole on a stitch that matches the fabric, the interfacing and the seams on the actual item of clothing. Position the button on the fabric sample and mark the top and bottom side of the fabric to determine the posi- tion of the buttonhole. -
Page 23: Zipper Application
Zipper Application Stitch selection: Presser foot: Zipper foot Thread tension: 3 – 6 Stitch length: Pin or baste zipper tape to fabric and place it under the foot. Pull the threads towards the back and lower the foot. To sew the left side of the zipper, guide the zipper teeth along the edge of the foot and stitch through the gar- ment and zipper tape. -
Page 24: Decorative Stitching Vari-Overlock (Scallop Hem)
DECORATIVE STITCHING Vari-Overlock (scallop hem) Stitch selection: Presser foot: Zigzag foot Thread tension: 2 – 6 Stitch length: 1.5 – 3 Use a lightweight fabric such as tricot. Fold the fabric and stitch on the bias. You may need to increase the needle thread tension slightly. -
Page 25: Appliqué
Appliqué Stitch selection: Presser foot: Zigzag foot Thread tension: 1 – 4 Stitch length: 0.5 − 1 Baste (or fuse with iron-on fabric joiner) appliqué onto the fabric. Sew on the appliqué, ensuring that the needle sews along the outer edge of the appliqué. When sewing corners, lower the needle down into the fabric. -
Page 26: Care Of Your Machine Cleaning The Bobbin Case And The Shuttle Race
CARE OF YOUR MACHINE Cleaning the Bobbin Case and the Shuttle Race WARNING: Always switch off the power switch and/or unplug the machine from the power supply before disas- sembling or cleaning the machine. The machine must only be disassembled as described in this section. -
Page 27: Oiling
Oiling WARNING: • Always switch off the power switch and/or unplug the machine from the power supply before oiling the shuttle race unit. • Remove the shuttle race unit as described. • If the machine will not be used for the time being, do not apply the oil until its next use. -
Page 28: Troubleshooting
TROUBLESHOOTING Condition Cause Remedy The needle thread 1. The needle thread is not threaded properly. Page 13 breaks. 2. The needle thread tension is too tight. Page 14 3. The needle is bent or blunt. Page 10 4. The needle is incorrectly inserted. Page 10 5. -
Page 29: Stitch Pattern Overview
STITCH PATTERN Overview... - Page 30 EN – 11/2016 – 1st Edition 5060003.0.04 / 311801208 © BERNINA International AG Steckborn CH, www.bernina.com...
- Page 32 EN – 11/2016 – 1st Edition 5060003.0.04 / 311801208 © BERNINA International AG www.mybernette.com/blue-jeans Steckborn CH, www.bernina.com...
Need help?
Do you have a question about the b33 and is the answer not in the manual?
Questions and answers