Table of Contents
Advertisement
Quick Links
Advertisement
Table of Contents

Related Manuals for Bernette b70 DECO


Summary of Contents for Bernette b70 DECO
-
Page 2: Table Of Contents
Table of Contents Table of Contents IMPORTANT SAFETY INSTRUCTIONS....................Important information ........................1 My bernette Embroidery......................... Overview Machine ........................ Overview front controls ..................... Overview front ........................10 Overview top........................11 Overview back........................11 Overview Embroidery module .................... 12 Accessory..........................13 Included accessories ...................... - Page 3 Table of Contents Needle ..........................26 Inserting the embroidery needle ..................26 Threading ..........................27 Threading preparation ....................... 27 Threading the upper thread....................27 Winding the bobbin thread ....................31 Threading the bobbin thread ..................... 32 Selecting the embroidery motif ..................... 34 Embroidery hoop ........................
- Page 4 Table of Contents Using eco mode ........................48 Cancelling any alterations with «clr» ..................48 5 Creative embroidering ........................49 Overview embroidering ......................49 Selecting and changing the embroidery motif ............... 49 Checking the embroidery time and the embroidery motif size ..........49 Regulating the speed ......................
- Page 5 Table of Contents 5.10 Administering embroidery motifs ..................61 Administering embroidery motifs..................61 Saving embroidery motifs in the personal memory ............. 61 Saving the embroidery motif on the USB stick..............62 Overwriting the embroidery motif in the personal memory ..........62 Overwriting the embroidery motif in the personal memory ..........
-
Page 6: Important Safety Instructions
Do not view the LED light directly with optical instruments (e.g. magnifier). The LED light corresponds with protection class 1M. • When the LED light is damaged or defective, contact your bernette specialist dealer. WARNING To reduce the risk of burns, fire, electric shock or injury to persons: •... - Page 7 – turn power switch to «0». • Do not use bent needles. • Always use the original bernette stitch plate.The wrong stitch plate can cause needle breakage. • To disconnect, turn power switch to «0» and then remove the plug from the outlet.
-
Page 8: Important Information
> Download the instruction manual under «Download». Appropriate use Your bernette machine is conceived and designed for private household use. It answers the purpose to quilt fabrics as it is decribed in this instruction manual. Any other use is not considered appropriate.bernette assumes no liability concerning consequences resulting from an inappropriate usage. -
Page 9: My Bernette Embroidery
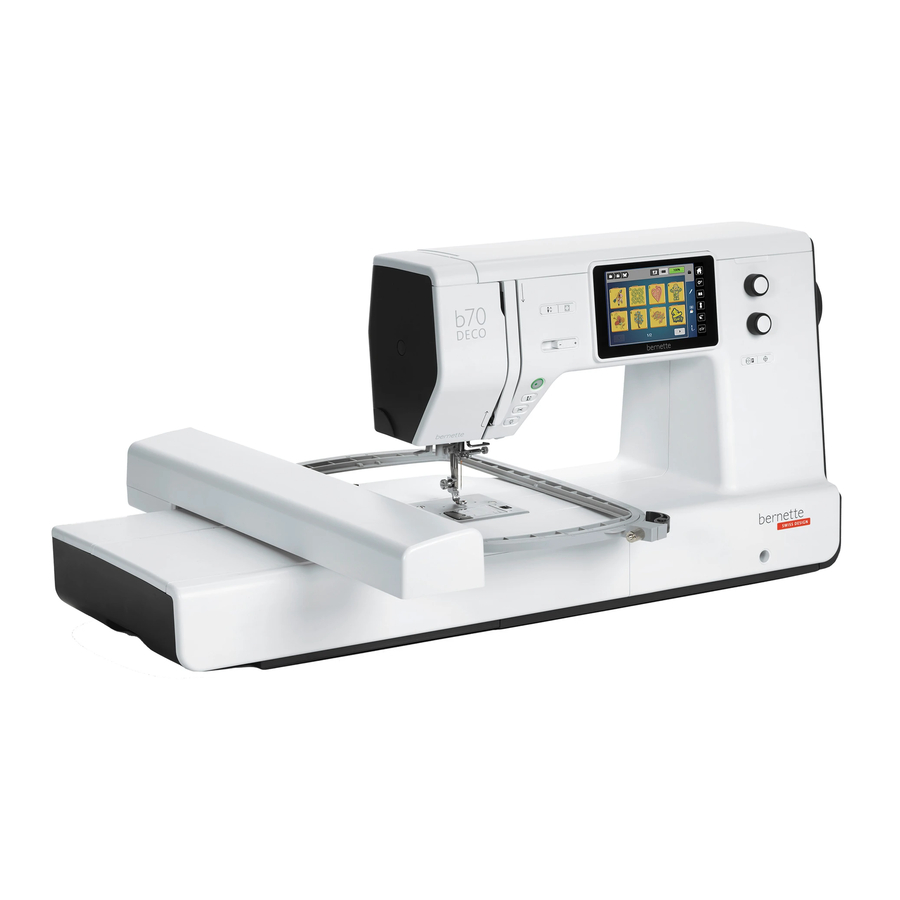
My bernette Embroidery My bernette Embroidery 1.1 Overview Machine Overview front controls Sewing light Needle up/down Thread cutter Upper Multifunctional knob Presser foot up/down Lower Multifunctional knob Start/Stop Motif center Checking motif size Center the needle to the embroidery hoop... - Page 10 My bernette Embroidery Number Buttons Name Purpose Thread cutter > Press the «Thread cutter» button in order to cut the upper and lower threads automatically. Presser foot up/ > Press the button «Presser foot up/down down »to raise the presser foot into hovering position.
-
Page 11: Overview Front
My bernette Embroidery Number Buttons Name Purpose Center the needle > To facilitate threading the needle and to to the embroidery get enough clearance from the needle to hoop the hoop, press the icon «Center embroidery hoop to the needle». -
Page 12: Overview Top
My bernette Embroidery Overview top Thread take-up lever Bobbin winding unit and holder for second spoolpin Thread pretension Bobbin winding stopper Thread guide Touchscreen pen Spool holder Overview back Connection for power cable Handwheel Air vents Carrying handle USB port... -
Page 13: Overview Embroidery Module
My bernette Embroidery Overview Embroidery module Embroidery arm Connection to the machine Bracket for attaching the embroidery hoop Embroidery unit release button Guide rails for the machine 2019-02 EN 5020070.00A.04... -
Page 14: Accessory
My bernette Embroidery 1.2 Accessory All rights reserved: For technical reasons and for the purpose of product improvements, changes concerning the features of the machine can be made at any time and without advance notice. The supplied accessory can vary depending on the country of delivery. -
Page 15: Overview Presser Feet
My bernette Embroidery Overview presser feet Illustration Name Purpose Embroidery foot (JL) For embroidering, darning and free-motion quilting. Hopper embroidery foot (JX) For embroidering, darning and free-motion quilting. 1.3 Overview User Interface Overview functions/visual information Upper thread tension Embroidery hoop display/Embroidery hoop... -
Page 16: Overview System Settings
My bernette Embroidery Overview System settings Home eco mode Setup Program Back to default setting Tutorial Overview Selection menu embroidery Selection embroidery motifs Color information Editing embroidery motifs Embroidery Overview Functions and Views Illustration Name Purpose Close The display is closed and the previously made adjustments are saved. - Page 17 My bernette Embroidery Illustration Name Purpose Cancel The process is canceled. The display is closed and the previously made adjustments are not saved. Slide By moving the slide the setting values are changed. Switch Activates or deactivates functions. Process navigation...
-
Page 18: Needle, Thread, Fabric
My bernette Embroidery 1.4 Needle, Thread, Fabric In the course of time a needle wears out. Therefore, the needle should be replaced regularly. Only a perfect point results in a good stitching result. In general it can be said: the thinner the thread, the finer the needle. -
Page 19: Needle/Thread Combination
My bernette Embroidery Needle/thread combination The needle/thread combination is correct, when the thread fits perfectly into the long groove and goes easily through the needle eye. The thread can be optimally sewn. The thread can break and cause skipped stitches if there is too much play in the long groove or eye of the needle. -
Page 20: Bobbin Thread
Embroidering motifs by third-party providers bernette recommends uploading embroidery motifs of any file format via the free program ««ART-Link»» to the machine or a USB stick. Using «ART-Link» ensures that the embroidery motif can be read and embroidered correctly. -
Page 21: Underlay Stitches
My bernette Embroidery Underlay stitches Underlay stitches are the foundation of a motif and are used to stabilize the base material and hold it in shape. They also prevent the covering stitches of the motif from sinking into the knit or the nap of the material. -
Page 22: Connecting Stitches
My bernette Embroidery Connecting stitches Long stitches which are used to get from one part of the motif to the next. Before and after the connecting stitch securing stitches are sewn. Connecting stitches are trimmed. 2019-02 EN 5020070.00A.04... -
Page 23: Embroidering Preparation
Embroidering preparation Embroidering preparation 2.1 Connection and Switching on Connecting the machine > Insert the power cable into the power cord connection. > Insert the power cable into the power cord connection. Use of the power cable (only USA/Canada) The machine has a polarized plug (one blade wider than the other). To reduce the risk of electrical shock, this plug is intended to fit in a polarized outlet only one way. -
Page 24: Spool Pin
Embroidering preparation 2.2 Spool pin Horizontal spool pin Placing the thread spool and the thread disc Spool discs hold the thread spool in place for proper release of thread from the spool. The thread disc is only used with the horizontal spool holder. >... -
Page 25: Attaching The Module
Embroidering preparation Inserting thread spool The felt disc prevents the thread from getting hooked at the second spool pin. > Place the felt disc (1) on the second spool pin. > Place the thread spool on the second spool pin. 2.3 Attaching the Module NOTICE Transporting the embroidery module... -
Page 26: Embroidery Foot
Embroidering preparation > To remove, hold the embroidery module and press the release button (2), then slide left the embroidery module out of the machine arm. 2.4 Embroidery foot Attaching the embroidery foot Mount the embroidery foot > Raise the needle. >... -
Page 27: Needle
Embroidering preparation 2.5 Needle Inserting the embroidery needle Embroidery needles of the type 130/705 H-SUK provide a larger eye and are slightly rounded. This avoids thread abrasion when using Rayon- and cotton embroidery thread. Depending on the embroidery thread use a size No. 70-SUK to No. 90-SUK needle. >... -
Page 28: Threading
Embroidering preparation 2.6 Threading Threading preparation > Press the button «Presser foot up/down» to raise the presser foot. > Raise the presser foot. Threading the upper thread ∼ Spool disc Guides Thread guide Guides Thread guide Needle threader lever Silver discs Hook pin Thread take-up lever cover Thread cutter... - Page 29 Embroidering preparation > Place the thread spool on the spool holder so that the thread unwinds clockwise. > Add the appropriate spool disc. > Guide the thread from the spool through the upper thread guide (2). > Guide the thread from the spool through the upper thread guide (3). >...
- Page 30 Embroidering preparation > At the top of this movement pass the thread from right to left through the slotted eye of the take-up lever and then downwards again. > Guide the thread through the guides above the presser foot. > Press the lever to the very bottom until it clicks in. –...
- Page 31 Embroidering preparation > To cut the excess thread, take thread end and gently pull it over the thread cutter. > To thread the needle, lift the threader lever. – The hook retreats and passes the thread through the needle eye where a loop is formed. >...
-
Page 32: Winding The Bobbin Thread
Embroidering preparation Winding the bobbin thread Spool disc Thread pretension Thread guide Spool pin > Place the thread spool and the appropriate spool disc on the spool holder. > For small thread spools use the spool disc. > In order to prevent tangling of the thread, please use a spool net. >... -
Page 33: Threading The Bobbin Thread
Embroidering preparation > Push the bobbin to the right. > The button «Start/Stop» flashes and the display for winding appears. > Hold the thread end with one hand. > To start the winding process for a few rotations and then stop, push the button «»Start«/Stop», so that the thread is held tight on the bobbin. - Page 34 Embroidering preparation > Insert the new spool so that the thread is wound in the counterclockwise direction. > Pull the thread into the slit (1). > Press gently on the bobbin. > Follow the arrow markings to bring the thread into the bobbin thread guide. >...
-
Page 35: Selecting The Embroidery Motif
Embroidering preparation 2.7 Selecting the embroidery motif All embroidery motifs can be embroidered directly or they can be altered using the various functions the embroidery machine provides. You can find all embroidery motifs at the end of the instruction manual. In addition to that, embroidery motifs can be downloaded from the personal memory or from the USB stick (optional accessory). -
Page 36: Selecting The Embroidery Hoop
Embroidering preparation Selecting the embroidery hoop The best embroidery result is achieved when the smallest possible embroidery hoop for the embroidery motif is selected. The embroidery motif has a pre-set size which is displayed. Prerequisite: • The embroidery motif is selected. >... -
Page 37: Using Iron-On Interfacing
Embroidering preparation Using iron-on interfacing Iron-on interfacings are available in a variety of weights. It is recommended to use an iron-on interfacing which is easily removable from the basic fabric. An Iron-on interfacing suits all materials that are easily distorted like stretch fabric such as tricot and jersey. >... - Page 38 – If a new type of fabric is used, the pressure must be adjusted by turning the screw. > Remove the inner hoop. > Place the template (1) in the inner hoop, so the bernette logo is at the front edge, and make sure the cut outs click into place.
-
Page 39: Attaching The Hoop
Embroidering preparation > Hoop the fabric to be embroidered tightly. > Close the quick release device (2). If necessary, tighten screw (1). > The inner hoop should protrude about 1 mm on the underside, this prevents the hoop from sticking to the stitch plate. -
Page 40: Overview Embroidery Functions
Embroidering preparation Overview Embroidery functions Center the needle to the embroidery hoop Grid on/off Embroidery arm return Motif center Locating the center of the embroidery motif The embroidery hoop is positioned so that the needle is exactly above the center of the embroidery motif or the motif begin. -
Page 41: Embroidery Arm Return
Embroidering preparation Embroidery arm return The embroidery arm can be positioned to store the embroidery module. > Touch the icon «Embroidery hoop display/Embroidery hoop selection». > Remove the hoop. > Touch the icon «Embroidery arm return» the embroidery arm travels horizontally to the left to the park position. -
Page 42: Setup Program
Setup Program Setup Program 3.1 Embroidery settings Adjusting the upper thread tension Alterations of the upper thread tension in the Setup Program affect all embroidery motifs. > Touch the icon «Setup Program». > Touch the icon «Embroidery settings». > Touch the icon «Alter the upper thread tension». >... -
Page 43: Deactivating Securing Stitches
Setup Program > Center the needle via the arrow icons on the display and confirm. Deactivating securing stitches > «»Touch the icon «Setup Program». > Touch the icon «Embroidery settings». > Touch the icon «Securing stitches on/off». > Touch the switch in the lower left corner of the display to deactivate the securing stitches. –... -
Page 44: Adjusting The Height Of The Embroidery Presser Foot
Setup Program > Cut the remaining thread with scissors. Adjusting the height of the embroidery presser foot > Touch the icon «Setup Program». > Touch the icon «Embroidery settings». > Touch the icon «Adjust the height of the embroidery presser foot». >... -
Page 45: Monitoring Functions
Setup Program 3.3 Monitoring functions Activating the upper thread indicator > Touch the icon «Setup Program». > Touch the icon «Monitoring settings». > Touch the switch in the upper portion of the display to deactivate the upper thread indicator. > Touch the switch again to activate the upper thread indicator. Activating the bobbin thread indicator >... -
Page 46: Calibrating The Display
Setup Program Calibrating the display Please find further information on this topic in the chapter attachment below troubleshooting at the end of the instruction manual. > Touch the icon «Setup Program». > Touch the icon «Machine settings». > Touch the icon «Calibrate the display». >... -
Page 47: Updating The Machine Firmware
Setup Program Updating the machine Firmware The latest firmware of the machine and a detailed step-by-step instruction for updating processes can be downloaded at www mybernette.com . Personal data and settings are automatically transferred during a firmware update. USB stick (optional accessory) has been removed too early NOTICE Firmware has not been updated and the machine cannot be used. -
Page 48: Selecting A Language
Setup Program Selecting a language The User Interface can be programmed in different languages according to the customer’s wish. > Touch the icon «Setup Program». > Touch the icon «Machine settings». > Touch the icon «Language selection». > Select a language. 2019-02 EN 5020070.00A.04... -
Page 49: System Settings
System settings System settings 4.1 Calling up the tutorial The tutorial provides information and explanations on different sections concerning embroidering. > Touch the icon «Tutorial». > Select the desired topic to get information. 4.2 Using eco mode During a longer interruption of work the machine can be set into a power save mode. Nothing can be selected in the display and the machine cannot be started. -
Page 50: Creative Embroidering
Creative embroidering Creative embroidering 5.1 Overview embroidering Scaling up, downsizing and moving the Area to be embroidered embroidery motif view Embroidery time/Embroidery motif size in mm «i»-Dialog 5.2 Selecting and changing the embroidery motif > Touch the icon «Selection». > Touch the icon «Upload embroidery motif». >... -
Page 51: Editing The Embroidery Motif
Creative embroidering 5.5 Editing the embroidery motif Overview Editing embroidery motif Preview all Rotating motif Moving the view Checking motif size Moving the view of the motif Bending the text Zoom out Mirror image left/right Zoom in Mirror image up/down Moving the embroidery motif Deleting Altering the motif proportionally... -
Page 52: Moving The Embroidery Motif View
Creative embroidering Moving the embroidery motif view The view of the embroidery motif can be moved. In addition to that, the embroidery motif position won’t be changed. > Select an embroidery motif. > Touch the icon «Zoom in» to edit the view of the embroidery motif. >... -
Page 53: Moving The Embroidery Motif
Creative embroidering Moving the embroidery motif > Select an embroidery motif. > Touch the icon «i»-Dialog. > Touch the icon «Move the motif». > Turn the Upper Multifunction knob to move the embroidery motif horizontally. > Turn the «Lower Multifunction knob» to move the embroidery motif vertically in 0.5-mm steps or touch the «+»/«-»... -
Page 54: Mirroring Embroidery Motifs
Creative embroidering > Touch the icon «Alter the embroidery motif proportionally». > To increase the size of the embroidery motif proportionally, turn the «Upper Multifunction knob» or the «Lower Multifunction knob» to the right or touch the icon ««+»». > To decrease the size of the embroidery motif proportionally, turn the «Upper Multifunction knob» or the «Lower Multifunction knob»... -
Page 55: Deleting An Embroidery Motif
Creative embroidering Deleting an embroidery motif The active embroidery motif is deleted. > Select an embroidery motif. > Touch the icon «i»-Dialog. > Touch the icon «Delete». > Touch the icon «Confirm» to delete the embroidery motif. 5.6 Creating lettering Overview embroidery alphabets Embroidery motif Name... -
Page 56: Editing Words/Sentences
Creative embroidering > Touch the icon (4) to use special characters. > Touch the icon «DEL» to delete single letters of the entered text. > Touch the icon «Confirm» to accept the text. > Touch the icon «Embroidery hoop display/Embroidery hoop selection». >... -
Page 57: Bending The Text
Creative embroidering > Touch the icon «Add motif». > Enter and also rotate the text «create». > Touch the icon «Embroidery hoop display/Embroidery hoop selection». > Touch the icon «Grid on/off» to position the text lines more exactly. Bending the text Texts can be arranged and designed arc-shaped. -
Page 58: Deleting A Single Embroidery Motif
Creative embroidering Deleting a single embroidery motif > Select the embroidery motif which is to be deleted. > Touch the icon «i-Dialog». > Touch the icon «Delete». > Touch the icon «Confirm». 5.8 Changing the colors of the embroidery motif Overview changing the color Colors of the embroidery motifs Altering color... -
Page 59: Changing The Thread Brand
Creative embroidering Changing the thread brand > Select an embroidery motif. > Touch the icon «Color information». > Touch the icon «Allocate thread brand». > Touch the icon «Scrolling» (1) to have further thread brands displayed. > Select a thread brand and touch the icon «Confirm». –... -
Page 60: Adding Basting Stitches
Creative embroidering Adding basting stitches The basting stitches can be embroidered along the embroidery motif. Therefore the connection between the fabric and the stabilizer can be improved. > Select an embroidery motif. > Touch the icon «Embroidering». > Touch the icon «Basting» to embroider basting stitches along the embroidery motif. >... -
Page 61: Cutting Connecting Stitches
Creative embroidering > Touch the icon «Magnifier» to select the desired stitch via entry. – The number in the yellow-framed icon indicates the number of stitches within the embroidery sequence. > Position the needle back far enough so that it will resume stitching several stitches before the thread breaks. -
Page 62: Color Indication
Creative embroidering Color indication Every color of the embroidery motif can be selected individually. The hoop moves to the first stitch of the current color. The currently active color can be embroidered individually or in another sequence. > Select an embroidery motif. >... -
Page 63: Saving The Embroidery Motif On The Usb Stick
Creative embroidering Saving the embroidery motif on the USB stick > Select an embroidery motif. > Edit the embroidery motif. > Touch the icon «i»-Dialog. > Touch the icon «Save the motif». – The embroidery motif to be saved is outlined in yellow. >... -
Page 64: Loading An Embroidery Motif From The Personal Memory
Creative embroidering Loading an embroidery motif from the personal memory > Touch the icon «Selection». > Touch the icon «Upload embroidery motif». > Select the file «Personal embroidery motifs». > Select an embroidery motif. Loading an embroidery motif from the USB stick >... -
Page 65: Embroidery
Embroidery Embroidery 6.1 Embroidering via the button «Start/Stop» In case of a power cut the embroidery process is interrupted. After the restart the machine goes to the position which was embroidered last. > Push the button «Start/Stop» to start the embroidery machine. –... - Page 66 Embroidery > Move the slider in the display using the touchscreen pen/finger to increase or reduce the upper thread tension. Permanent alteration of thread tension Thread tension of the current embroidery motif 2019-02 EN 5020070.00A.04...
-
Page 67: Bernina Cutwork Tool
BERNINA CutWork Tool BERNINA CutWork Tool 7.1 Changing the CutWork Tool The CutWork Tool accessory is optional. It is not included with this machine. The CutWork Tool is a very sharp accessory. Special care is required when working with this tool and keep fingers away from the sharp knife. -
Page 68: Start To Cut
BERNINA CutWork Tool 7.2 Start to cut > Push the button «Start/Stop» and start to cut. – When it is completed, the machine stops automatically and return to Embroidery menu display. > Turn the CutWork Tool knife according to the cutting position on the display of Color indication (3). >... -
Page 69: Attachment
Attachment Attachment 8.1 Maintencance and cleaning Cleaning the display > Clean the display in the switched off status with a soft slightly damp mircrofiber cloth. Cleaning the hook Electronically driven components CAUTION Risk of injury near the needle and the hook. >... -
Page 70: Oiling The Needle Bar
Attachment Oiling the needle bar If needle bar lacks of lubrication, needle bar might not move smoothly. If the machine is used often, the needle bar should be oiled every 6 months to avoid it from blocking. Electronically driven components WARNING Risk of injury near the needle bar. -
Page 71: Troubleshooting
> Reduce the upper thread tension. Incorrectly threaded. > Rethread. Poor quality thread. > Use quality thread. The stitch plate or the hook tip is > Contact a specialized bernette dealer to have the damaged. damages repaired. > Replace the stitch plate. 2019-02 EN 5020070.00A.04... - Page 72 The bobbin is threaded > Check bobbin and thread correctly. incorrectly. The stitch hole in the stitch plate > Contact a specialized bernette dealer to have the is damaged. damages repaired. > Replace the stitch plate. Needle blunt or bent.
- Page 73 Settings in the Setup Program. > Activate it in the Setup Program. Bobbin thread indicator doesn't react The bobbin thread indicator is > Contact the specialized bernette dealer. defect. The update process is blocked > Remove the USB stick. Error during software update and the hourglass on the display >...
-
Page 74: Error Messages
Attachment 8.3 Error messages Message on the display Cause Repair Embroidery module has to be > Push the release button and pull the embroidery module removed. carefully to the left. The embroidery module has to be > Carefully slide the module from left to right into the attached. - Page 75 The needle threader lever is not > Raise the needle threader lever. raised. The bernette USB stick (Optional > Insert the bernette USB stick (Optional accessory) into accessory) is not inserted the USB stick socket. Not enough free space available >...
- Page 76 Attachment Message on the display Cause Repair The embroidery hoop is > Touch the icon «Confirm». calibrated. The maximum number of > Select another pattern with less stitches. stitches, which is 120.000, has been reached. The data is loading. > Wait for processing. Software version update failed.
-
Page 77: Technical Data
Attachment 8.4 Technical data Term Value Measurement unit Sewing light 300, 2 mA, Watt Maximum speed Embroidery mode850 Stitches per minute Measurements (B × T × H) 509 × 199,8 × 314,3 Weight Energy consumption Input voltage 100 – 240 Protection class (Electrical engineering) Class II 2019-02 EN 5020070.00A.04... -
Page 78: Overview Stitch Patterns
Overview stitch patterns Overview stitch patterns 9.1 Overview Embroidery motifs Editing the embroidery motif Let your inspiration run free. A vast selection of embroidery motifs is at your disposal. If you see one the following pictograms below a number of the embroidery motif, you can find additional information at www.mybernette.com/7series. - Page 79 Overview stitch patterns Embroidery motif Width x Embroidery motif Width x Height Height Colors Colors in mm in mm 57,6 (12490-5_si (12587-57) 20,3 zed) 52,8 (12587-58) 116,2 (12587-59) 94.8 126,2 (12587-60) (12606-33) 136,9 (12611-27) 137,3 (12611-28) 109,4 (12670-03) 144,6 (12669-03) 194,6 (19999-002 136,4...
- Page 80 Colors Colors in mm in mm 118,8 (21021-05) 155,6 (21027-01_ 122,2 120,8 123,4 (21027-14) 120,8 (32078-02) 172,9 155,2 (BE790308_ 178,2 (FB148_48) 89,6 bernette) 39,6 56,6 (FB158_48) 53,2 (NA597) 52,8 96,6 (NA614) 101,4 (NA617) 96,6 87,6 (NB843_48) 121,2 2019-02 EN 5020070.00A.04...
-
Page 81: Quilt Motifs
Overview stitch patterns Quilt motifs Embroidery motif Width x Embroidery motif Width x Height Height Colors Colors in mm in mm 110,6 (12380-04) 89,8 (12380-22) 60,8 123,6 113,0 (12380-43) 123,6 (12383-09) 77,2 122,4 (12607-20) 122,4 (BD298_L_b 154,6 ernette) 61,4 63,4 (BD502_48) 60,8 (BD513_48) -
Page 82: Borders And Lace
Overview stitch patterns Embroidery motif Width x Embroidery motif Width x Height Height Colors Colors in mm in mm 139,6 139,6 (Quilt 10) 139,6 (Quilt 11) 139,6 Borders and Lace Embroidery motif Width x Embroidery motif Width x Height Height Colors Colors in mm... -
Page 83: Children
Overview stitch patterns Embroidery motif Width x Embroidery motif Width x Height Height Colors Colors in mm in mm 42,3 (BE790705) 169,3 (FQ736_48) 253,2 65,6 151,6 (NX952) 98,6 71,1 (NX238) 97,9 Children Embroidery motif Width x Embroidery motif Width x Height Height Colors... - Page 84 Overview stitch patterns Embroidery motif Width x Embroidery motif Width x Height Height Colors Colors in mm in mm 106,6 (BE790313) 102,4 (CM193_48 127,4 70,2 100,4 (CM368_48 (CM376_48 97,6 83,8 68,2 (NA667) 83,8 (NB302-48) 80,6 88,8 78,2 (CK229) (CM428_48 106,4 94,2 (MS974) 98,6...
-
Page 85: Flowers
112,6 112,6 (12392-01) 157,4 (12392-13) 203,4 97,6 120,0 (21008-24) 121,6 (BE790406) 180,8 123,2 (21012-04) (80001-23) 101,6 115,2 155,1 (BE790304_ 59,6 (BE790401_ 220,9 sized) bernette) 135,6 (BE790402_ (BE790404_ 180,2 sized) bernette) 88,6 84,7 (FI135) 87,1 (FI136) 89,2 2019-02 EN 5020070.00A.04... - Page 86 Overview stitch patterns Embroidery motif Width x Embroidery motif Width x Height Height Colors Colors in mm in mm 90,4 90,4 (FQ527_48) 141,4 (FQ562_48) 156,4 123,8 23,6 (FQ808_48) 142,4 (FQ810_48) 206,4 63,2 (NA146) 69,3 (NB039_48) 63,9 (Rose_S) 129,2 (Sunflower) 88,2 80,8 76,2 (FP005)
-
Page 87: Seasons
Overview stitch patterns Embroidery motif Width x Embroidery motif Width x Height Height Colors Colors in mm in mm 62,6 (FQ239_48) 90,4 Seasons Embroidery motif Width x Embroidery motif Width x Height Height Colors Colors in mm in mm 132,8 84,4 (12384-02) 203,4... - Page 88 Overview stitch patterns Embroidery motif Width x Embroidery motif Width x Height Height Colors Colors in mm in mm 72,4 (NA006) 91,8 (HG747_48 147,4 45,8 39,9 (12421-03) 48,4 (12421-11) 43,6 67,4 77,6 (12421-37) (FQ749_48) 94,8 88,1 133,2 (HE252) 144,9 (HE255) 127,2 63,2 89,2...
-
Page 89: Asia
Overview stitch patterns Embroidery motif Width x Embroidery motif Width x Height Height Colors Colors in mm in mm (HE179) 95,2 Asia Embroidery motif Width x Embroidery motif Width x Height Height Colors Colors in mm in mm 115,1 102,4 (FB276_48_ 103,2 (FB283_48) - Page 90 Overview stitch patterns Embroidery motif Width x Embroidery motif Width x Height Height Colors Colors in mm in mm 71,7 71,7 (12611-22) 155,8 (12611-23) 155,8 117,2 116,4 (12677-01_ 115,2 (12677-02) sized) 134,8 (12677-03_ 82,4 (80085-25) 166,2 sized) 80,3 80,2 (BE790601_ 80,2 (BE790602) 75,6...
- Page 91 Overview stitch patterns Embroidery motif Width x Embroidery motif Width x Height Height Colors Colors in mm in mm 63,3 101,6 (SP980) 63,6 (SP989) 82,4 76,2 70,8 (CK510) (CK522) 53,2 84,8 99,2 (CK970) 81,6 (LT749) 38,4 89,1 46,4 (LT920) 55,6 (CM442_48 97,6 98,8...
-
Page 92: Animals
Overview stitch patterns Animals Embroidery motif Width x Embroidery motif Width x Height Height Colors Colors in mm in mm 68,4 (BE790302 66,4 (12672-02 133,4 89,2 56,6 (CM022_4 (CM142_4 66,8 80,6 58,2 (CM211_4 70,6 (CM213_4 71,4 63,2 (CM220_4 71,8 (CM226_4 97,8 115,1 (CM286_4... - Page 93 Overview stitch patterns Embroidery motif Width x Embroidery motif Width x Height Height Colors Colors in mm in mm 64,5 93,8 (FQ624_48 144,2 (FQ945_48 93,2 84,6 (LJ699) (WM785) 103,4 76,2 77,8 (WP201_4 (WP325_4 93,8 100,4 (WP217_4 78,2 (WP224_4 132,4 95,8 (WP415_4 148,4 (WP421_4...
-
Page 94: Cutwork
Overview stitch patterns Embroidery motif Width x Embroidery motif Width x Height Height Colors Colors in mm in mm 87,5 114,1 (BE790309 149,8 (BE790311 152,5 (BE790312 Cutwork Embroidery motif Width x Embroidery motif Width x Height Height Colors Colors in mm in mm 90,8 (CM594_4... -
Page 95: Campaign
Overview stitch patterns Campaign Embroidery motif Width x Embroidery motif Width x Height Height Colors Colors in mm in mm 118,9 75,3 (Campaign 216,7 (Campaign 69,3 _3_elemen _1_elemen 75,7 (FB060) 72,9 (FB062) 53,1 (FB069) 87,4 2019-02 EN 5020070.00A.04... -
Page 96: Index
Index Index Activating the bobbin thread indicator 44 Positioning the spool disc 23 Activating the upper thread indicator 44 Adjusting the brightness of the display 44 Regulating the speed 49 Adjusting the display color 43 Altering the stitch density 56 Attaching the hoop 38 Safety instructions... - Page 97 © BERNINA International AG www.mybernette.com/b70DECO Steckborn CH, www.bernina.com...
Need help?
Do you have a question about the b70 DECO and is the answer not in the manual?
Questions and answers
Здравствуйте порвался ремень на вышивальной машине bernette b70 deco. как правильно его установить по меткам на соосность.