Ravas iForks User Manual
Hide thumbs
Also See for iForks:
- Service manual (12 pages) ,
- Service manual (15 pages) ,
- Service manual (58 pages)
Table of Contents
Advertisement
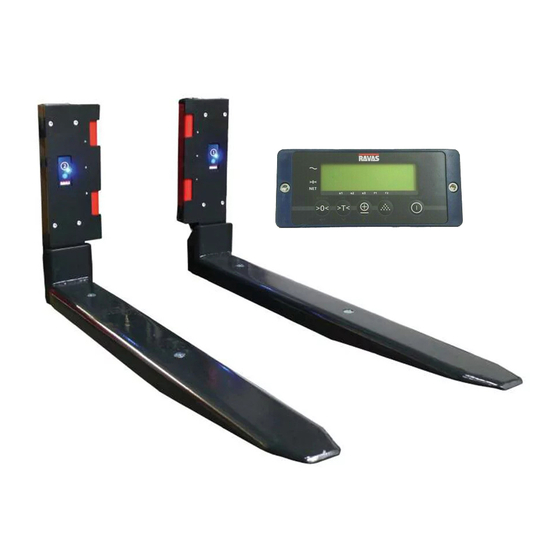
USER MANUAL
iForks
We would like to inform you about the fact that this RAVAS product is 100 % recyclable on the basis
that the parts are processed and disposed off in the right manner.
More information can be found on our website www.ravas.com.
Rev.20150617
Printing/typographical errors and model changes reserved
iForks
1
USER MANUAL –
Advertisement
Table of Contents

Related Manuals for Ravas iForks


Summary of Contents for Ravas iForks
- Page 1 USER MANUAL iForks We would like to inform you about the fact that this RAVAS product is 100 % recyclable on the basis that the parts are processed and disposed off in the right manner. More information can be found on our website www.ravas.com.
- Page 2 This manual has been compiled with all due care, but the manufacturer cannot be held responsible for any errors or the consequences thereof. All rights are reserved and no part of this manual may be reproduced in any way. iForks USER MANUAL –...
-
Page 3: Table Of Contents
Table of contents page 1. Introduction 2. Warnings & Safety measures 3. Exploded-view & parts list 4. System setup iForks 4.1 Installation the iForks 4.2 Locking the 4.3 Installing the indicator iForks 4.4 Placing battery modules in the iForks 4.5 Switching on the 4.6 Switching on indicator... -
Page 4: Introduction
Follow the contents of the manual precisely. Always do things in the correct order. This manual should be kept on a safe and dry place. In case of damage or loss the user may request a new copy of the manual from RAVAS. Warnings & Safety measures When using the iForks, please observe carefully the instructions and guidelines contained in this manual. -
Page 5: Exploded-View & Parts List
Bluetooth receiver board EB-31-N-BLT-DUAL RAVAS Middle cover HOP-MC RAVAS Cellrubber block HOP-PACK-XTRA-RU-STRIP RAVAS AA battery 1.5V BA-1,5-PENN-AA-R6 Buy locally Contact snap single BAP-SNAP-SINGLE RAVAS Contact snap dual BAP-SNAP-DUAL RAVAS Strain relief HOP-RAV-STRAINRELIEF RAVAS Bottom housing indicator HOP-RAV-RAL9011-LOWER RAVAS iForks USER MANUAL –... -
Page 6: System Setup
System setup iForks Installing the iForks The standard forks must be taken from the carriage plate. The are placed on the carriage plate. iForks Locking the iForks USER MANUAL –... -
Page 7: Installing The Indicator
1. at the cabin’s roof. 2. at the right side of the cabin, mounted onto a side-rail. 3. at the dashboard. The indicator should be easy to reach and read out! Installation of the indicator bracket & support iForks USER MANUAL –... -
Page 8: Placing Battery Modules In The Iforks
Placing the batterypacks in the 1. Lift up the locking clips on the battery holders. 2. Position the batterypacks in both forks. 3. Click the batterypacks into the battery holders. 4. Push the locking clips down to secure the batterypacks. -
Page 9: Switching On Indicator
Switching off the system 8 sec. ID CODE TOTAL KG/LB ID CODE TOTAL KG/LB Switch off the indicator by pressing the on/off key for 3 seconds. Switch off the forks by pressing the blue buttons for 8 seconds. iForks USER MANUAL –... -
Page 10: Changing The Batteries
Changing batteries iForks Low battery indication iForks Exchangeable batterypacks supply power to the When the voltage level of the batterypacks is running low, the low bat indicator will light up and the pointer of the relating fork - “F1”, ”F2” or both - will start blinking in the display. -
Page 11: Changing The Batterypacks Of The Iforks
Changing the batterypacks of the 5.2.1 Take out both batterypacks 5.2.2 Change the D-Cells inside the batterypacks 1.Remove the 6 Philips-head screws M3 x 25. 2.Remove the top housing of the battery pack. 3.Take out the D-cells. iForks USER MANUAL –... - Page 12 5.2.3 Place 4 full D-cell batteries in each batterypack. Replace the top housing of the batterypack and tighten the 6 Philips-head screws M3 x 25 (not too tight). iForks 5.2.4 Replace the batterypacks of the (see step 4.3, page 8) 5.2.5...
-
Page 13: Changing The Batteries Of The Indicator
Open the indicator housing Place new and remove the empty batteries. batteries. Be sure the batteries are positioned correctly. Watch for the polarity! Close the indicator housing and tighten the bolts by using a M6 hex key. iForks USER MANUAL –... -
Page 14: Use
Use (accurate weighing) 3 - 5 min. After 3 to 5 minutes the load cells have reached the operational temperature. Don’t lift loads before the zero-point correction has been executed min -10°C max 40°C 15°F 105°F iForks USER MANUAL –... -
Page 15: Level Correction
>0< Level correction (option) Legal for trade: > α NTEP: OK if α = +/- 5% ( 3˚) OIML: OK if α = +/- 5˚ iForks USER MANUAL –... -
Page 16: Establish Bluetooth Communication And Weigh
Establish Bluetooth communication and weigh! ID CODE TOTAL KG/LB Switch on the iForks: Start up the indicator: press the on/off key. press the blue button below both batterypacks. ID CODE TOTAL KG/LB ID CODE TOTAL KG/LB 5 sec. Before each weighing: check the zero point! Before each weighing it is necessary to check whether the system is unloaded and free. -
Page 17: Auto Shut-Off Indicator
KG/LB 2 min. no action ! Countdown starts: Press any key during to cancel auto-shut-off and go back to the weighing mode. ID CODE TOTAL KG/LB ID CODE TOTAL KG/LB ID CODE TOTAL KG/LB Indicator off iForks USER MANUAL –... -
Page 18: Auto Shut-Off Iforks
TOTAL KG/LB ID CODE TOTAL KG/LB iForks 2 hour no weighing ! -Indicator off ID CODE TOTAL KG/LB Switch on the iForks: Restart the indicator: Press the on/off key. press the blue button below both batterypacks. iForks USER MANUAL –... -
Page 19: Indicator Functions
Fork 1 / setpoint 1 is activated ( option relay output) Fork 2 / setpoint 2 is activated ( option relay output) displayed shows weight is kilograms displayed shows weight is pounds number displayed represent number of pieces on the scale low bat indicator iForks USER MANUAL –... - Page 20 Operation of a key is not accepted unless the weighing system is stable (and the “load stable” pointer lights up). This means that the indicator only executes commands with a stable load. For a detailed description of the functions check our operational CODE ENTRY PIECE COUNT RELAY manual Indicator 4100 at www.ravas.com. iForks USER MANUAL –...
-
Page 21: Error Messages
Forks are out of level (only legal-for-trade version) Put the forks into horizontal position ErrCS Problem with correction sensor Contact the RAVAS Service department Battery of indicator is empty Replace the 4 AA batteries Battery of fork 1 is empty... -
Page 22: Gross / Tare / Net Weight
EXPLANATION: Net(1) + Tare(2) = Gross(3) 6.8.1 Net weighing: automatic tare ID CODE TOTAL KG/LB ID CODE TOTAL KG/LB ID CODE TOTAL KG/LB The indicator is set to zero. The “NET” pointer shows that the tare weight is activated. iForks USER MANUAL –... - Page 23 ID CODE TOTAL KG/LB 1000 The display shows the net value of the weighed load. ID CODE TOTAL KG/LB ID CODE TOTAL KG/LB The gross weight is displayed again. 1000 iForks USER MANUAL –...
-
Page 24: Net Weighing: Manual Tare Pt
ID CODE TOTAL KG/LB ID CODE TOTAL KG/LB Press the up or down key until the desired Press ENTER value is to activate the reached. tare weight. iForks USER MANUAL –... - Page 25 ID CODE TOTAL KG/LB 1000 The “NET”pointer lights up ID CODE TOTAL KG/LB ID CODE TOTAL KG/LB 1000 iForks When the completely unloaded, the tare value is displayed negatively. iForks USER MANUAL –...
- Page 26 ID CODE TOTAL KG/LB ID CODE TOTAL KG/LB The gross weight is displayed again. iForks USER MANUAL –...
-
Page 27: Adding And Reset
ID CODE TOTAL KG/LB Press the TOTAL key to add the weight load to the total weight. 1000 If a printer is installed, a printout will be made. The gross, net and tare weights are printed. iForks USER MANUAL –... - Page 28 ID CODE TOTAL KG/LB ID CODE TOTAL KG/LB 3 sec. The subtotal can be checked by pressing the TOTAL key for 3 sec. 3 sec. TOTAL = RESET TOTAL & PRINT KG/LB = RESET TOTAL iForks USER MANUAL –...
-
Page 29: Kg-Lb Switch
6.10 KG- LB switch ID CODE TOTAL KG/LB ID CODE TOTAL KG/LB KG/LB 5 sec. iForks USER MANUAL –... -
Page 30: User Settings
These user settings can be changed if TOTAL key for desired. See next pages. 10 sec. EXIT & SAVE 3 sec. Back to weigh mode EXIT without SAVING Back to weigh mode iForks USER MANUAL –... - Page 31 Set the auto shut-off time indicator (delay time in minutes) 0 min = indicator always on Set backlight (intensity in %) 0 % = backlight off iForks USER MANUAL –...
- Page 32 (De-) activate Com Port 1 iForks It is not possible to de-activate Com Port 1 for forks” (De-) activate Com Port 2 iForks USER MANUAL –...
-
Page 33: 6.12. Changing The Time And Date On The Printout
The display will show “YE_00” or the previous year setting. The right digit flashing. Repeat the above procedure to accept or change the year setting. The indicator will return to normal weighing mode. iForks USER MANUAL –... - Page 34 This declaration of conformity is valid when the above-mentioned instrument is marked with the CE mark. The instrument is verified in the factory and may be used immediately. We, RAVAS Europe B.V., declare under our sole responsibility that this weighing system is in conformity with the directives and standards mentioned.
Need help?
Do you have a question about the iForks and is the answer not in the manual?
Questions and answers