Table of Contents
Advertisement
Quick Links
Digitrax Command Control
Starter Set Manual
Command Station Booster Throttle,
PS314 Power Supply,
LT1 LocoNet Cable & Decoder Tester
2443 Transmitter Road
Panama City, Florida USA 32404
Support: helpdesk.digitrax.com
www.digitrax.com
Digitrax Manuals & Instructions are updated periodically.
Please visit www.digitrax.com for the latest version of all
manuals & for available firmware updates.
C
omplete
T
rain
C
ontrol
Includes:
DCS51 All In One
Digitrax, Inc.
TM
Advertisement
Table of Contents
Troubleshooting

Summary of Contents for Digitrax Zephyr xtra
- Page 1 LT1 LocoNet Cable & Decoder Tester Digitrax, Inc. 2443 Transmitter Road Panama City, Florida USA 32404 Support: helpdesk.digitrax.com www.digitrax.com Digitrax Manuals & Instructions are updated periodically. Please visit www.digitrax.com for the latest version of all manuals & for available firmware updates.
-
Page 2: Table Of Contents
4.0 Preparing Your Layout................9 5.0 DCS51 Front Panel Controls And Indicators..........9 6.0 DCS51 Display ....................11 7.0 Hooking Up Your Zephyr Xtra ..............12 7.1 Zephyr Xtra Rear Panel Connections ............12 7.2 Connecting the Zephyr Xtra ..............13 8.0 Run a Locomotive Without a DCC Decoder ..........14 9.0 Run a DCC Equipped Locomotive ............15... - Page 3 16.7 Configuration Variable (CV) Programming Notes: ........29 17.0 Functions ....................30 17.1 Controlling Functions F0-F9 ..............30 17.1.1 Function 0 (F0) Headlights Forward and Reverse ......30 17.1.2 Functions 1, 4, 5, 6, 7, 8 & 9 ..............30 17.1.3 Function 2 (F2) Momentary Operation ..........30 17.1.4 Function 3 (F3) Standard or Momentary Operation ......31 17.1.5 MUTE Function Key (F8) ..............31 17.1.6 Functions 10 through 19 (F10 - F19) ..........32...
- Page 4 Index........................62 Digitrax, the Digitrax Train Logos, LocoNet, Super Empire Builder Xtra, Super Chief Xtra, Transponding, SuperSonic, AutoReversing, Zephyr Xtra, Jump & others are trademarks of Digitrax, Inc. This manual may not be reproduced in any form without permission. ©2012 Digitrax, Inc.
-
Page 5: Introduction
Please read this manual to learn more. We have included lots of hints and operating ideas based on our experience. The Zephyr Xtra is designed for easy operation and expandability with Digitrax LocoNet. With LocoNet, just plug in system components to build the layout control system that you’ve always wanted! If you have questions not covered by this manual... -
Page 6: Before You Begin
PS314 into an AC outlet that matches the power cord on the PS314. The PS314 will work universally on 110 through 240V AC PS314 or similar DC supply Screw terminal strip ©2012 Digitrax, Inc. www.digitrax.com... -
Page 7: Turn On Track Power
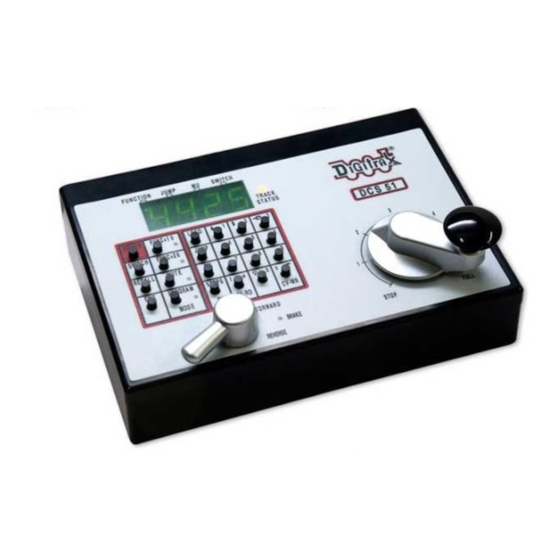
1. On the front panel of the DCS51, locate the key marked “POWER” It is on the left hand column of keys. 2. When you push it, the orange “TRACK STATUS” light will come on. pOWer key traCK StatuS light SWITC H ©2012 Digitrax, Inc. www.digitrax.com... -
Page 8: Select & Run Non-Dcc Locomotives
5. To stop the locomotive, either turn the Throttle back to “STOP,” or shift the Direction/Brake lever to “BRAKE”. lOCO key Keypad EXI T SWITC H POWE R PRO G MOD E Direction/Brake lever in “FOrWarD” position ©2012 Digitrax, Inc. www.digitrax.com... -
Page 9: Select & Run Dcc Equipped Locomotives
Enjoy running trains for a few minutes before you dive in to the rest of the manual. The remaining sections of the manual go into more detail about the capabilities of the Zephyr Xtra. When you are ready to learn more, read on! ©2012 Digitrax, Inc. www.digitrax.com... -
Page 10: Preparing Your Locomotives
Troubleshooting Basic Operation. 3.0 Preparing Your Locomotives You will be able to run one locomotive without a decoder on your Zephyr Xtra system along with the ones with decoders. So, even if you don’t have a loco with a decoder, you can still hook up your new system and try it out right... - Page 11 “Emergency Stop.” EXI T SWITC H POWE R PRO G MOD E ©2012 Digitrax, Inc. www.digitrax.com...
-
Page 12: Dcs51 Display
The SWITCH Indicator Dot lets you know when you are in switch mode for controlling turnouts or setting up system options. See Section 24 for turnout operation and Section 28 for Option Switch set up information. ©2012 Digitrax, Inc. www.digitrax.com... -
Page 13: Hooking Up Your Zephyr Xtra
-plug in the PS314 here. pOWer in & for connecting the DCS51 to other LocoNet lOCOnet pOrtS a devices for expanding your layout. . You can connect Zephyr Xtra to most existing layouts. yOur layOut pS314 or similar DC supply ©2012 Digitrax, Inc. -
Page 14: Connecting The Zephyr Xtra
7.2 Connecting the Zephyr xtra These simple instructions will help you get up and running quickly. A full description of all controls and technical reference information are included later in this manual. This section assumes that you are using a new set straight out of the box. -
Page 15: Run A Locomotive Without A Dcc Decoder
In the proceeding steps you familiarized yourself with the controls and con- nected the Zephyr Xtra to your layout. Just follow these simple steps and you’ll be running one of your existing DC locomotives in just a few more minutes. -
Page 16: Run A Dcc Equipped Locomotive
00. By adding DCC decoders to your locomotives and additional throttles to your system, you can individually control up to 20 locomotives at the same time with your Zephyr Xtra Set. 9.0 Run a DCC Equipped Locomotive 9.1 DCC Decoder or address Basics... -
Page 17: Selecting And Running Your Dcc Locomotive
DCS51. In this example we assume that you have a new Digitrax decoder that is factory programmed to address 03. If your decoder is using a different address, simply use that address as you follow these instructions. -
Page 18: Using The Recall Key
WhiStle/2 9.3 using the reCall Key The Zephyr Xtra’s RECALL feature allows you to change control among recently used addresses without the need to re-enter the address each time. The factory default is a 2 address recall stack which allows you to switch quickly between the last two loco addresses that you used. -
Page 19: Locomotive Direction Control
The TRACK STATUS Light pOWer will light up. 4. The DCS51 display will show the last locomotive address you were running and be ready to begin right where you left off. ©2012 Digitrax, Inc. www.digitrax.com... -
Page 20: Troubleshooting Basic Operation
Please read the manual and take time to understand and master each topic. Your Zephyr Xtra Set is the gateway to all the possibilities and options offered by Digitrax and LocoNet so the best advice is to take it step by step and don’t try to do everything at once. -
Page 21: Locomotive Speed Control
DCS51. As the loco slows to a stop, the Brake Indicator Light will change from blinking to steady on to let you know that the brake is on. ©2012 Digitrax, Inc. www.digitrax.com... -
Page 22: Emergency Stop
Do not turn Track Power off during a short. Clear the short first. The Zephyr Xtra shuts off when it sees a short to protect itself. Having Trouble Stopping? If the deceleration CV value you set for a particu-... -
Page 23: Programming & Reading Your Decoder
CV’s are used and programming instructions. The factory set address for all Digitrax decoders is 03. This is the first CV you will want to change because it is not very useful to have all of your locos respond to the same address. - Page 24 Your programming track can be as simple as a spare piece of track not connect- ed to the layout as shown above or it can be a double gapped section of track connected to the DCS51’s prOg a & prOg B outputs as shown below. programming track example Diagram ©2012 Digitrax, Inc. www.digitrax.com...
-
Page 25: Changing & Reading The Decoder Address
DCS51 to enter programming mode. The prOg DCS51 will display one of the programming modes available. Digitrax rec- ommends the Direct Mode when you are using the programming track. If you press the PROG key repeatedly, you will cycle through the following programming choices: dir, OPS, PAGE, PHYS. -
Page 26: Programming Configuration Variables Other Than Addresses
2. Press the Key to enter programming mode. The DCS51 will display prOg one of the programming modes available. Digitrax recommends the Direct Mode when you are using the programming track. As you press the prOg Key repeatedly, you will cycle through the following choices: dir, OPS,PAGE, PHYS, Once the mode you want to use is on the screen you can go to step 3. - Page 27 9. When you are finished programming, press the key to resume normal exit operations. taBle i: DCS51 programming Display table If you are using a programming mode other than Direct mode see Table 1 for the meanings of the screens you will see. ©2012 Digitrax, Inc. www.digitrax.com...
-
Page 28: Programming On The Mainline: Operations Mode Programming
Cv-Wr 7. Press the key when finished programming to return to normal opera- exit tions. OPS Mode Programming on most systems is write only. OPS mode nOte: read back requires Digitrax compatible transponding decoders and transpond- ©2012 Digitrax, Inc. www.digitrax.com... -
Page 29: Programming Error Messages
Once the mode you want to use is on the screen you can go to step 3. For example, to select Direct mode, stop pressing the Key when the prOg following screen appears: ©2012 Digitrax, Inc. www.digitrax.com... -
Page 30: Configuration Variable (Cv) Programming Notes
This will allow you to profile each locomotive type for programming similar locomotives. 3. Resetting your decoder CV values to factory settings can eliminate some problems caused by inadvertently changing a CV value. ©2012 Digitrax, Inc. www.digitrax.com... -
Page 31: Functions
Function 2 and is labeled with a whistle icon to remind you that this is the pre- ferred function for whistle or horn operation. This key is set up as a “non-latch- ing key” so that if a horn or whistle sound is installed in the loco, it will sound ©2012 Digitrax, Inc. www.digitrax.com... -
Page 32: Function 3 (F3) Standard Or Momentary Operation
F8/MUTE for the adressed locomotive, and when the indicator light is on, F8 is ON and a sound decoder will be muted. Note: Some Sound decoders may use functions other than F8 for mute. In the case of these decoders, the DSC51 MUTE key will operate F8. ©2012 Digitrax, Inc. www.digitrax.com... -
Page 33: Functions 10 Through 19 (F10 - F19)
MU and the command station handles the rest of the commands to the other locomotives in the MU. As the address you will use to control the consist is not necessarily the address of the lead or head end loco, ©2012 Digitrax, Inc. www.digitrax.com... -
Page 34: Adding A Locomotive To An Mu
If you want to add more locos to the MU, repeat the procedure.To add locos to an MU you must add them to the TOP address. It’s a good idea to keep an MU set up sheet like the following to help you remember which locos are MUed together: ©2012 Digitrax, Inc. www.digitrax.com... - Page 35 14 you would get this error. If you wanted to add another loco to the MU with 23 as the TOP address, the right way to do it is to add that loco to 23, not to another address in the MU. ©2012 Digitrax, Inc. www.digitrax.com...
-
Page 36: Removing A Loco From An Mu
Simple 3 step or Advanced 28 step loadable speed tables (See your Digitrax Decoder Manual for more information on these features of your decoder). -
Page 37: Stealing: When An Address Is Running On Another Throttle
19.0 Stealing: When an Address Is Running on Another Throttle Digitrax systems do not allow more than one user to select and run the same locomotive address unless the loco is “stolen” by the new user. When an address is receiving commands from more than one throttle, it may seem to be out of control. -
Page 38: Releasing An Address From A Throttle
Dispatching also lets you run MUs with basic throttles that can’t set up their own MUs and run four digit addresses on basic throttles that only have two digit capability. It lets ©2012 Digitrax, Inc. www.digitrax.com... -
Page 39: The Full Message
If you see this message while you are operating, you can release locos that you are no longer using by pressing the key, entering the address you want lOCO to release and then pressing the exit key. ©2012 Digitrax, Inc. www.digitrax.com... -
Page 40: Dcs51 Error Messages
Amp current limit. In this case you should run fewer locomotives or add more boosters to increase the current limit of the total layout. See Section 25.3 for information on adding another DCS51 or see www.digitrax.com for informa- tion about adding boosters. -
Page 41: Decoder Speed Step Settings
“speaking the same dialect of the DCC language” for every- thing to work smoothly. Digitrax DCS51 is set at the factory to send 128 speed step mode information because the 128 speed step format provides for the best speed control available. -
Page 42: Switch Mode
1 to 512 during the session. For convenience it will allow switch numbers from 513 to 999 to also be selected and controlled on the layout. Switch commands may also be used for controlling Digitrax compatible signal units. -
Page 43: Saving The Last Switch States Or Settings For Your Current Dcs51 Session
When you are ready to end your session on the layout, you can make the DCS51 remember the settings of switches 1 to 512 in non-volatile memory by pressing the POWER key to turn off the Track power before turning off the power input into the DCS51. ©2012 Digitrax, Inc. www.digitrax.com... -
Page 44: Adding Throttles: Loconet & Jump Ports
Your DCS51 can handle up to 20 LocoNet Throttles. If you need to run more than 20 throttles, you can move up to a Digitrax Command Station with addi- tional capacity. You can continue to use your DCS51 as a throttle and booster with any command station on your Digitrax LocoNet system. - Page 45 Throttle and nothing is selected on either Jump 1 or Jump 2. 1. The loco you are controlling on the DCS51’s throttle knob is called the local throttle. The local throttle display looks something like this: ©2012 Digitrax, Inc. www.digitrax.com...
- Page 46 The screen will begin flashing to let you know that the lOCO loco selection is pending. The display will now show the last loco that was selected on this throttle. It will look something like this: ©2012 Digitrax, Inc. www.digitrax.com...
- Page 47 A sound board must be installed laMp/0 and connected in order to use the Whistle and Bell functions. A special cou- pler is required in order to use the Coupler function. ©2012 Digitrax, Inc. www.digitrax.com...
-
Page 48: Jump Ports: Using A Smooth Dc Power Pack As An Additional Throttle
The command station determines the total number of locomotive addresses your system can handle: Zephyr Xtra handles up to 20. Adding a booster does not change the number of addresses available to the command station, but you do gain additional power to run trains. -
Page 49: Assigning Throttle Identities
00 to 63. It is useful to label the back of the unit the the throttle ID assigned to it to prevent duplication of throttle IDs. 4. Press to return to normal operations. exit ©2012 Digitrax, Inc. www.digitrax.com... - Page 50 DC supply Double Gaps Between Layout Power Districts DCS51 running as a booster and throttle (Option Switch 02 set to "c") LocoNet Cable Layout Power District (Double Gapped) pS314 or similar DC supply ©2012 Digitrax, Inc. www.digitrax.com...
-
Page 51: Making Loconet Cables
LocoNet cables. The LT1 tester that came with your Zephyr Xtra can be used to test LocoNet cables to be certain they are good before you install them on your layout. Many layout problems we see are related to LocoNet cables that were not built or crimped correctly. -
Page 52: Clearing The System
4. Press the key. exit 5. Repeat for all locos/addresses used in your session. To Shut Down the System: 1. Press the Power Key to turn track power off. 2. Unplug the PS314 from the wall. ©2012 Digitrax, Inc. www.digitrax.com... -
Page 53: Troubleshooting General
DCS51 command station. The factory setting for the DCS51 is advanced 28/128 speed step mode. Your Digitrax decoder was shipped programmed to 28/128 speed step mode. You may have changed your decoder’s programming when performing the decoder test procedure. In any case, if you are not able to turn the locomotives lights on and off, you will need to change CV 29 to a value of “06”... -
Page 54: Decoder Won't Respond
CV29 is available in your Digitrax Decoder Manual. If you have a Digitrax Series 3 decoder and you can control the lights but not the motor, check for a motor short circuit. These decoders are designed to shut- down motor operation when a short is detected to prevent damage to the decoder. -
Page 55: I'm Totally Lost
DCS51 option switches are noted in the right column. To reset the DCS51 Option Switches to factory settings: If you change option switches and experience unexpected results, just set OpSw 39 to (closed) to reset the unit to the original factory settings. “c” ©2012 Digitrax, Inc. www.digitrax.com... - Page 56 OpSw 43 c=Disable LocoNet update of command station’s track status OpSw 45 c=Disable reply for switch state request NOTE: Do not change any option switches not listed in the table. ©2012 Digitrax, Inc. www.digitrax.com...
-
Page 57: Loconet: The Digitrax Difference
With LocoNet, you customize your layout to run the way you want it to run! There is a lot of information available to help you along the way. The Digitrax web site, www.digitrax.com, contains a wealth of information on all of our products. -
Page 58: Fcc Information
• Consult the dealer or an experienced radio/TV technician for help. Note that any modifications to the equipment not expressly approved by Digitrax voids the user’s authority to operate under and be in compliance with CFR 47 rules, as administered by the Federal Communication Commission. -
Page 59: Digitrax 'No Worries' Warranty & Repair
For complete warranty and repair details see www.digitrax.com. Please contact Digitrax tech support at (850) 872 9890 before sending anything to us for serv- ice so that we can try and resolve the problem by phone or e-mail. Except as... -
Page 60: Specifications
& intellectual property: As of the date of this writing Digitrax, Inc. owns the rights to the following patents which may cover some or all of the products covered in this brochure: US 6,275,739, 6,536,716, 6,533,223, 6,367,742 B1, 6,533,224. Additional patent applications are pending. -
Page 61: Notes
Notes ©2012 Digitrax, Inc. www.digitrax.com... - Page 62 ©2012 Digitrax, Inc. www.digitrax.com...
-
Page 63: Index
Functions 10 to 19 (F10 - F19) 32 CV-RD Read Back CVs 24, 28 Functions 20 to 28 (F20 - F28) 32 CV-WR Write CVs 25 Hooking Up Your Zephyr 12 d nA error message 28 HORN/2 Key 30 ©2012 Digitrax, Inc. www.digitrax.com... - Page 64 PAGE-Paged Mode Programming 24, 26 Short circuit 39 PHYS Physical Register Programming Shutting Down the System 18 24, 26 Specifications 59 PM42 Power Management 48 Speed Limit 20 Power In Jack 5, 12, 13 status editing 19, 40 ©2012 Digitrax, Inc. www.digitrax.com...
- Page 65 Troubleshooting Basic Operation 19 Troubleshooting Function Operation 32 Troubleshooting General 52 Troubleshooting Locomotive Lighting 19, Troubleshooting Stopping 21 turnout 41 view which addresses are being used by each throttle 44 Warranty & Repair 58 Whistle/2 17 write only 29 ©2012 Digitrax, Inc. www.digitrax.com...
-
Page 66: Need Help
Need Help? Digitrax Tech Support Team Need Help?: helpdesk.digitrax.com Digitrax Tech Support Depot 24/7/365 www.digitrax.com/support Contains links to all instructions sheets and manuals, application notes, videos and tons of helpful information. Digitrax Decoder Selector www.digitrax.com/decoderselector Helps you find which decoder will fit in a particular locomotive.
Need help?
Do you have a question about the Zephyr xtra and is the answer not in the manual?
Questions and answers