Table of Contents
Advertisement
Quick Links
Advertisement
Table of Contents

Related Manuals for AGP Slide Compound Miter Saw


Summary of Contents for AGP Slide Compound Miter Saw
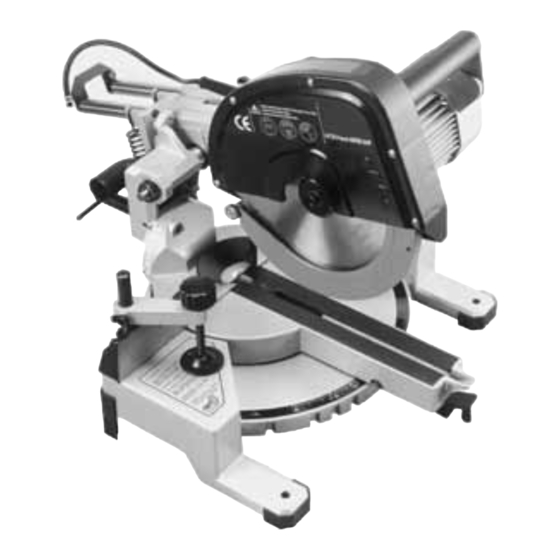
- Page 1 I N S T R U C T I O N M A N U A L Compound Miter Saw Slide Compound Miter Saw SYSTEM ASSESSMENT & CERTIFICATION TO ISO 9001 ORIGINAL INSTRUCTIONS For your personal safety,READ and UNDERSTAND before using.
- Page 2 Model Slide Compound Miter Saw Compound Miter Saw Voltage See machine nameplate No Load min 3000 (60Hz ), 3000 (50Hz) Power Input 1600 W Bevels 0 to 45 degrees Miters 0 to 45 degrees left and right Blade (Diameter and Bore)
-
Page 3: General Safety Instructions
GENERAL SAFETY INSTRUCTIONS WARNING! Read all safety warnings and all instructions. Failure to follow the warnings and instructions may result in electric shock, fire and/or serious injury. Save all warnings and instructions for future reference. The term “power tool” in the warnings refers to your mainsoperated (corded) power tool or battery-operated (cordless) power tool. -
Page 4: Symbols Used In This Manual
4) POWER TOOL USE AND CARE Do not force the power tool. Use the correct power tool for your application. The correct power tool will do the job better and safer at the rate for which it was designed. Do not use the power tool if the switch does not turn it on and off. Any power tool that cannot be controlled with the switch is dangerous and must be repaired. -
Page 5: Cutting Procedures
SAFETY INSTRUCTIONS FOR ALL SAWS Cutting procedures DANGER: Keep hands away from cutting area and the blade. Keep your second hand on auxiliary handle, or motor housing. If both hands are holding the saw, they cannot be cut by the blade. - Page 6 tend to sag under their own weight. Supports must be placed under the panel on both sides, near the line of cut and near the edge of the panel. Do not use dull or damaged blades. Unsharpened or improperly set blades produce narrow kerf causing excessive friction, blade binding and kickback.
-
Page 7: Assembly (All Models)
order and properly maintained. WARNING: Never remove any cut-offs or other parts of the workpiece from the cutting area while the machine is running with an unguarded saw blade. LIFTING AND TRANSPORTATION INFORMATION Always use the motorhead lock chain before moving the machine. Only lift the machine from the sides of the base. - Page 8 CHANGING BLADES (BRAKE EQUIPPED MODELS) Not that brake equipped models cannot use the lock bar. Instead, there is a lock nut wrench and hex wrench supplied. To change blade, first unplug machine. Fig.5 While locking the flange in place with the lock nut wrench, use the hex wrench to loosen bolt.
-
Page 9: Vacuum Attachment
JIGS Round and irregular cross section stock cannot be held flush to the table. Therefore, suitable jigs must be used. SLIDE ACTION (Slide equipped models only) For cutting wider stock, slide action is necessary. Loosen slide lock bolt. Cut through workpiece normally as described in"CUTTING". (Fig.11) After blade has cut through work, slide motor head back in a slow,steady motion to finish cut. -
Page 10: Maintenance
MAINTENANCE Every 50 hours of operation blow compressed air through the motor while running at no load to clean out accumulated dust. (If operating in especially dusty conditions, perform this operation more often.) Always unplug before servicing.Brush off chips and dust after every use. Periodically oil the slide bars with machine oil. - Page 11 WIRING WITHOUT BRAKE START-UP MOTOR CAPACITOR SWITCH BLACK YELLOW TERMINAL TERMINAL WITH BRAKE BLACK MOTOR TERMINAL START-UP MOTOR MOTOR BRAKE BRAKE CAPACITOR CAPACITOR BLACK TERMINAL TERMINAL YELLOW TERMINAL BLACK TERMINAL SWITCH...
- Page 12 EXPLODED VIEW & PARTS LIST FOR COMPOUND MITER SAW...
- Page 13 Parts Name Q'TY Parts Name Q'TY PAN HEAD SCREW M4 x 12 CHAIN BLADE COVER KERF PLATE ARBOR BOLT M8 x 20 TURN TABLE COUNTER FLANGE RUBBER WASHER COUNTER FLANGE (BRAKE) HEX NUT M8 ARBOR FLANGE 25.4 HEX BOLT M8 x 40 ARBOR FLANGE 30 PRESSURE SPRING Ø1.6 x Ø11.5 x Ø14.7 x 6.5T x 46.5L CIRCLIP S-30...
- Page 14 EXPLODED VIEW & PARTS LIST FOR SLIDE COMPOUND MITER SAW...
- Page 15 Parts Name Q'TY Parts Name Q'TY PAN HEAD SCREW M4 x 12 TABLE BLADE COVER PAN HEAD SCREW M4 x 8 ARBOR BOLT M8 x 20 MITER SCALE COUNTER FLANGE TURN TABLE AXLE COUNTER FLANGE (BRAKE) HEX NUT M12 x P1.5 ARBOR FLANGE 25.4 ARBOR FLANGE...
Need help?
Do you have a question about the Slide Compound Miter Saw and is the answer not in the manual?
Questions and answers