
Subscribe to Our Youtube Channel
Related Manuals for Extech Instruments EC170


Summary of Contents for Extech Instruments EC170
- Page 1 USER GUIDE Salinity Meter Pen Style Water Quality Meter Model EC170 GlobalTestSupply www. .com nd Quality Products Online at: sales@GlobalTestSupply.co...
-
Page 2: Supplied Materials
IP65 Waterproof housing Automatic Ranging and Manual Ranging capability Dual Display with ATC (automatic temperature compensation) Data hold for freezing displayed readings Low battery indicator Automatic power‐off for maximum battery efficiency Switchable temperature units of measure ( F) Multi‐point and one‐touch calibration features Pocket sized, powered by four (4) LR44 batteries Supplied Materials EC170 meter Four (4) LR44 button batteries Operation manual (hard copy, mini‐disk, and on‐line availability at www.extech.com) EC170-EU-EN V1.1 7/13 GlobalTestSupply www. .com nd Quality Products Online at: sales@GlobalTestSupply.co... -
Page 3: Battery Installation
Battery Installation The meter is shipped with the four (4) LR44 button batteries removed. The user must install the batteries before the meter can be used. Refer to accompanying diagram. Unscrew the battery compartment cover (top of meter) in a counter‐clockwise direction. Please do not discard the black washer. Install the four (4) LR44 button batteries, carefully orienting the batteries and observing polarity. Replace the battery compartment cover. Please remove the batteries while the meter is not in use for long periods. Never dispose of used batteries or rechargeable batteries in household waste. As consumers, users are legally required to take used batteries to appropriate collection sites, the retail store where the batteries were purchased, or wherever batteries are sold. Disposal: Do not dispose of this instrument in household waste. The user is obligated to take end‐of‐life devices to a designated collection point for the disposal of electrical and electronic equipment. Other Battery Safety Reminders a. Never dispose of batteries in a fire. Batteries may explode or leak. b. Never mix battery types. Always install new batteries of the same type. EC170-EU-EN V1.1 7/13 GlobalTestSupply www. .com nd Quality Products Online at: sales@GlobalTestSupply.co... -
Page 4: Meter Description
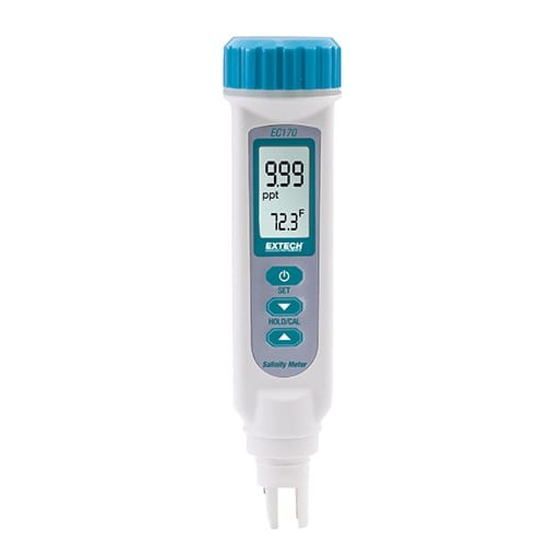
Battery Compartment Display Keypad Electrode Electrode protective cap Display Description Data Hold icon Micro‐ and milli‐Siemens units (unused in this meter) Primary measurement reading Parts per thousand salinity units (ppm parts per million are not used in this meter) Temperature reading Temperature units of measure Battery strength indicator Calibration icon Keypad Description Power ON‐OFF and SET button Down Arrow, Data Hold, and Calibration button Up arrow button EC170-EU-EN V1.1 7/13 GlobalTestSupply www. .com nd Quality Products Online at: sales@GlobalTestSupply.co... -
Page 5: Operation
4. This meter is powered by four (4) LR44 buttons batteries. If the meter will not switch ON please check that fresh batteries are installed. Automatic and Manual Ranging There are two ranges available Range 1 (0.00 to 10.00 ppt) and Range 2 (10.1 to 70.0 ppt). The meter defaults to the AUTO Range mode where one of these two ranges is selected automatically to provide the best resolution and accuracy for each given measurement. However, MANUAL Range mode can also be used where range 1 and range 2 can be selected manually. 5. Press and hold the UP arrow button, the number 1 (range 1) will appear on the lower right of the LCD and ‘ran’ (range) will appear at the center of the LCD. 6. Release the button and the meter will be forced into range 1. 7. Press and hold the UP arrow button again, the number 2 (range 2) will appear on the lower right of the LCD and ‘ran’ (range) will appear at the center of the LCD. 8. Release the button and the meter will be forced into range 2. 9. Press and hold the UP arrow button again, ‘ATo’ will appear on the lower LCD area indicating that the meter is once again in the AUTO Range mode. 10. Release the button to end the range setting session or return to step 1 to repeat this process. EC170-EU-EN V1.1 7/13 GlobalTestSupply www. .com nd Quality Products Online at: sales@GlobalTestSupply.co... - Page 6 Press the HOLD button to freeze a displayed reading. Press again to release the display. Salinity Measurement 1. Read the Measurement Preparation section above before continuing. 2. Insert the electrode into the sample ensuring that the electrodes are completely submersed. 3. Slowly stir the solution with the electrode to remove air bubbles. 4. The meter uses the Auto‐range utility to find the proper range and then displays the salinity reading at the center of the LCD with the temperature reading shown on the lower LCD area in smaller digits. Finishing a Measurement Session After a measurement session: Rinse the electrode in deionized or distilled water and store dry. Affix the protective cap over the electrode when storing. If the unit is to be left un‐unused for long periods, remove and store the batteries separately. Automatic Power OFF (Sleep mode) The meter will automatically switch OFF after 20 minutes of inactivity. To disable the Sleep Mode: With the instrument switched off, press and hold the SET and HLD/CAL buttons simultaneously until the ‘n’ icon appears on the display. Release the buttons and the meter will power up. The meter will now stay switched ON until the user manually switches it OFF. The meter reverts to the ‘Sleep Mode active’ state each time it is powered down. EC170-EU-EN V1.1 7/13 GlobalTestSupply www. .com nd Quality Products Online at: sales@GlobalTestSupply.co...
-
Page 7: Setup Mode
3. Use the arrow buttons to select ‘y’ for YES RESET or ‘n’ for NO RESET. 4. Press the SET button momentarily to confirm the setting. 5. Press and hold the SET button for at least 2 seconds to return to the normal operation mode or press the up arrow button momentarily to move to Parameter P4 (see below). Parameter P4: Calibration Review for Range 1 and Range 2 Concentrations 1. If continuing from Parameter P3 skip directly to step 2 below. If starting from the normal operating mode, press and hold the SET button for at least 2 seconds until the ‘Px’ icon appears on the meter display (x = setup parameter number) and then continue step 2 below. 2. Use the arrow buttons to scroll to the P4.0 icon if necessary. The ‘CAL’ display icon will be visible above the P4.0 icon. 3. Press the SET button momentarily to view the current Range 1 Calibration Concentration. The P4.0 icon will change to P4.1. If dashes (‐ ‐ ‐) appear on the display this indicates that the meter has not been calibrated thus far. 4. Press the up arrow button to move to the P4.2 display. The displayed value now represents the Range 2 Calibration Concentration. Again, if dashed lines appear, then the meter has not been calibrated up to this point. 5. Press and hold the SET button for at least 2 seconds to return to the P4.0 ‘CAL’ screen. 6. Use the arrow keys to select another parameter or press and hold the SET button for at least 2 seconds to return to the normal operation mode. EC170-EU-EN V1.1 7/13 GlobalTestSupply www. .com nd Quality Products Online at: sales@GlobalTestSupply.co... - Page 8 Alternatively, use a calibration solution value that is approximately 2/3 of the expected full scale measurement range. Remember not to re‐use calibration solutions; contaminants in the solution will affect the calibration and the accuracy. Salinity Calibration Procedure Insert the probe into deionized or distilled water for approximately 30 minutes to rinse the probe. Select the Sodium Chloride standard that is closest to the expected measurement range. Fill two separate and clean sample cups with the standardizing solution to a depth of at least 3 cm (1.2”) each. Switch the meter ON. Rinse the probe in one of the sample cup solutions, gently stirring the probe. Rinsing could remove contaminants that could affect calibration and cause measurement errors. Dip the rinsed probe into the other sample cup solution. Tap or move the electrode in the sample to dislodge air bubbles. Let the probe stabilize to the solution temperature. Press and hold the HOLD/CAL button (approximately 2 seconds) until the salinity value and the ‘CAL’ icon begin flashing on the LCD. Use the arrow buttons to adjust the displayed value to match the value of the standard solution. The Salinity reading can be adjusted ±30% from the detected value. Values differing more than ±30% from the detected value indicates that the electrode needs to be cleaned. When the CAL icon stops flashing, press the SET button momentarily to confirm the value. The meter will then return to the normal measurement mode. 10. Note that in cases where the Salinity reading is outside the ±30% window, the meter display may freeze and not allow the user to return to the normal operating mode. In this case, remove one of the batteries to switch the meter OFF and do not use the meter again until the electrode has been cleaned or replaced. EC170-EU-EN V1.1 7/13 GlobalTestSupply www. .com nd Quality Products Online at: sales@GlobalTestSupply.co...
-
Page 9: Maintenance
In Manual Range mode, press and hold the up range arrow for 2 seconds to change range or use the Auto Range mode E03 Salinity is over‐range Check against a standard buffer solution. If problem persists, repair meter E04 Temperature error Repair meter TEMPERATURE ERRORS E01 Temperature circuit Repair meter damaged E02 Temperature value is below Check again at room temperature. If error allowable range or persists, repair meter Temperature circuit damage E03 Temperature value is above Check again at room temperature. If error allowable range or persists, repair meter Temperature circuit damage EC170-EU-EN V1.1 7/13 GlobalTestSupply www. .com nd Quality Products Online at: sales@GlobalTestSupply.co... -
Page 10: Factory Default Settings
Waterproof IP65 rated Temperature Coefficient Built‐in NaCl temperature coefficient Operating Conditions Temperature: 0 to 50°C (32 to 122°F); <80%RH Storage Conditions Temperature: 0 to 60°C (32 to 140°F); <90%RH Normalization Temperature Fixed at 25°C (77°F) Basic status indicators Out‐of‐range (‐‐‐‐) and low battery Power Supply Four (4) LR44 ‘button’ batteries Dimensions Meter: 165 x 35 x 32mm (6.5 x 1.4 x 1.3”) L CD: 30 x 18mm (1.2 x 0.7”) Weight 115g (4 oz.) Copyright © 2013 FLIR Systems, Inc. All rights reserved including the right of reproduction in whole or in part in any form www.extech.com EC170-EU-EN V1.1 7/13 GlobalTestSupply www. .com nd Quality Products Online at: sales@GlobalTestSupply.co...
Need help?
Do you have a question about the EC170 and is the answer not in the manual?
Questions and answers